How to View Deleted Instagram Posts (12 Methods)
View Deleted Instagram Posts Instantly!
Enter any Username, Email, Phone Number or Name to View Instagram Posts!
“This tool has been amazing for finding people online. Highly recommend it!”
50,000+
Profiles Found
5,000+
Satisfied Users
4.8/5
Average Rating
Backed by my firsthand testing of over 25 methods and 30+ different tools, I’ve carefully selected these 12 best ways to see deleted IG posts. These methods are also relatively easy to use in comparison to other complex methods and ordinary tools. I recommend trying a combination of these recovery tricks because each one of them helps different use cases.
Peekviewer is a widely used anonymous viewer app that can give access to Instagram accounts, whether public or private. It is great for users who are interested in someone, curious in general, and social media managers. It also allows to download all the content and save it for up to 3 months.

Method 1: View Deleted Instagram Posts Using the Recently Deleted Feature
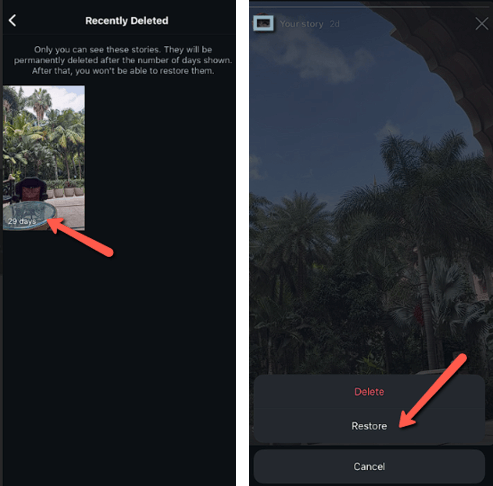
The Recently Deleted feature can be used for your own account, thus, daily casual users, businesses, and influencers can try this method. It is one of the fastest and easiest tricks that you can use to see your deleted Instagram posts. I could easily view and select what content I wanted to restore from this folder. But it stores the deleted posts only for 30 days. Therefore, anything outside this window will be permanently removed from your account.
If you are looking for any pictures or videos that have crossed the 30-day restoration window, you can check your phone’s Gallery. If you have auto-save on, then you will find the deleted media in your Instagram folder. If it isn’t in the IG folder, I suggest going through other albums as well.
Here’s how you can find the Recently Deleted Folder:
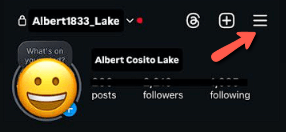
Step 1) Open your app
Next, go to your Profile, and tap on the three-line hamburger menu.
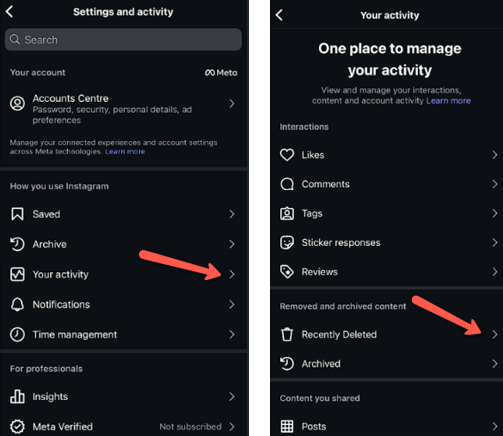
Step 2) Now tap on Your Activity
On the Activity tab, you will find the Recently Deleted folder. Here you will find both posts and stories that were deleted.
Step 3) Select and Restore
Tap on the folder and select the post you want to view and restore it if needed.
Method 2: See Deleted Instagram Posts Using the Archive Feature
The Archive feature is an excellent solution for users who have archived some of their posts and need to review them to put them back on their grid. I also found several forgotten media in this folder that I could re-add to my profile. Moreover, it is helpful for content creators who want to refurbish reels or posts that they archived in the past. I used it to recover my old selfies with a friend because I wanted to create a collage on her birthday.
However, I noticed that this feature works only for manually archived posts. On the contrary, for stories, it saves only the ones that have completed their 24 hours without being deleted manually. Therefore, any deleted content can only be restored from the Recently Deleted folder. If you can no longer find what you’re looking for on the Archived section, try checking your phone’s Gallery.
Here’s how you can view and restore pictures from the Archive:
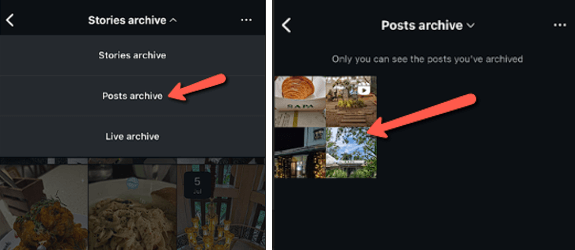
Step 1) Open your profile and go to the three-line menu, then navigate to the Archive.
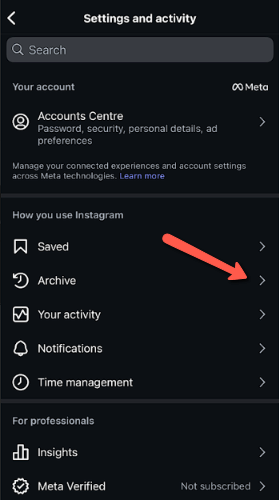
Step 2) This will lead you to your archives, where you must select the type of content you want to view: Stories, Posts, or Live. Choose the Posts Archive and tap on it to view or restore.
Method 3: Using Peekviewer Anonymous Instagram Viewer App
Peekviewer is a widely used anonymous viewer app that can give access to Instagram accounts, whether public or private. It is great for users who are interested in someone, curious in general, and social media managers. Once, I used it to help a friend verify her date. I could view the individual’s posts, stories, highlights, reels, likes, and comments. It also allowed me to download all the content and save it for up to 3 months. Hence, you can store even the uploads that automatically get removed after 24 hours. However, any posts that were deleted before you accessed their account using Peekviewer won’t be available.
Media Access: Instagram Posts, Stories, Reels, Tagged Photos, and even “Deleted” Content
Stealth Monitoring: No Instagram Account Needed
Live Tracking: Not Applicable
Refund Policy: 14-Days Money-Back Guarantee
It only stores the data for the future, so that even when it’s deleted from the original account, it is captured in Peekviewer. Hence, you can also use it for your account in case you want to delete some content but still save its copies. Business owners who want to keep track of their competitors can also use Peekviewer to analyse their peers’ posts. I faced a slight challenge while accessing a private account, but additional attempts after refreshing the page resolved this issue.
You can follow the steps given below to use PeekViewer for viewing IG posts:
Step 1) Visit https://peekviewer.com/, tap on Watch Now, and select whether you want to access a Public or a Private Account.
Step 2) Once selected, you can enter their username or the URL and click on Watch.

Step 3) Finally, you will now be able to view their account.

14-Days Money-Back Guarantee
Method 4: Using mSpy Phone Monitoring Tool
Phone monitoring tools like mSpy can be great for viewing your kid’s or spouse’s deleted Instagram captures. I found it great for seeing what content my kid deletes since I have to monitor their online presence. Additionally, it has helped me find out if they were hanging out in inappropriate places by catching their updates before they were deleted. It also allowed me to find out if my kid was being influenced by the wrong ideas, or posting any hate mongering or bullying content. Furthermore, people who suspect their spouses of cheating can also gather evidence by viewing IG snaps before they are erased.
Media Access: Photos and Videos Included
Stealth Monitoring: Totally Invisible Monitoring
Live Tracking: Updates in Real Time
Refund Policy: 14-Days Money-Back Guarantee
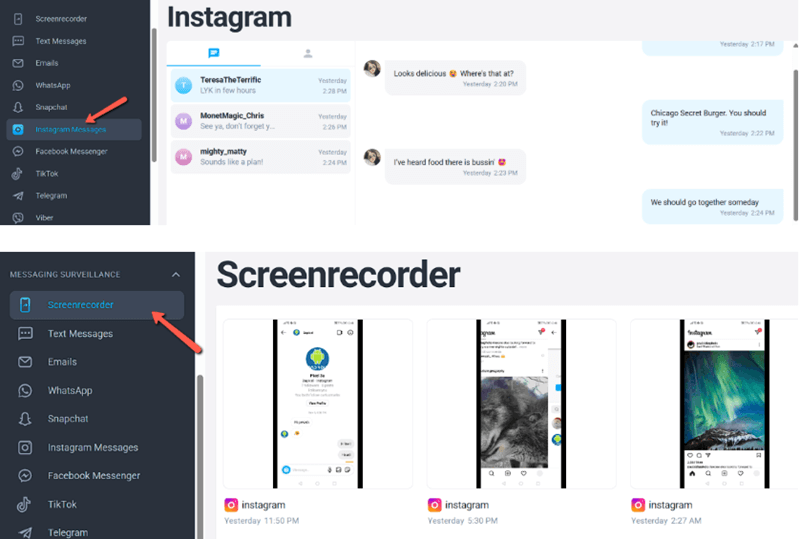
mSpy requires you to utilize its features wisely to access deleted content on someone’s account. That’s because it is not a direct Instagram post accessing tool. Instead, it is a phone spy app that offers Insta DM access with helpful features like Keylogger, Gallery Access, Screenshots, and Screen Recorder. Therefore, I used all of these functionalities to my advantage to view deleted snaps, stories, etc. I noticed heavy battery drainage on the target phones while continuous monitoring, therefore, use it in moderation.
Follow the steps given below to use mSpy:
Step 1) Go to https://www.mspy.com/, select a suitable plan for yourself, and install the app on your target device. In case of iPhones, you need only the iCloud credentials.
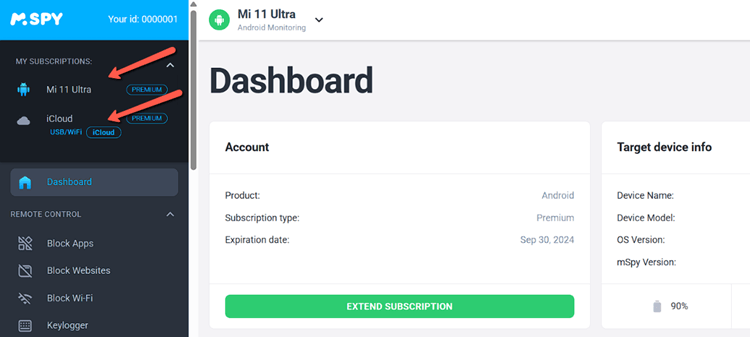
Step 2) Once installed, set up the app and then sync the device by adding it to your mSpy account on the dashboard. The setup might take around 15 minutes.
Step 3) Once the phone data has synced with your account, you can start monitoring in real-time. Tap on the option Instagram to view the DMs and shared media. You can also use the other features to capture deleted IG posts.
If you face any difficulties using mSpy or need alternatives, you can also use tools like xMobi and uMobix. These are phone monitoring tools with similar robust features.
14-Days Money-Back Guarantee
Method 5: Using The Create Option’s “On This Day” Feature
The Instagram Story feature has an “On This Day” option within its Create button. This feature takes you to the stories and posts, including carousel, that you uploaded on that particular day. It’s like a memory lane, and it even takes you to your archived folder. This recall feature is great for revisiting some special moments from the past. All I had to do was go to the story section, tap on Create, and slide to the timer/ clock button to reveal what I posted on this day.

Unfortunately, manually deleted images won’t be found in this feature. You will either have to visit your device’s Instagram folder or other saved files to find the lost post. Law enforcement accessing Insta accounts with a warrant may find this feature helpful in tracing essential clues, as it provides data with dates. I noticed that this feature glitches frequently, which is either an indication of an outdated app or a network problem. Therefore, always keep your app up to date and use a stable connection while accessing this feature. If the glitching continues, just reinstall the app.
Method 6: Check Your Phone Gallery
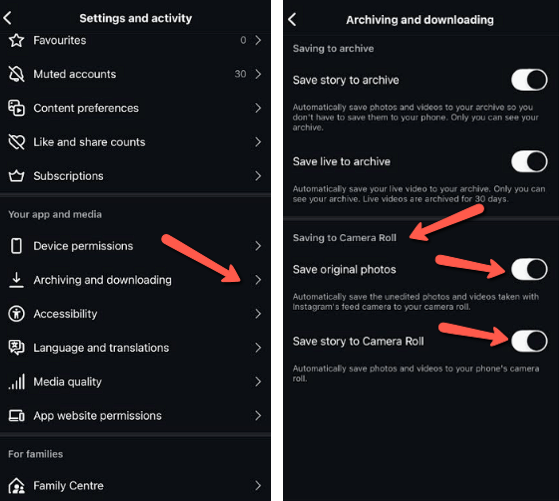
Instagram has an auto-save option for whatever you share with your selective followers or the public. According to me, it’s an ideal way to store copies of what you upload to your grid or story. This feature is helpful for people who want to find posts that were shared ages ago and manually removed, with no way of restoring them from the app. It is also an excellent feature for brands and companies to go back and analyse their old content. You can do this by going to the Gram’s settings menu and scrolling down to Archiving and Downloading. This will take you to the Save to Camera Roll section, where you can turn on Save original photos and Save story to Camera Roll.
This feature helped me find a rare image of my pet, which I assumed was lost forever, since I accidentally deleted it. I was just scrolling through my Instagram folder in the gallery, and suddenly there it was. It felt like finding an old, treasured item from my childhood. However, if your autosave isn’t turned on, you will not find them in this folder. In such cases, check the Recently Deleted on both IG and your device to try your luck. You might also find some of the videos and pics in your other folders, as it’s highly likely that you used your phone camera rather than the IG lens.
Method 7: Request Your Instagram Data
Data Download is an option that Instagram offers to its users by allowing them to request a copy of their account’s data. A creator friend of mine got his account hacked and lost the authority over his profile after he reached over 300K followers. Once he received the rights back, all his 557 posts were removed by the hacker, hence, he had to request a data download. It took him about 48 hours, and then he received a link in his email that helped him download his deleted posts.
However, since IG provides them as a ZIP file with either HTML or JSON, some users might find it confusing. Get a tech-savvy or an IG expert who can help you navigate it. At times, you may not receive any link in your inbox. Don’t worry, you can check your spam, promotions, or social to find it. If it’s still unavailable, send your request again, you will surely receive it sooner or later.
Here’s how you can request a data download on Instagram:
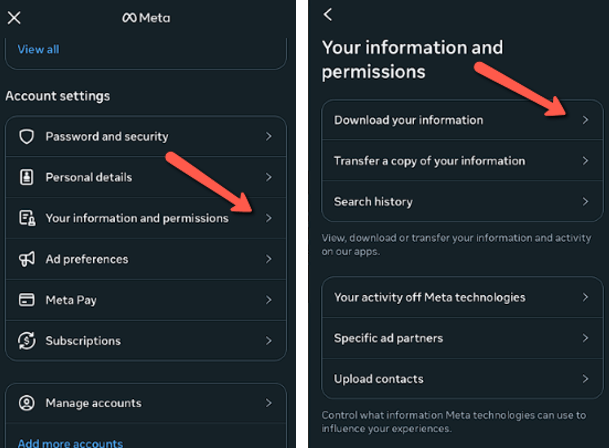
Step 1) This method can be slightly complex, but I have simplified it, which will help you understand it easily. First, go to Instagram settings and tap on Accounts Center.

Step 2) Next, scroll down to Your information and permissions. Here you will find the Download your information button– tap on it.
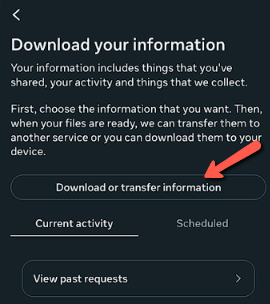
Step 3) Now it will lead to Download or transfer information–click on this button.
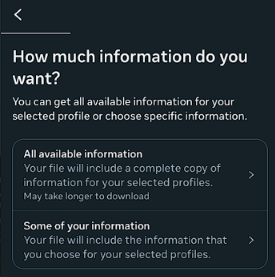
Step 4) It will then ask you, “How much information do you want?” Here, you can select your preference– all available data or only some. If you select Some of your info, you can pick the type of data you want to download, such as Media, Comments, Likes, Messages, etc.
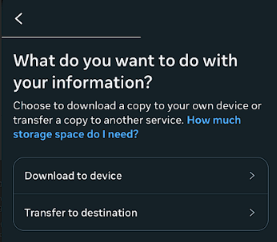
Step 5) Finally, choose Download to the device or Transfer to a destination. The request will take some time to be approved. Once you have the approval, Instagram will send a link to your email to download your data.
Method 8: Check Cloud Backups
Many users set auto-backup for their photos and videos, while some smartphones come with such default settings. This technique can be used by anyone, such as usual IG users, content creators, digital marketers, etc. Thus, whenever I delete a picture from any media by mistake, I often end up on my Google Photos and iCloud. If you are using other cloud backup services, do check them as well. Hence, I did find some of my deleted posts that were almost two years old, on my cloud. It is easier to locate the deleted content if you know the date when the post was created, if not the exact day, at least the year.

But, this method is not reliable if you have not enabled the auto-backup before deleting any IG posts. In such situations, you can request a data download from Instagram. There are also times when you might be logged into some other cloud account. Hence, ensure you are signed into the same cloud account that you use for your phone’s backup.
Method 9: Ask Followers or Friends
Getting some crowd help can be quite valuable and efficient sometimes. About a year ago, I deleted one of my celebrated college reunion images while decluttering my grid and regretted it a few months later. I assumed that I might have saved it on my cloud or device’s Instagram folder, unfortunately, I wasn’t able to locate it anywhere. That’s when I decided to DM my friends, and I even uploaded statuses on all my social accounts asking people if they, by any chance, have our group photo. I received many DMs with similar images from different angles. Finally, two days later, a follower tagged me with a comment on a post that she found in one of our mutual friends’ profiles.
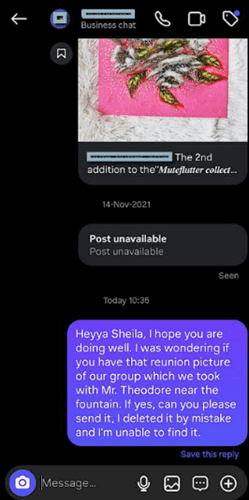
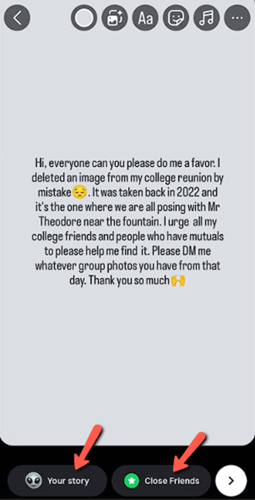
Even if you are looking for a manually deleted story, you can try this trick. Since your followers or friends might have screenshot your story. Social Media influencers might benefit the most from this method, due to a large fan following. Make sure your status describes the video or the photo specifically to avoid having to explain multiple times. Some of you may not be comfortable with asking for help publicly, so you can just post the status to close friends.
Asking friends and followers can be useful, but it might not always favor your luck. It is a gamble since even if people might find your image in that same outfit or same location where you posed. However, you might be looking for a different picture with slight variations. In such cases, so why not consider data recovery tools.
Method 10: Use Data Recovery Tools For Your Device
There are numerous data recovery tools, such as Dr.Fone, DiskDigger, EaseUS, and more. These tools can help you recover your snaps and videos if there’s no new data that’s been overwritten. If you are tech-savvy or an investigator with a phone at hand as evidence, this could be helpful. Such apps can scan your device storage and recover your deleted posts. I noticed that some of these tools require rooting or jailbreaking, which isn’t safe since it will void your device’s warranty and make it vulnerable to security risks.
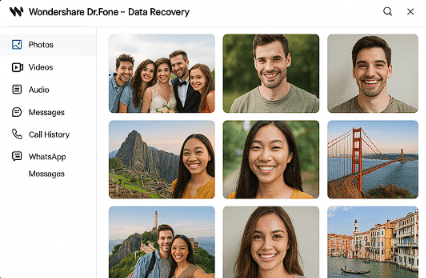
Therefore, once you get back your deleted files, you can backup and move device storage to a secure place. Then connect your iPhone to a Mac and restore the jailbreak by wiping the device and downloading the latest iOS version. In case of Android, I use Flash Stock Firmware or Magisk to install the newest OS. Moreover, data recovery apps do not work if the post wasn’t saved to your device before it got deleted. If such issues arise, go to Google Photos and iCloud, cause your device’s auto-save might have stored the media in your cloud.
Although data recovery tools can be robust, some people may hesitate to use them, since they require rooting and jailbreaking. Additionally, you have to be tech-savvy to handle the rest of the technicalities after rooting your phone. So, the following method might be simpler for most users.
Method 11: Web Archives or Third-Party Archivers
The Wayback Machine or similar archivers sometimes crawl popular or public Instagram profiles. I used it to find some of my old images from when my profile was public, and I found around 6 pictures. All you have to do is enter the profile’s URL into this site and view the cached version. It can be used by people who have or had an open profile. Therefore, Public figures, content creators, business accounts, or even regular users can try it. Additionally, you can use it not only for your own posts but also for others. For example, your kid, crush, random user you are curious about, etc. If the URL doesn’t lead anywhere, try using the full handle name and searching for the person. This may bring up some of their deleted posts.
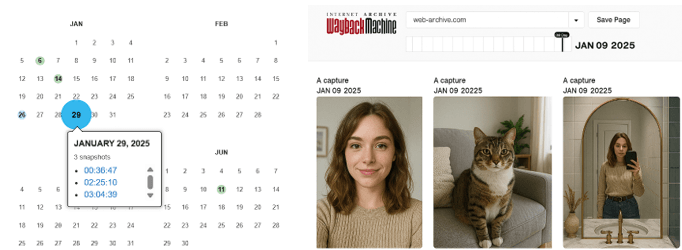
While archivers can be useful, they are unpredictable and may not always function. I also found some of them quite confusing as they kept redirecting me to blank pages. Thus, your other shot at finding deleted posts is to access different social media sites.
Method 12: Check Other Social Media
This method works both for your personal account and individuals that you are curious about. It is also helpful for small business owners who want to know what their competitors are posting across other social networks. Recruiters who need to do a background check might also find this method effective. Furthermore, people who are into online dating can try this to do a thorough check on their new connections. I find this method quite helpful since Instagram offers a cross-posting option. Hence, if you archive anything, you may still find it on Facebook.
There are also times when we post the same click across multiple social media, so there’s a chance you may find it on your other handles. Using this method, I found some pictures of my target person from 2014 on Facebook, which are no longer visible on their Instagram grid. Additionally, some of their reels, which have been deleted, were also visible on their TikTok.
What You Should Know Before Recovering Deleted Instagram Posts
Here are some of the crucial prerequisites you must know before attempting to recover IG’s deleted posts:
- No return after permanent delete: Any post that is deleted from the Recently Deleted section or has expired the 30-day window cannot be recovered from the app instantly.
- Be logged in: If you have logged out of your Instagram or you are signed in via any third-party sites, the restoration won’t work. Moreover, you cannot access Recently Deleted via third-party tools.
- Account must be active: You cannot access the Recently Deleted posts on banned, deactivated, or disabled profiles. Unless you reopen an account or reactivate it, then delete any posts.
- Ability to verify: To verify, while restoring the user, Instagram sends a code via text or email, or to your registered phone number.
- Authenticator codes ready: If you already have 2FA, you must have your authentication or backup codes ready for the process to avoid delays.
- Stable internet: Fix your shaky connection since it could hinder the loading of media, or your request might not be completed.
- Update the app first: Unless your Instagram is updated, you might not be able to view the Recently Deleted folder.
- Copyright or reported: If your content has been taken down by DMCA (Digital Millennium Copyright Act), then you must file a valid counterpoint and get your appeal approved. Unless you win the appeal, your post will remain removed.
- Community-Guidelines removals: Any post that has been removed due to a violation of Instagram’s community guidelines isn’t restorable unless you make an appeal. These posts may include nudity, hate speech, etc.
FAQs
Conclusion
All of the above methods helped me find deleted Instagram posts, although a few of them needed extra work and tweaking at times. The outcome of these methods will vary from profile to profile, depending on several factors such as auto-save, open profile, manual deletion, etc. However, as per my experience, I found Recently Deleted Option, Archive Folder, Peekviewer, and mSpy as the most reliable methods. You can utilize them to find your and other profiles’ deleted pictures and videos. Although it’s best to respect people’s privacy by keeping your curiosity in check and never sharing your finds publicly. You must also never search for someone else’s post with a harmful intent and avoid all forms of stalking.
Peekviewer is a widely used anonymous viewer app that can give access to Instagram accounts, whether public or private. It is great for users who are interested in someone, curious in general, and social media managers. It also allows to download all the content and save it for up to 3 months.