Bugzilla Tutorial – Defect Tracking Tool
⚡ Smart Summary
Bugzilla Tutorial introduces the open-source defect tracker by Mozilla. Lessons cover login, bug submission, graphical reports, browse function, simple and advanced search, custom columns, and personal preferences.
![]()
What is Bugzilla?
Bugzilla is an open-source issue/bug tracking system that allows developers to keep track of outstanding problems with their product. It is written in Perl and uses MYSQL database.
Bugzilla is a Defect tracking tool, however, it can be used as a test management tool as such it can be easily linked with other Test Case management tools like Quality Center, Testlink etc.
This open bug-tracker enables users to stay connected with their clients or employees, to communicate about problems effectively throughout the data-management chain.
Key features of Bugzilla includes
- Advanced search capabilities
- E-mail Notifications
- Modify/file Bugs by e-mail
- Time tracking
- Strong security
- Customization
- Localization
How to log-in to Bugzilla
Step 1) Use the following link for your hands-on. To create an account in Bugzilla tool or to login into the existing account go to New Account or Log in option in the main menu.

Step 2) Now, enter your personal details to log into Bugzilla
- User ID
- Password
- And then click on “Log in”

Step 3) You are successfully logged into Bugzilla system

With an account, the most common task is filing a new defect.
Creating a Bug-report in Bugzilla
Step 1) To create a new bug in Bugzilla, visit the home-page of Bugzilla and click on NEW tab from the main menu

Step 2) In the next window
- Enter Product
- Enter Component
- Give Component description
- Select version,
- Select severity
- Select Hardware
- Select OS
- Enter Summary
- Enter Description
- Attach Attachment
- Submit
NOTE: The above fields will vary as per your customization of Bugzilla
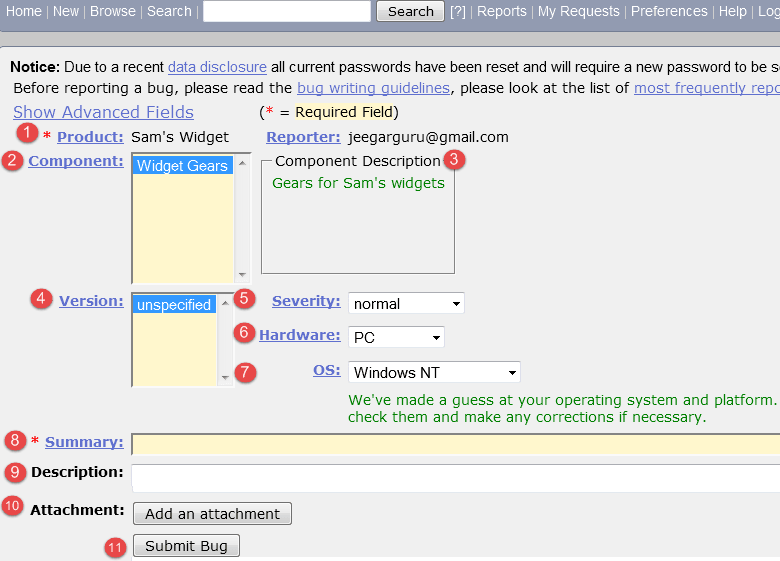
NOTE: The mandatory fields are marked with *.
In our case field’s
- Summary
- Description
Are mandatory
If you do not fill them you will get a screen like below

Step 4) Bug is created ID# 26320 is assigned to our Bug. You can also add additional information to the assigned bug like URL, keywords, whiteboard, tags, etc. This extra-information is helpful to give more detail about the Bug you have created.
- Large text box
- URL
- Whiteboard
- Keywords
- Tags
- Depends on
- Blocks
-
Attachments


Step 5) In the same window if you scroll down further. You can select deadline date and also status of the bug. Deadline in Bugzilla usually gives the time-limit to resolve the bug in given time frame.

Create Graphical Reports
Graphical reports are one way to view the current state of the bug database. You can run reports either through an HTML table or graphical line/pie/bar-chart-based one. The idea behind graphical report in Bugzilla is to define a set of bugs using the standard search interface and then choosing some aspect of that set to plot on the horizontal and vertical axes. You can also get a 3-dimensional report by choosing the option of “Multiple Pages”.
Reports are helpful in many ways, for instance, if you want to know which component has the largest number of bad bugs reported against it. In order to represent that in the graph, you can select severity on X-axis and component on Y-axis, and then click on generate a report. It will generate a report with crucial information.

The graph below shows the Bar chart representation for the Bugs severity in component “Widget Gears”. In the graph below, the most severe bug or blockers in components are 88 while bugs with normal severity are at the top with 667 number.

Likewise, we will also see the line graph for %complete Vs Deadline
Step 1) To view your report in a graphical presentation,
- Click on Report from Main Menu
- Click on the Graphical reports from the given option

Step 2) Let’s create a graph of % Complete Vs Deadline
In here on the vertical axis we chose % Complete and on our horizontal axis we chose Deadline. This will give the graph of amount of work done in percentage against the set-deadline.
Now, set various option to present reports graphically
- Vertical Axis
- Horizontal Axis
- Multiple Images
- Format- Line graph, Bar chart or Pie chart
- Plot data set
- Classify your bug
- Classify your product
- Classify your component
- Classify bug status
- Select resolution
- Click on generate a report

The image of the graph will appear somewhat like this

Browse Function
Step 1) To locate your bug we use browse function, click on Browse button from the main menu.

Step 2) As soon as you click on browse button a window will open saying “Select a product category to browse” as shown below, we browse the bug according to the category.
- After clicking the browse button
- Select the product “Sam’s Widget” as such you have created a bug inside it

Step 3) It opens another window, in this click on component “widget gears”. Bugzilla Components are sub-sections of a product. For instance, where our product is SAM’S WIDGET whose component is WIDGET GEARS.
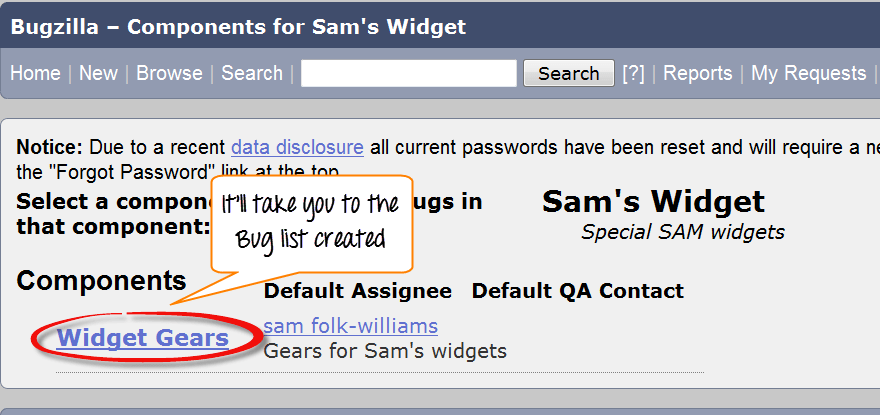
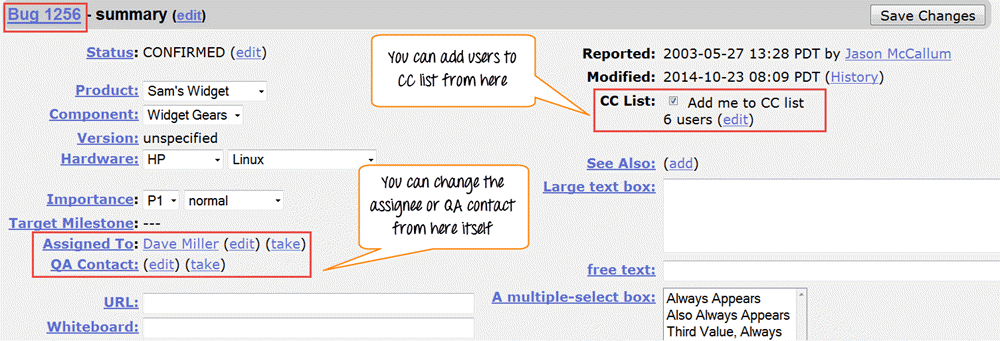
Step 4) when you click on the component, it will open another window. All the Bugs created under particular category will be listed over here. From that Bug-list, choose your Bug#ID to see more details about the bug.

It will open another window, where information about your bug can be seen more in detail. In the same window, you can also change the assignee, QA contact or CC list.
How to use Simple search option in Bugzilla
Bugzilla provides two ways of searching for bugs, they are Simple Search and Advance Search methods.
Step 1) We will first learn the “Simple Search” method. Click on search button from the main menu and then follow these steps
- Click on “Simple Search” button
- Choose the status of the Bug – choose Open if you are looking the bug in Open status and closed for bug in closed status
- Choose your category and component, and you can also put keywords related to your bug
- Click on the search

Step 2) Here we will search for both option open and closed status, first we have selected closed status for bug and clicked search button.

For closed status, it fetched 12 bugs.

Step 3) Likewise we have searched for Open status as well, and it has fetched 37 bugs related to our queries.

Also, at the bottom of the screen you have various options like how you want to see your bug – an XML format, in Long format or just Time summary. Apart from that you can also use other option like send mail to bug assignee, change several bugs at once or change column of the screen, etc.

In next step, we will demonstrate one of this function change column of the screen, through which we will learn how to add or remove the column to the existing column.
How to add or remove a column to default search screen
Step 1) Click on the Change Column as shown in above screen-shot. It will open a new window where you have to follow these steps.
- Select any given option from the column you want to appear in the main screen – here we have selected % complete
- Click on the arrow button, it will move % complete column from à Available Column to the Selected column
These steps will move the selected column from left to right.

The % complete is moved from left to right as shown below, and once we click on change column it will appear in the main screen

Before- Search result screen before using “Change Column” option-
- There is no % complete column appears in search screen result as shown below

After- Search result screen after using “Change Column” option
- You can see % complete column added to the extreme right in the existing column in the main screen, which was not their previously.

NOTE: Likewise you can remove or add any column you want.
For complex queries spanning many fields, Advanced Search unlocks Bugzilla’s filtering power.
How to use Advanced Search in Bugzilla
Step 1) After a Simple search we will look into the Advanced Search option for that you have to follow the following steps.
- Click on the advanced search option
- Select option for a summary, how you want to search
- Enter the keyword for your bug- for example, Widget gears twisted
- Select the category of your Bug under classification, here we selected Widget
- Choose your product under which your Bug was created- Sam’s Widget
- Component- Widget gears
- Status- Confirmed
- Resolution

Step 2) Once you select all the option, click on search button. It will detect the bug you created

The advanced search will find your bug, and it will appear on the screen like this

How to use preferences in Bugzilla
Preferences in Bugzilla is used to customize the default setting made by Bugzilla as per our requirement. There are mainly five preferences available
- General Preferences
- E-mail Preferences
- Saved Searches
- Account Information
- Permissions
General Preferences
For general preferences, you have a various option like changing Bugzilla general appearance, a position of the additional comment box, automatically add me to cc, etc. Here we will see how to change the general appearance of the Bugzilla.
There are many changes you can do which are self-explanatory, and you can choose the option as per your requirement.
Step 1)
- To set the background Skin of Bugzilla
- Go to Bugzilla general preference (Skin)
- Select the option you want to see as a change and submit the change ( DuskàClassic )
- A message will appear on the window saying changes have been saved, as soon as you submit the changes

After the skin preference is changed to Classic from Dusk, the background color of the screen appears white

Likewise, for other default settings changes can be done.
E-mail preferences
E-mail preferences enable you to decide how to receive the message and from whom to receive the messages.
Step 1) To set the e-mail preferences
- Click on e-mail services
- Enable or disable the mail to avoid receiving notification about changes to a bug
- Receiving a mail when someone asks to set a flag or when someone sets a flag you asked for
- When and from whom you want to receive mail and under which condition. After marking your option at the end, submit the changes.

Saved Searches Preference
Saved searches preference gives you the freedom to decide whether to share your bug or not to share.
Step 1) Click on saved searches, it will open window with the option like edit bugs, don’t share, can confirm, etc. Choose the option as per your need.

Step 2) We can run our bug from “Saved Searches”.
- Go to Saved Searches under preference
- Click on the “Run” button

As soon as you run your search from Saved Searches it opens your bug as shown below

Step 3) In the same window we can also choose specific users with whom we want to share the search by marking or unmarking the checkbox against the users

That’s all to Bugzilla!
Bugzilla Bug Life Cycle
Every defect moves through a defined sequence of states. Understanding this life cycle helps hand work off cleanly between developers and testers.
- UNCONFIRMED: Initial state until a triager confirms reproducibility.
- NEW: Confirmed defect waiting for ownership.
- ASSIGNED: A developer accepts the bug.
- RESOLVED: Marked Fixed, Wontfix, Duplicate, Invalid, or Worksforme.
- VERIFIED: Quality assurance confirms the fix.
- CLOSED: Final state once the fix ships stably.
Bugs can REOPEN if verification fails, looping back to ASSIGNED for additional work.
Bugzilla vs Jira: Practical Comparison
Teams often weigh Bugzilla against Jira when choosing a tracker.
| Aspect | Bugzilla | Jira |
|---|---|---|
| License | Open source (MPL) | Commercial; free under 10 users |
| Focus | Defect tracking | Full project management |
| Agile boards | Not built-in | Scrum and Kanban built-in |
| Workflow customization | Limited | Highly customizable |
| Reporting | Basic HTML and charts | Advanced dashboards plus JQL |
| Hosting | Self-hosted | Cloud or self-hosted |
Choose Bugzilla when simplicity and cost matter. Choose Jira when agile and dashboards are also priorities.