Apache Tutorials for Beginners
⚡ Smart Summary
Apache HTTP Server powers more than half of the public web, and this resource breaks down its architecture, installation paths, virtual hosting models, security hardening, logging, and production deployment so administrators can confidently operate it across Linux, Windows, or macOS environments.

What is Apache?
Apache is a remarkable piece of application software. It is the most widely used Web Server application in the world, with more than 50% share in the commercial web server market. Apache is the most widely used Web Server application on Unix-like operating systems, but it can be used on almost all platforms such as Windows, OS X, OS/2, etc. The word, Apache, has been taken from the name of the Native American tribe Apache, famous for its skills in warfare and strategy making.
It is a modular, process-based web server application that creates a new thread with each simultaneous connection. It supports a number of features; many of them are compiled as separate modules and extend its core functionality, providing everything from server-side programming language support to authentication mechanisms. Virtual hosting is one such feature that allows a single Apache Web Server to serve a number of different websites from the same hardware.

How to install Apache
Before deploying Apache, it is worth understanding the different installation routes available. There are numerous ways of installing the package or application, as listed below.
- One of the features of this open source web application is that anyone can prepare an installer for their own environment. This has allowed various vendors like Debian, Red Hat, FreeBSD, and SUSE to customize the file location and configuration of Apache, taking into account other installed applications and the base OS.
- Apart from installing it from a vendor-based installer, there is always the option of building and installing it from the source code. Installing Apache from the source file is platform independent and works for almost every OS.
The Apache web server is a modular application where the administrator can choose the required functionality and install different modules as per requirement.
All modules can be compiled as Dynamic Shared Objects (a DSO is an object file that can be shared by multiple applications while they are executing) that exist separately from the main Apache binary. The DSO approach is highly recommended; it makes the task of adding, removing, or updating modules from the server configuration very simple.
Install Apache: Linux Platform
On Red Hat or rpm based systems
If you are using an rpm (Red Hat Package Manager, a utility for installing applications on Linux systems) based Linux distribution, that is, Red Hat, Fedora, CentOS, or SUSE, you can install this application by either a vendor-specific Package Manager or by directly building the rpm file from the available source tarball.
You can install Apache via the default Package Manager available on all Red Hat based distributions like CentOS, Red Hat, and Fedora.
[root@amsterdam ~]# yum install httpd
The Apache source tarball can be converted into an rpm file using the following command.
[root@amsterdam ~]# rpmbuild -tb httpd-2.4.x.tar.bz2
It is mandatory to have the -devel package installed on your server for creating an .rpm file from source.
Once you convert the source file into an rpm installer, you can use the following command to install Apache.
[root@amsterdam ~]# rpm -ivh httpd-2.4.4-3.1.x86_64.rpm
After the installation, the server does not start automatically. In order to start the service, you have to use any of the following commands on Fedora, CentOS, or Red Hat.
[root@amsterdam ~]# /usr/sbin/apachectl start

[root@amsterdam ~]# service httpd start

[root@amsterdam ~]# /etc/init.d/httpd start
Install Apache from Source
If a package-manager build does not match your environment, source installation offers full control. Installing Apache from source requires the -devel package to be installed on your server. You can find the latest available version of Apache and download it from the official Apache download page. Once you download the source file, move it to the /usr/local/src folder.
[root@amserversterdam ~] cd /usr/local/src

[root@amserversterdam ~] gzip -d httpd-2.2.26.tar.gz

[root@amserversterdam ~] tar xvf httpd-2.2.26.tar

[root@amserversterdam ~] httpd-2.2.26
In order to see all configuration options available for Apache, you can use the ./configure –help option. The most common configuration option is –prefix={install directory name}.
[root@amserversterdam ~]./configure --help

[root@amserversterdam ~]./configure --prefix=/usr/local/apache --enable-so

[root@amserversterdam ~] make

[root@amserversterdam ~] make install
The above example shows the compilation of Apache within the /usr/local/apache directory with the DSO capability. The –enable-so option allows required modules to be loaded into Apache at run time via the DSO mechanism rather than requiring a recompilation.
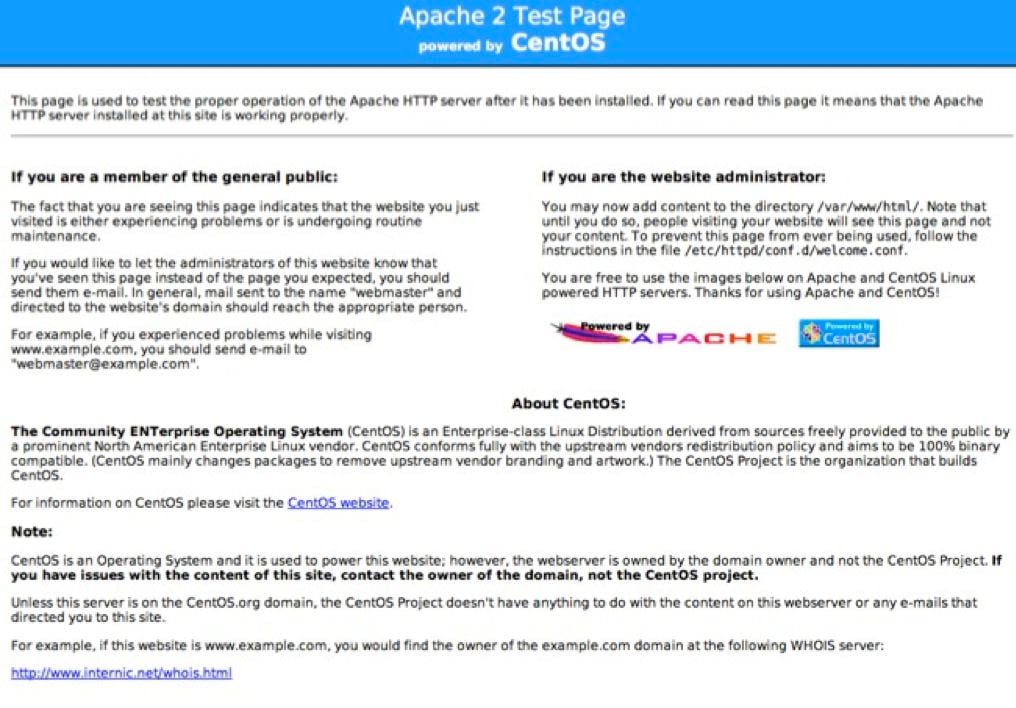
Once the installation completes, you can browse the web server’s default page with your favorite browser. If a firewall is enabled on your server, you must make an exception for port 80 on your OS firewall. You can use the following command to open port 80.
iptables -I INPUT -p tcp --dport 80 -j ACCEPT
service iptables save
You can see the default Apache2 Welcome screen by browsing to your server IP address.
What is Virtual Host?
Once Apache is running, the next logical step is learning how to host multiple sites on the same machine. An Apache web server can host multiple websites on the SAME server. You do not need a separate server machine and Apache software for each website. This can be achieved using the concept of a Virtual Host or VHost.
Any domain that you want to host on your web server will have a separate entry in the Apache configuration file.

Types of Apache Virtualhost
- Name-based Virtual host
- Address-based or IP based virtual host
Name-based Virtual Host
Name-based virtual hosting is used to host multiple virtual sites on a single IP address.
In order to configure name-based virtual hosting, you have to set the IP address on which you are going to receive the Apache requests for all the desired websites. You can do this with the NameVirtualHost directive within the Apache configuration, that is, the httpd.conf or apache2.conf file.
Apache virtual host Example:
NameVirtualHost *:80

<VirtualHost 192.168.0.108:80>

ServerAdmin webmaster@example1.com

DocumentRoot /var/www/html/example1.com

ServerName www.example1.com

</VirtualHost>

<VirtualHost 192.168.0.108:80>

ServerAdmin admin@example2.com

DocumentRoot /var/www/html/example2.com

ServerName www.example2.com

</VirtualHost>
You can add as many virtual hosts as your environment requires. You can check your web configuration files with:
[root@amsterdam ~]#httpd -t
Syntax OK
If the configuration file has incorrect syntax, it will throw an error:
[root@115 conf.d]# httpd -t

Syntax error on line 978 of /etc/httpd/conf/httpd.conf:

Invalid command '*', perhaps misspelled or defined by a module not included in the server configuration
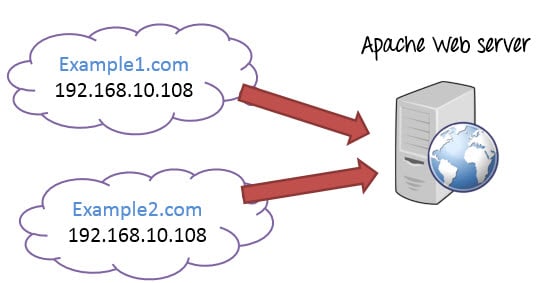
IP-based Virtual host
In order to set up IP-based virtual hosting, you need more than one IP address configured on your server. So, the number of vhosts Apache can serve will depend on the number of IP addresses configured on your server. If your server has 10 IP addresses, you can create 10 IP-based virtual hosts.

In the above diagram, two websites, example1.com and example2.com, were assigned different IPs and are using IP-based virtual hosting.
Listen 192.168.0.100:80

<VirtualHost 192.168.10.108:80>

ServerAdmin webmaster@example1.com

DocumentRoot /var/www/html/example1.com

ServerName www.example1.com

</VirtualHost>

<VirtualHost 192.168.10.109:80>

ServerAdmin admin@example2.com

DocumentRoot /var/www/html/example2.com

ServerName www.example2.com

</VirtualHost>
Apache vs Nginx: Quick Comparison
Apache is often weighed against Nginx when planning a new deployment. The table below summarizes the most common decision points.
| Factor | Apache HTTP Server | Nginx |
|---|---|---|
| Processing model | Process or thread per connection (prefork, worker, event MPMs) | Event-driven, asynchronous |
| Configuration | Per-directory .htaccess overrides supported | Centralized configuration, no .htaccess |
| Dynamic content | mod_php and other modules embed runtimes in-process | Proxies to PHP-FPM or external app servers |
| Static file throughput | Strong, but higher memory per connection | Excellent under very high concurrency |
| Module ecosystem | Very large; loaded as DSOs at runtime | Compiled-in or dynamic modules, smaller ecosystem |
| Typical use case | Shared hosting, .htaccess workflows, mixed dynamic apps | Reverse proxy, static delivery, high-concurrency endpoints |
What Apache needs to Run Php File?
Running PHP files on Apache needs mod_php enabled on your server. It allows Apache to interpret .php files. It has PHP handlers that interpret the PHP code in Apache and send HTML to your web server.
If mod_php is enabled on your server, you will have a file named php.conf in the /etc/httpd/conf.d/ directory. You can also check it with:
httpd -M | grep "php5_module"
The output will be similar to:

Php handlers in Apache
- mod_php
- CGI
- FastCGI
- suPHP
mod_php is the oldest PHP handler; it makes PHP part of Apache and does not call any external PHP process. This module is installed by default in every Linux distribution repository, so enabling or disabling it is very easy.
If you are using FastCGI as your PHP handler, you can set multiple versions of PHP to be used by different accounts on your server.
FastCGI, that is, mod_fastcgi, is an extension of mod_fcgid, where mod_fcgid is a high-performance alternative to CGI (mod_cgi). It starts a sufficient number of CGI instances to handle concurrent web requests. It also uses suexec to support different users with their own instances of PHP and improves web security.
Running Ruby files on Apache needs mod_ruby to be enabled. Apache can also handle Ruby files through FastCGI. It is possible to use multiple versions of Ruby with the help of mod_fcgid, that is, FastCGI.
You can also install Apache Passenger and configure Apache to use it for serving Ruby pages.
(Phusion Passenger, also known as “Passenger“, is a free web server module that is designed to integrate with Apache and Nginx.)
Steps to install mod_ruby on your server:
cd /tmp

wget http://www.modruby.net/archive/mod_ruby-1.2.6.tar.gz

tar zxvf mod_ruby-1.2.6.tar.gz

cd mod_ruby-1.2.6/

./configure.rb --with-apr-includes=/usr/include/apr-1

make

make install
How to run Ruby with Apache
We have to add the mod_ruby module to the Apache configuration, that is, /etc/httpd/conf.d/ruby.conf, and add the following line.
LoadModule ruby_module modules/mod_ruby.so
If you like to enable or disable these modules, you have to edit the Apache configuration file and comment or uncomment these modules, provided the web server is already compiled with them.

How to Secure Apache Web Server
Once Apache is serving the right content, the next priority is locking it down. Securing your web server is very important; it means allowing others to see only the intended information, protecting your data, and restricting access.
These are common practices that enhance your Apache web server’s security.
1) Hiding Apache version and OS information
Apache displays its version and the name of the operating system in errors, as shown in the screenshot below.

An attacker can use this information to launch an attack using publicly available vulnerabilities in the particular version of the server or OS.
In order to prevent Apache from displaying this information, we have to modify the “server signature” option available in the Apache configuration file. By default, it is “on”; we need to set it to “off”.
vim /etc/httpd/conf/httpd.conf
ServerSignature Off

ServerTokens Prod
We have also set “ServerTokens Prod” that tells the web server to return only Apache and suppress the OS major and minor version.
After modifying the configuration file, you have to restart or reload your Apache web server to make the change effective.
service httpd restart

2) Disable Directory Listing
If your document root directory does not have an index file, by default your Apache web server will show all the content of the document root directory.

This feature can be turned off for a specific directory through the “Options” directive available in the Apache configuration file.
<Directory /var/www/html>

    Options -Indexes

</Directory>

3) Disabling unnecessary modules
It is good practice to disable all unnecessary modules that are not in use. You can see a list of enabled modules available in your Apache configuration file.
[root@amsterdam ~]#httpd -M

perl_module (shared)

php5_module (shared)

proxy_ajp_module (shared)

python_module (shared)

ssl_module (shared)
Many of the listed modules can be disabled, like mod_imap, mod_include, mod_info, mod_userdir, and mod_autoindex, as they are hardly used by any production web servers.
vi /etc/httpd/conf/httpd.conf

#LoadModule auth_digest_module modules/mod_auth_digest.so
Once you comment out the module, save the file.
Restart Apache services with the following command.
/etc/init.d/httpd restart
4) Restricting Access to files outside the web root directory
If you want to ensure that files outside the web root directory are not accessible, you have to make sure that the directory is restricted with the “Allow” and “Deny” options in your web server configuration file.
<Directory/>

Options None

AllowOverride None

Order deny,allow

Deny from all

</Directory>
Once you restrict access outside the web root directory, you will not be able to access any file located on any other folder on your web server; you will get a 404 return code.

5) Using mod_evasive to rebut DoS attacks
If you want to protect your web server from DoS (Denial of Service) attacks, you must enable the mod_evasive module. It is a third-party module that detects DoS attacks and prevents them from doing as much damage as they would if left to run unchecked. It can be downloaded below.
6) Using mod_security to enhance Apache security
This module works as a firewall for Apache and allows you to monitor traffic in real time. It also prevents the web server from brute-force attacks. The mod_security module can be installed with the default package manager of your distribution.

7) Limiting request size
Apache does not have any restriction on the total size of the HTTP request, which could lead to a DoS attack. You can limit the request size with the Apache directive “LimitRequestBody” inside a Directory tag. The value could be set anything from 0 to 2 GB (2147483647 bytes) as per your requirement.
<Directory "/var/www/html/uploads">

   LimitRequestBody 512000

</Directory>
Apache Log Format
With the server hardened, log review becomes the primary tool for spotting problems. Apache logs provide detailed information that helps detect common issues with the server.
In order to create access logs, the mod_log_config module must be enabled.
Three directives available in Apache config file
- TransferLog: Creating a log file.
- LogFormat: Specifying a custom format.
- CustomLog: Creating and formatting a log file.
The TransferLog directive is available in the Apache configuration file, and it rotates virtual host log files as per set parameters.
<VirtualHost www.example.com>

  ServerAdmin webmaster@example.com

  DocumentRoot /usr/www/example/httpd/htdocs/

  ServerName www.example.com

  ServerAlias example.com www.example

  ErrorLog /usr/www/example/httpd/logs/error_log

  TransferLog /usr/www/example/httpd/logs/accesslog

  CustomLog /usr/www/example/httpd/logs/accesslog combined

</VirtualHost>
Two types of Apache Log Format
- Common Log Format
- Combined Log Format
You can enable them by editing the Apache configuration file, that is, apache2.conf (Debian/Ubuntu) or httpd.conf (rpm-based systems).
Common Log Format
LogFormat "%h %l %u %t \"%r\" %>s %b" common

CustomLog logs/access_log common
Common Log generated by Apache
[Wed Oct 11 14:32:52 2000] [error] [client 127.0.0.1] client denied by server configuration: /export/home/live/ap/htdocs/test
Combined Log Format
LogFormat "%h %l %u %t \"%r\" %>s %b \"%{Referer}i\" \"%{User-agent}i\"" combined

CustomLog log/access_log combined
Here,
- %h is the remote host.
- %l is the identity of the user determined by identd.
- %u is the user name determined by HTTP authentication.
- %t is the time the server finished processing the request.
- %r is the request line from the client. (“GET / HTTP/1.0”)
- %>s is the status code sent from the server to the client (500, 404, etc.).
- %b is the size of the response to the client (in bytes).
- Referer is the page that linked to this URL.
- User-agent is the browser identification string.
Combined Log generated by Apache:
199.187.122.91 - - [06/Mar/2014:04:22:58 +0100] "GET /robots.txt HTTP/1.1" 404 1228 "-" "Mozilla/4.0 (compatible; MSIE 6.0; Windows NT 5.1; SV1; .NET CLR 2.0.50727)"
Custom Log creates a separate log file for each Virtual Host on your server. It needs to be specified in the virtual host section of the config file.
You can see the virtual host configuration below; the generated log will be custom for that virtual host and the format will be combined.

Configure your very first Production Web Server
With configuration, security, and logging covered, the final piece is bringing it all together into a production-ready environment.
1. In order to have a running production web server, you need a dedicated node (physical, virtual, or cloud instance) running Linux, Unix, Windows, macOS, etc.
2. The Web Server must have a direct network connection and a static IP address configured on it.
3. It needs to have all the modules required for running web pages. If a web server processes PHP pages, it needs the PHP module enabled.
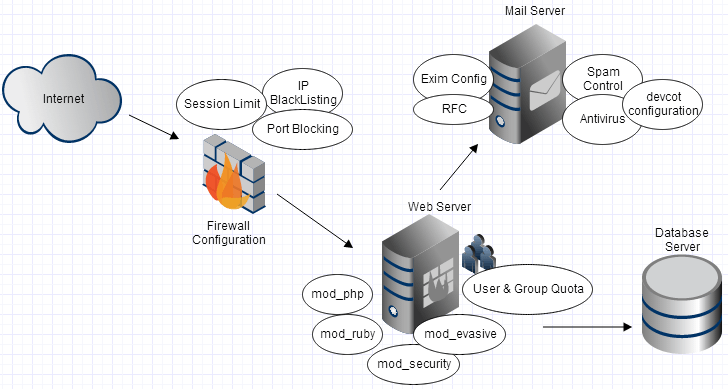
- It also needs a good antivirus application configured and running for securing the Web Server from malware or virus attacks. You also need a mechanism to update the configured antivirus or anti-malware application on a regular basis without any manual intervention in order to get maximum benefit.
- If you have hundreds of domains to be hosted on your web server, you must implement limitations on file system quota for each domain, the number of databases each domain can create, the number of email accounts per domain, etc.
- If your web server has been set up for shared hosting services, users on your web server need to be restricted. A shared hosting user should have least user privilege so that they do not damage important files or break the entire server. Apache does not provide any such functionality and needs different third-party applications and customization of the OS to achieve this.
- If you are adding a new domain on your web server, it requires editing hundreds of configuration entries to enable all features for the added domain.
- If one of the hosted domains requires different PHP settings than the rest of the domains, implementing this in core Apache is very complex and needs extensive customization of your web server.
- A production web server needs a firewall to block unwanted traffic that could cause high load on your server. Implementing IPTABLE rules with the command line is complex. It needs expertise of core Linux or Unix environments to write effective firewall rules for blocking unwanted traffic. IPTABLE is based on the netfilter module; it is an OS-level firewall that allows an administrator to create rules for incoming and outgoing traffic on the server.
- A production web server requires several different applications like email, FTP for file upload, and Domain Name System for parked domains. Managing all these applications on a core Linux or Unix system requires expertise in the respective technologies.
So, one can say that managing a web server for multiple domains is a very complex task and requires editing hundreds of configuration files and customizing each application to fulfill the desired result. Troubleshooting any misconfiguration will be very difficult for beginners.
The Solution using Cpanel or similar software
cPanel provides a graphical way of managing your web server. It is meant to provide mass hosting services that are easy to use and configure. cPanel has reduced the technical barriers to entry into hosting and web server management. It makes complex tasks easier; it provides many useful and easy-to-use web interfaces that perform common system administration tasks required to operate a web server.

cPanel compiles its own version of software.
If you have to recompile your web server (Apache) on a normal Linux platform, you have to manually select or search for the modules that are required. cPanel provides EasyApache functionality, which is a script-based web server compilation method.

It not only provides you with web services but also Mail, DNS, FTP, and many more services that are required for your web application.
Tasks that need expertise in core Linux or Unix based hosting, like installing SSLs, recompiling Apache with different PHP modules, updating web security, configuring effective IPTABLE rules, adding FTP users, creating mail accounts for each domain, scanning your document root with antivirus, and creating databases, are easy to complete with cPanel.
It provides a lot of scripts that fix, install, and troubleshoot common administrative tasks.
It provides backup and restore functionality, eliminating the need to manually copy files to backup storage. If you are backing up your domain, cPanel will create a tar file that will contain the document root folder, email accounts and mails, FTP accounts, databases, DNS records, and other applications.
It also provides robust documentation and has a very big community of users where you can discuss and get solutions for your issues.
So, one can say that cPanel is a strong application for managing your web server with the required features. It provides an easy-to-use interface for managing your domain and a mechanism to avoid the complexity of managing a core Web Server.
There are many competing products to cPanel, like Plesk, ISPConfig, Ajenti, Kloxo, Open Panel, and ZPanel.