SAPUI5 Tutorial for Beginners
⚡ Smart Summary
SAPUI5 is SAP’s responsive HTML5 framework powering enterprise web applications across desktop, mobile, and tablet devices. This walkthrough explains the MVC architecture, component model, libraries, and how to build parent and child components inside Eclipse.

What is SAPUI5?
SAPUI5 is a set of libraries to build responsive web applications that run on multiple devices like Desktop, Mobile, and Tablet. SAPUI5 works on MVC concept to accelerate the development cycle by creating data, business logic, and representation of data separately on the view. So the development of view and controller can take place independently to create models (data containers).
SAPUI5 is the latest in the series of SAP UI development technologies. In order to provide web integration for the underlying SAP ERP system, SAP came up with multiple UI development technologies like BSP (Business server pages), PDK (Portal development kit), Web Dynpro Java, Web Dynpro ABAP. And the successor of Web Dynpro ABAP is SAPUI5.
SAPUI5 Architecture
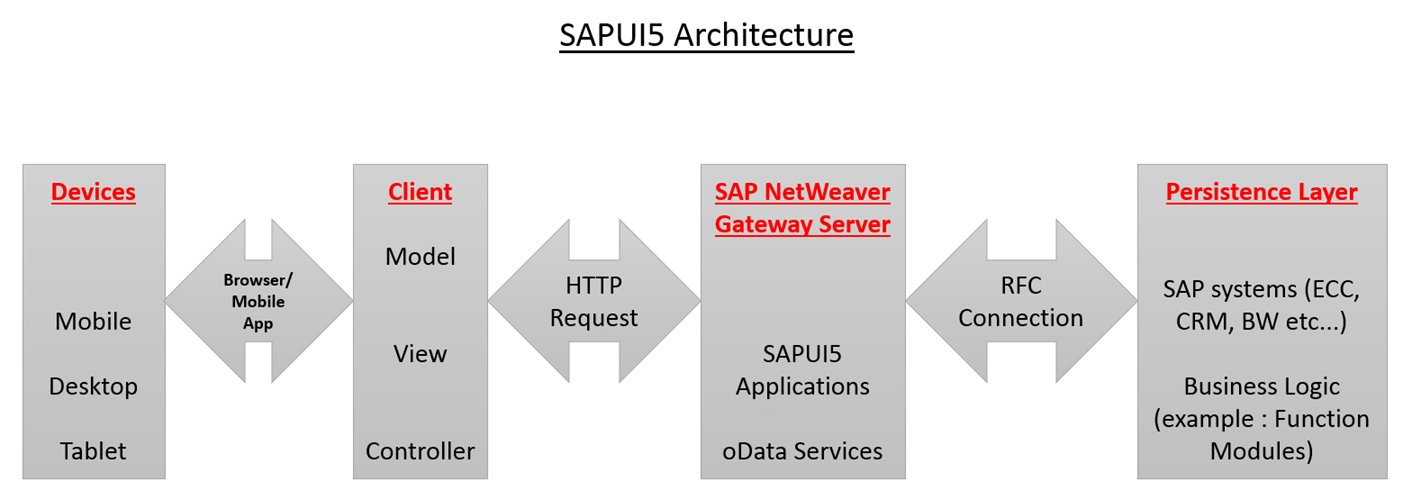
SAPUI Architecture Diagram
In the above Architecture, the first box ‘Devices’ indicates the devices on which UI5 applications run. UI5 applications can be accessed via a Mobile app or any browser. This layer is called the ‘Presentation Layer.’
SAPUI5 applications and oData services reside on the SAP NetWeaver Gateway Server. This layer of the architecture is called the ‘Application Layer.’
Actual business logic is implemented in SAP core systems like ECC, CRM, and BW. Business logic can be implemented using SAP programs and function modules. SAP transactional and Master Data reside on SAP systems. This layer is called the ‘Database Layer’ or ‘Persistence Layer.’
SAPUI5 Component
A Component is a piece of reusable code. There are 2 types of components provided by SAPUI5:
- UI Components – These represent a user interface containing UI elements. These are based on the SAPUI5 class called sap.ui.core.UIComponent
- Faceless Components – These do not have a user interface. These are based on the SAPUI5 class called sap.ui.core.Component
Essentially, a Component is a folder. When you create a new SAPUI5 application, you will be able to see a folder structure created in your project explorer like below.

In this UI5 application, PassNum is a Component. The Component.js file is mandatory for a UI5 application to behave like a Component.
Next in this SAPUI5 Eclipse tutorial, we will learn how to setup SAPUI5.
SAPUI5 Setup
Before we start, you need to ensure that:
- Eclipse (Luna version) is installed on your laptop
- SAP Development Tools for Eclipse Luna are installed on your Eclipse (SAP Development Tools for Eclipse Luna – https://tools.hana.ondemand.com/luna/)
- SAP Logon Pad is installed, and you have access to the SAP NetWeaver Gateway system for deployment and testing of the application we are going to build in this blog.
After the application is completely built, it should look like below:

In this SAPUI5 tutorials guide, we will create 2 components named Parent Component and Child Component. First, we will create the Child Component and then consume it in the Parent component.
Let’s start getting our hands dirty.
Part 1) Create Child Application
Our goal is to create a Child Component that will accept a number from 1 to 12 and display the name of the month. For example, when it receives 3, it should display ‘March’.
Step 1) Create the UI Project
Go to File->New->Other->SAPUI5 Application Development->Application Project.

Create an application project for SAPUI5 by following the wizard. See screenshot below.

Enter the name of the project, and let the other selections remain as suggested by the wizard.

In the above screenshot, there are 2 types of libraries displayed as radio buttons:
- sap.m
- sap.ui.commons
When you select sap.m, you are telling the wizard to create a UI5 application project whose bootstrap section will automatically include the sap.m library, which is meant for creating responsive web applications.
Next in this SAP FIORI tutorial, you will see the section of the wizard below where you need to create the initial View. An Initial view is a view which will be rendered first when the application is accessed.

Here you need to give the name of the view and select the type of the view. SAPUI5 supports 4 types of view as evident on the above screen. So the UI of a SAPUI5 application can be built using JavaScript or XML or JSON or HTML, whichever language you are comfortable with.
At the end of the wizard, a new project will be created and displayed in the Project Explorer window of Eclipse like below.

Step 2) Component.js code
Next, let us create a Component.js file and write the below code in it.
sap.ui.core.UIComponent.extend("DisplayMonth.Component", {

	metadata: {
	    "name": "DisplayMonth",
	    "dependencies": {
	      "components": []}
	    },

createContent: function() {
    var oViewData = {
      component: this
    };
    var oView = sap.ui.view({
      viewName: "DisplayMonth.displaymonth.DisplayMonthView",
      type: sap.ui.core.mvc.ViewType.XML,
      viewData: oViewData
    });

     return(oView);
  },

  init: function() {
    // call super init (will call function "create content")
    sap.ui.core.UIComponent.prototype.init.apply(this, arguments);

    // always use absolute paths relative to our own component
    // (relative paths will fail if running in the Fiori Launchpad)
    var sRootPath = jQuery.sap.getModulePath("DisplayMonth");


  },
});
Step 3) Index.html code
Next, let us tell our index.html file to load Component.js when the application is accessed. Write the below code in the index.html file.
<!DOCTYPE HTML>
<html>
	<head>
	// adding meta tags to tell IE browser to render the page in IE-edge mode.
	<meta http-equiv="X-UA-Compatible" content="IE=edge">
	// adding meta tag to tell eclipse to use UTF 8 as character encoding
	<meta http-equiv='Content-Type' content='text/html;charset=UTF-8'/>
	// Bootstrap script to tell ui5 designtime and runtime to use sap.m library, use //blue-crystal these and use complex binding syntax
		<script src="resources/sap-ui-core.js"
				id="sap-ui-bootstrap"
				data-sap-ui-libs="sap.m"
				data-sap-ui-theme="sap_bluecrystal"
				data-sap-ui-xx-bindingSyntax="complex"
				data-sap-ui-resourceroots='{"DisplayMonth": "./"}'>
		</script>

		<script>

				sap.ui.getCore().attachInit(function() {
				    new sap.m.Shell({
				      app: new sap.ui.core.ComponentContainer({
				        height : "100%",
				        name : "DisplayMonth"
				      })
				    }).placeAt("content");
				  });
		</script>

	</head>
// start of body of SAPUI5 application. It contains a div element.
	<body class="sapUiBody" role="application">
		<div id="content"></div>
	</body>
</html>
Step 4) DisplayMonthView.view.xml code
Next, let us write code in our displaymonth view to display the Month whose number is received from the parent Component.
<html:style>
	#__xmlview1--id{
	margin-left: 30rem;
    margin-top: 9rem;
    font-size: 6rem;
    font-style: italic;
    background-color: burlywood;
	}
</html:style>
	<App id="fioricontent">
		<Page title="Child Component">
			<content>
				<Text id="id" xmlns="sap.m" text="{myModel>/monthname}"></Text>
			</content>
		</Page>
	</App>
After you’ve pasted the above code, your view should look like below.

Step 5) DisplayMonthView.controller.js code
And finally, let us write the code of DisplayMonthView’s Controller file.
The code is written only in the onInit() hook method, so only that is pasted here. The rest of the file is as generated by the framework.
onInit : function() {
		sap.ui.getCore().getEventBus().subscribe("exchange", "data",
				function(channel, event, oEventData) {
					jsonModel = new sap.ui.model.json.JSONModel({
						monthumber : oEventData,
						monthname : ''

					});

					// derive month name from month number
					switch (jsonModel.oData.monthumber) {
					case "1":
						jsonModel.oData.monthname = 'January';
						break;
					case "2":
						jsonModel.oData.monthname = 'February';
						break;
					case "3":
						jsonModel.oData.monthname = 'March';
						break;
					case "4":
						jsonModel.oData.monthname = 'April';
						break;
					case "5":
						jsonModel.oData.monthname = 'May';
						break;
					case "6":
						jsonModel.oData.monthname = 'June';
						break;
					case "7":
						jsonModel.oData.monthname = 'July';
						break;
					case "8":
						jsonModel.oData.monthname = 'August';
						break;
					case "9":
						jsonModel.oData.monthname = 'September';
						break;
					case "10":
						jsonModel.oData.monthname = 'October';
						break;
					case "11":
						jsonModel.oData.monthname = 'November';
						break;
					case "12":
						jsonModel.oData.monthname = 'December';
						break;

					}
					this.getView().setModel(jsonModel, "myModel");

				}, this);
	},
Step 6) Deployment of the application on SAP NetWeaver Gateway Server
Deploy the project and give the technical name of the BSP application generated on the ABAP frontend server. Let the name be zdisplaymonth. Your project should look like below.

PART 2) Creating a Parent Component
Now it is time to create a new Component (Parent Component) which will consume the Component we created so far in this tutorial.
Step 1) Create a new SAPUI5 application
Go to File->New->Other->SAPUI5 Application Development->Application Project. Then follow the wizard instructions to create a new SAPUI5 application project. This has been described in detail in Step 1 of Part 1 in this tutorial above.
The name of the parent Component project is PassNum. The technical name of the BSP application generated after deployment is zpassnum. The project structure will look like below.

Let us now write code in index.html, Component.js, PassNum.view.xml, and PassNum.controller.js files.
Step 2) Source Code of Index.html of the Parent Component
<!DOCTYPE HTML>
<html>
	<head>
// adding meta tags to tell IE browser to render the page in IE-edge mode.
	<meta http-equiv="X-UA-Compatible" content="IE=edge">
// adding meta tag to tell eclipse to use UTF 8 as character encoding
	<meta http-equiv='Content-Type' content='text/html;charset=UTF-8'/>
// Bootstrap script to tell ui5 designtime and runtime to use sap.m library, use //blue-crystal these and use complex binding syntax
		<script src="resources/sap-ui-core.js"
				id="sap-ui-bootstrap"
				data-sap-ui-libs="sap.m"
				data-sap-ui-theme="sap_bluecrystal"
				data-sap-ui-resourceroots='{"PassNum": "./"}'>
		</script>
		<script>
				  sap.ui.getCore().attachInit(function() {
				    new sap.m.Shell({
				      app: new sap.ui.core.ComponentContainer({
				        height : "100%",
				        name : "PassNum"
				      })
				    }).placeAt("content");
				  });

		</script>

	</head>
// start of Body of SAPUI5 application, Contains a div tag,
	<body class="sapUiBody" role="application">
		<div id="content"></div>
	</body>
</html>
Step 3) Source code of Component.js file of Parent Component
sap.ui.core.UIComponent.extend("PassNum.Component", {

	metadata: {
	    "name": "PassNum",
	    "dependencies": {
	      "components": []}
	    },

createContent: function() {
    var oViewData = {
      component: this
    };

// Creating Reference of a PassNum XML view
    var  myView = sap.ui.view({
      viewName: "PassNum.passnum.PassNum",
      type: sap.ui.core.mvc.ViewType.XML,
      viewData: oViewData
    });

     return(myView);
  },

  init: function() {
    // call super init (this will call function "create content")
    sap.ui.core.UIComponent.prototype.init.apply(this, arguments);
    // ensure to use absolute paths relative to own component
    // (running in the Fiori Launchpad, relative paths will fail)
    var sRootPath = jQuery.sap.getModulePath("PassNum");

  },
});
Step 4) Source code of PassNum.view.xml file
<Page title="Parent Component">
		<content>

			<VBox xmlns="sap.m" id="vboxid">

			<items>
				<Button xmlns="sap.m" id="1" text="First" press="clickbutton"
					class="sapUiSmallMarginEnd"></Button>
				<Button xmlns="sap.m" id="2" text="Second" press="clickbutton"
					class="sapUiSmallMarginEnd"></Button>
				<Button xmlns="sap.m" id="3" text="Third" press="clickbutton"
					class="sapUiSmallMarginEnd"></Button>
				<Button xmlns="sap.m" id="4" text="Fourth" press="clickbutton"
					class="sapUiSmallMarginEnd"></Button>
				<Button xmlns="sap.m" id="5" text="Fifth" press="clickbutton"
					class="sapUiSmallMarginEnd"></Button>

				<core:ComponentContainer id="conpcontid"
					name="DisplayMonth" manifestFirst="true" component="zdisplaymonth"></core:ComponentContainer>

				</items>
			</VBox>

		</content>
	</Page>
After you use the above code in your view, your view should look like below.

Step 5) Source code of PassNum.controller.js
Only the onInit() method has been changed. Everything else in this file remains the same.
onInit: function() {

	jQuery.sap.registerModulePath("DisplayMonth", "../zdisplaymonth");
	},

	clickbutton:function(oEvent)
	{
		sap.ui.getCore().getEventBus().publish("exchange",
				"data", oEvent.oSource.sId.split("--")[1]);


	}
Step 6) Deployment of Parent Component to SAP NetWeaver Gateway Server
Deploy the application on the ABAP frontend server and run it. You should be able to run it by right-clicking on the project and clicking the ‘Run on ABAP server’ option.

The below URL will open up in the Eclipse browser.
http://hostname:8000/sap/bc/ui5_ui5/sap/zpassnum/index.html
Copy the URL and run it in the actual browser. In the above hostname (marked in yellow) is the hostname of your ABAP frontend server.
Output

Click on the ‘First’ button, and January should display in the Child Component.

Enjoy creating beautiful, responsive web applications using SAPUI5.