JIRA Tutorial for Beginners
Smart Summary
Jira Tutorial for Beginners introduces Jira as a comprehensive tool for bug tracking, issue tracking, and project management developed by Atlassian. It enables efficient software lifecycle management by providing integrated workflows, customizable issue types, and Agile-friendly reporting tools that enhance team collaboration and productivity.

What is Jira?
Jira is a tool developed by the Australian Company Atlassian. This software is used for bug tracking, issue tracking, and project management. The name ‘Jira’ comes from the Japanese word ‘Gojira,’ meaning Godzilla. The basic use of this tool is to track issues and bugs related to your software and Mobile apps.
It is also used for project management. The Jira dashboard consists of many useful functions and features that make handling issues easy. Some of the key features are listed below. In this Jira tutorial for testers, you’ll learn about Jira Defect and Project tracking software
What is Jira used for?
Jira software can be used for the following purposes:
- Requirements and Test case management.
- In Agile Methodology.
- Project Management.
- Software Development.
- Product Management.
- Task Management.
- Bug Tracking.
How to Use Jira for Beginners?
Here is a step-by-step process for beginners on how to use Jira software:
- Step 1) Open Jira software and navigate to the Jira Home icon.
- Step 2) Select the Create project option.
- Step 3) Choose a template from the library.
- Step 4) Set up the columns as per your needs from Board settings.
- Step 5) Create an issue.
- Step 6) Invite your Team members and start working.
Which Teams Can Jira Help?
Below are 7 different teams that leverage Jira to achieve their goals.
- Software Development Teams.
- Agile Teams.
- Project Management Teams.
- DevOps Teams.
- Product Management Teams.
- Marketing Teams.
- Customer Service Teams.
Now that you understand what Jira can do and who uses it, let’s explore the core concepts that make Jira work—starting with schemes and issue types.
Test Management in Jira
Tricentis Test Management for Jira
You can use Tricentis Test Management for Jira as a test management solution. It allows me to handle all planning, tracking, and reporting directly within Jira.
![]()
It has an intuitive UI and uses Jira issues to define requirements and test cases, ensuring that QA and development share visibility into a single testing record. Unlike many of today’s Jira extensions, Test Management for Jira is low-cost and stays fast and performant as your team and projects grow, so you can scale without worry. Available for Jira Cloud.
Features of Tricentis Test Management for Jira
- Centralized Test Management: Integrates testing with Jira to align QA, development, and product teams.
- AI-Powered Test Case Generation: Automatically generates test cases from requirements using AI.
- Real-Time Reporting: Provides immediate insights with detailed analytics on test execution.
- Flexible Test Case Management: Supports creating, organizing, and managing test cases with features like cloning and bulk updating.
- Third-Party Tool Integration: Allows management of manual and automated testing within Jira through external tool integration.
Jira Scheme
Inside the Jira scheme, everything can be configured, and it consists of
- Workflows.
- Issue Types.
- Custom Fields.
- Screens.
- Field Configuration.
- Notification.
- Permissions.
Jira Issues and Issue Types
This section in this Jira tutorial for beginners will guide you through Jira Software Issues and their types.
What is a Jira Issue?
An issue is the fundamental unit of work in Jira. Everything you track—whether it’s a bug, a feature request, or a task—is represented as an issue.
Jira issues would track bugs or issues that underlie the project. Once you have imported the project, you can create issues.
Under Issues, you will find other useful features like
- Issue Types.
- Workflows.
- Screens.
- Fields.
- Issue Attributes.
Now, in this Jira Agile tutorial, let us see Jira issues in detail:
Jira Issue Types
Issue Type displays all types of items that can be created and tracked via the Jira testing tool. Jira Issues are classified under various forms, such as new feature, sub-task, bug, etc., as shown in the screenshot.
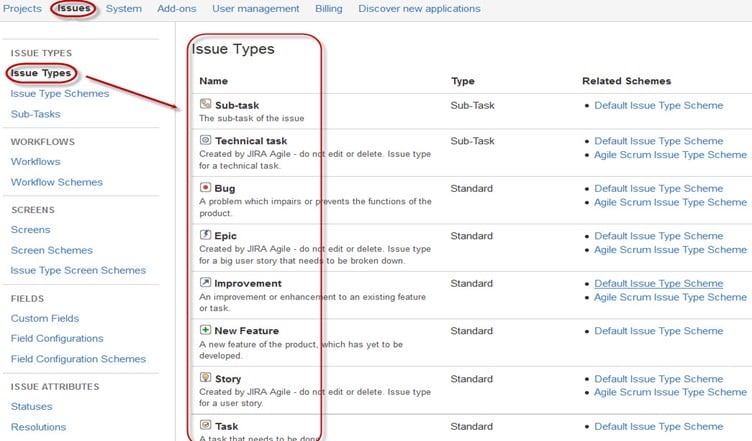
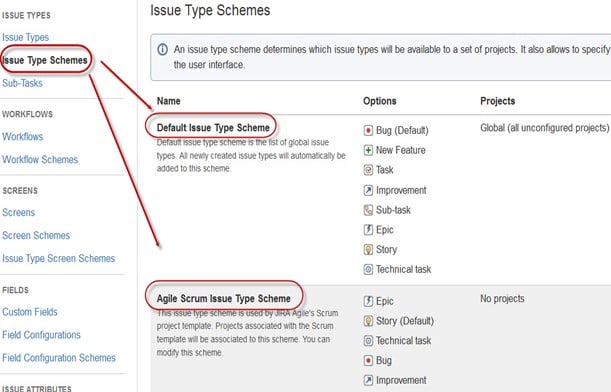
There are two types of issue type schemes in the Jira project management tool:
- Default Issue Type Scheme: In the default issue type scheme, all newly created issues will be added automatically to this scheme.
- Agile Scrum Issue Type Scheme: Issues and projects associated with Agile Scrum will use this scheme.
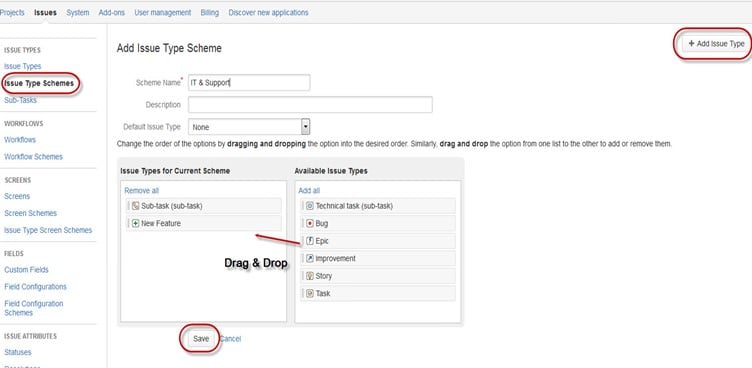
Apart from these two issue type schemes, you can also add schemes manually as per requirement. For example, we have created an IT & Support scheme, and for this, we will drag and drop the issue types from the Available Issue type to the Issue type for the current scheme, as shown in the screenshot below:
Jira Components
Jira Components are sub-sections of a project used to group related issues within a project into smaller parts. Components add some structure to the projects, breaking them up into features, teams, modules, subprojects, and more. Using components, you can generate reports, collect statistics, and display them on dashboards and so on.
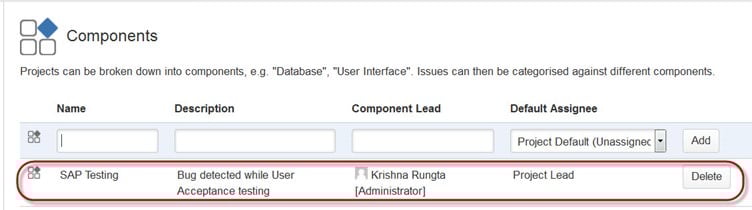
To add new components, as shown in the above screen, you can add a name, description, component lead, and default assignee.
Jira Screen
When the issue is created in Jira, it will be arranged and represented in different fields; this display of the fields in Jira is known as a screen. This field can be transitioned and edited through workflow. For each issue, you can assign the screen type as shown in the screenshot. To add or associate an issue operation with a screen, you have to go to the main menu, click on Issues, click on Screen Schemes, and then click on “Associate an issue operation with a screen,” and add the screen according to the requirement. In this Jira tutorial for testers, we will learn about Jira Issue Attributes.

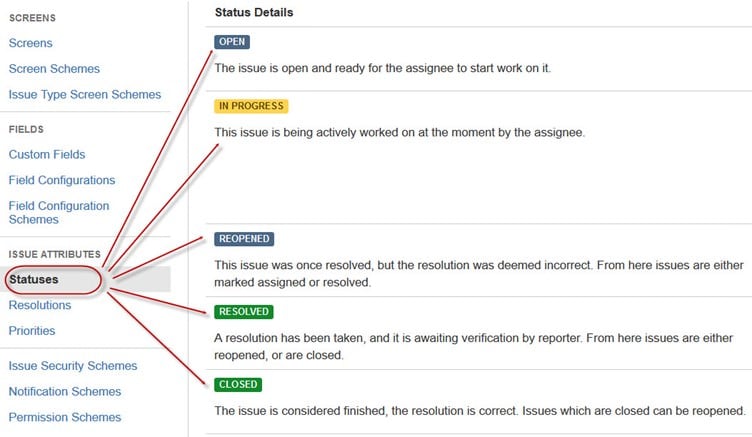
Jira Issue Attributes
Issue Attributes encompass:
- Statuses.
- Resolutions.
- Priorities.
Statuses: Different statuses are used to indicate the progress of a project, like To Do, InProgress, Open, Closed, Reopened, and Resolved. Likewise, you have resolutions and priorities. Resolutions again tell about the progress of the issue, like Fixed, Won’t fix, Duplicate, Incomplete, Cannot reproduce, Done. Also, you can set the priorities of the issue, whether an issue is critical, major, minor, blocker, or trivial.
Issue Security Schemes
This function in Jira allows you to control who can view the issues. It consists of a number of security levels, which can have users or groups assigned to them. You can specify the level of security for the issues while creating or editing an issue.
Similarly, there is a Default Permission Scheme. Any new project that is created will be assigned to this scheme. Permission Schemes allow you to create a set of permissions and apply this set of permissions to any project.
System Administration
Some of the useful features that the Jira admin provides to users are:
- Audit Log
Under Audit Log, you can view all the details about the issue created and the changes made to the issue. - Issue Linking
This will show whether your issues are linked to any other issue that is already present or created in the project. Also, you can deactivate issue linking from the panel itself. - Mail in Jira
Using the Mail system in admin, you can mail issues to an account on a POP or IMAP mail server or messages written to the file system generated by an external mail service. - Events
An event describes the status, the default template, the notification scheme, and workflow transition post-function associations for the event. The events are classified into two types: System event (Jira-defined events) and Custom event (User-defined events). - Watch list
Jira allows you to watch a particular issue, which informs you about notifications of any updates relating to that issue. To watch an issue, click on the word “watch” in the issue window. To see who is watching your issues, click on the number in brackets. - Issue Collectors
In the form of Jira issues, an issue collector allows you to gather feedback on any website. In administration, if you click on Issue Collectors, an option will open asking to Add an Issue Collector. Once you have configured the look and feel of an Issue Collector, embed the generated JavaScript in any website for feedback. - Development Tools
You can also connect your Software development tools, including the Jira testing tool, to Jira using this admin function. You have to enter the URL of the application to connect with Jira.
With the foundational concepts covered, let’s put them into practice by creating your first issue in Jira.
How to create an issue in Jira
In this section, you shall learn how to create and manage issues in Jira, starting with setting up a project. I will guide you through the step-by-step process I use to create, edit, and summarize an issue in Jira, an effective tool for testing.
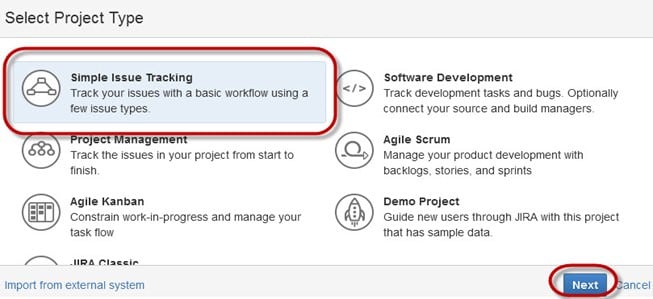
Step 1) Open Jira software and log in with your ID and password.
Once you log in, Jira opens the Dashboard, where you can access your projects. Under the free Jira dashboard, you will find the option Project; when you click on it, it will open a window that lists options like Simple Issue Tracking, Project Management, Agile Kanban, Jira Classic, and so on, as shown in the screenshot below.
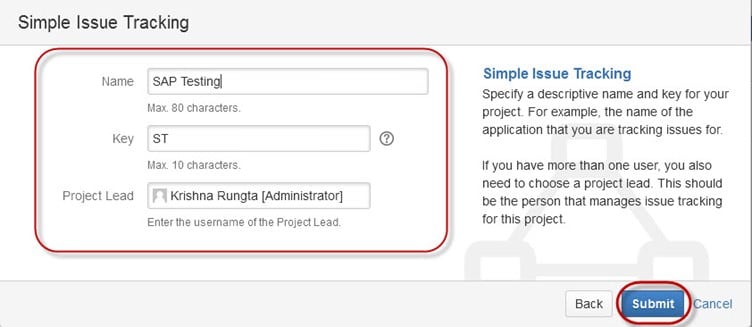
Step 2) Provide issue details.
When you click on the option Simple Issue Tracking, another window will open, where you can mention all the details about the issue and assign the issue to the responsible person.
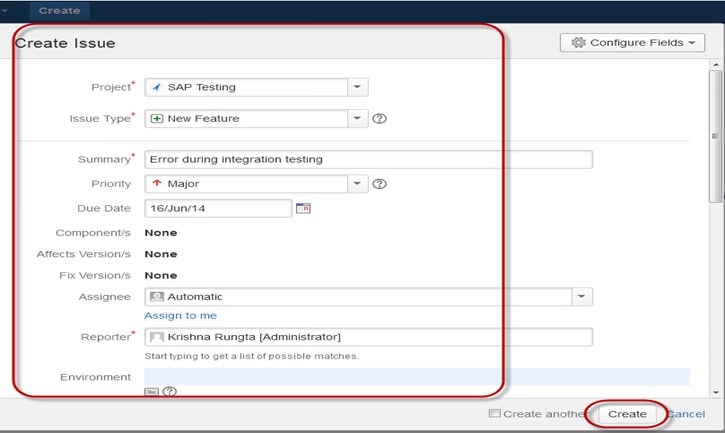
Step 3) Provide detailed information to create an issue.
When you click on the “Submit” button, a window will open where you can perform a list of tasks like creating issues, assigning issues, checking the status of issues like resolved, In-Progress, or closed, and so on.
Once the issue is created, a pop-up will appear on your screen saying your issue has been created successfully, as shown in the screenshot below:

Step 4) Open the Issues menu to search and perform multiple functions on issues.
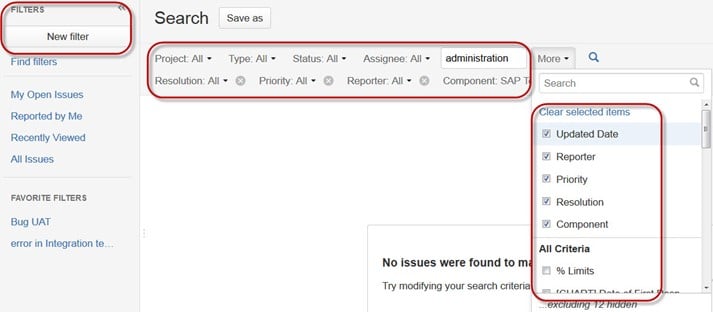
Now, if you want to edit an issue or export the issue to an XML or Word document, then you can hover your mouse on the main panel and click on Issues. Under Issues options, click on Search for issues, which will open a window from which you can locate your issues and perform multiple functions.
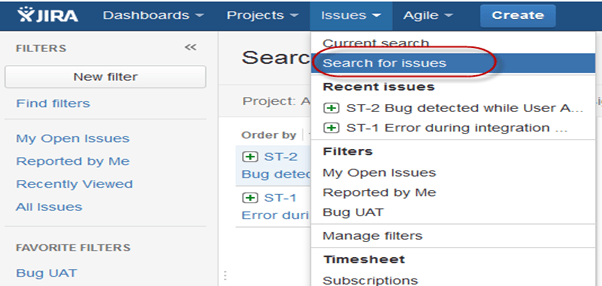
When you select the “search for Issues” under Issues, a window will appear as shown in the screenshot:
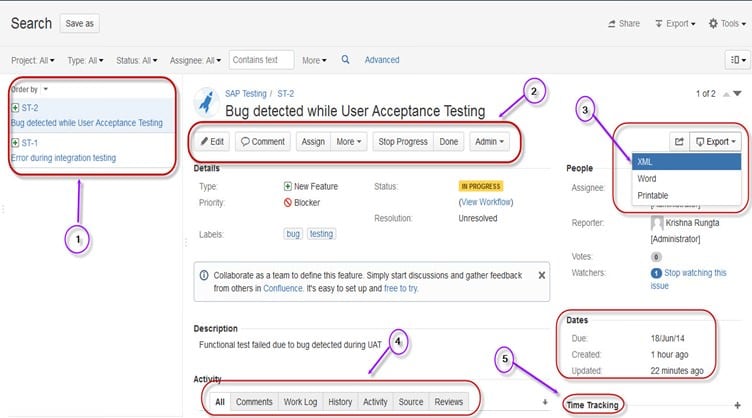
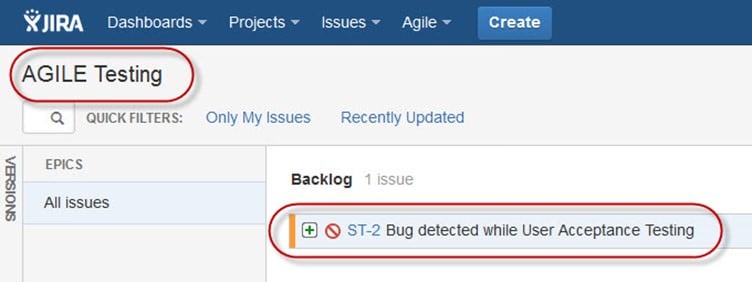
- The Search for issues option will bring you to a window where you can see the issues you created. For example, here we have issues ST1 and ST2.
- Here in the screenshot, you can see the issue “Bug detected while User Acceptance Testing” and all the details related to it. From here, you can perform multiple tasks, such as stopping the progress on issues, editing the issues, commenting on the issues, assigning issues, and so on.
- You can even export issue details to an XML or Word document.
- Also, you can view the activity going on the issue, reviews on the issue, work log, history of the issue, and so on.
-
Under the time tracking option, you can see the estimated time to resolve the issues.
In the same window, you can set a filter for the issue and save it under Favorite Filters, so when you want to search or view a particular issue, you can locate it using the filter.
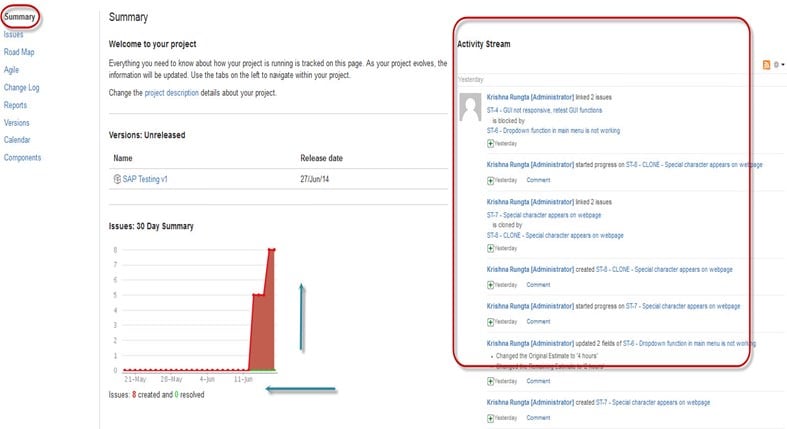
Step 5) Click on the Summary option to view the details about issues
To view the summary of the issue, you can click on the options summary; this will open a window that will show all the details of your project and progress on this chart. On the right-hand side of the summary window, there is an Activity Stream, which gives the details about the issues and comments made by the assignee on the issue.
Sub-Task
Subtask issues are useful for splitting up a parent issue into several smaller tasks that can be assigned and tracked separately. It addresses issues more comprehensively and segregates the task into smaller chunks to be done.
How to create a Sub-Task?
Sub-tasks can be created in two ways:
- Create a sub-task under the parent issue.
- Creating an issue as a sub-task.
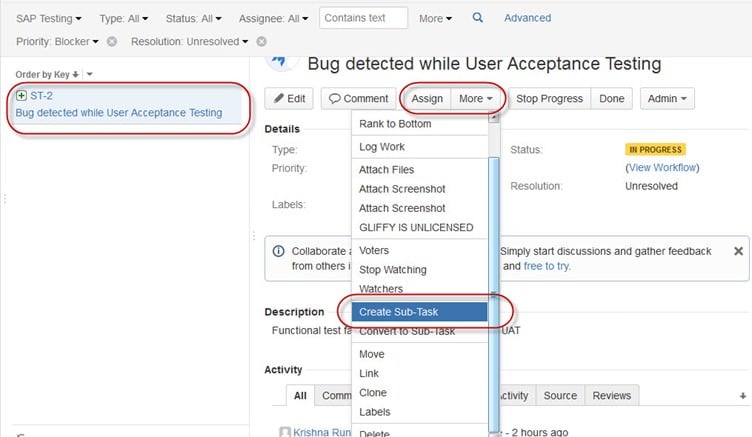
To create a subtask in Jira, you have to select an issue to which you want to assign the subtask. Under the issue window, click on the Assign more option, and then click on Create subtask, as shown in the screenshot below. You can also select convert to subtask under the same tab to convert the parent issue into a subtask.
Once you click Create Sub-Task, a window will pop up to add a sub-task issue. Fill in the details about the sub-task and click on Create, as shown below, and this will create a sub-task for the parent issue.

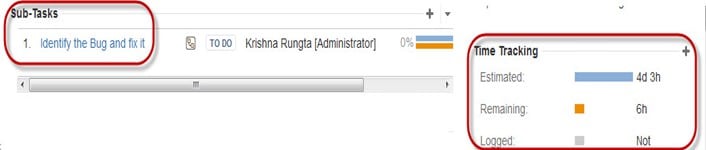
It will create a sub-task under parent issues, and details will appear about when to complete the task on the issue type page, as shown in the screenshot below. If you want to add more sub-tasks, you can click on the plus (+) sign in the corner of the sub-task panel. Likewise, if you want to note the time spent on the present task, click on the (+) plus sign in the corner of the time tracking and put down the details in the log sheet.
Some important points to remember while creating a Sub-Task:
- You can have as many sub-tasks as needed under an Issue.
- You cannot have a sub-task for a sub-task.
- Once a sub-task is created under a parent, the parent cannot be converted into a sub-task.
- A sub-task can, however, be converted into a parent issue.
- You can work on your sub-task without having to navigate away from the parent issue.
WorkFlows
A Jira workflow is a set of statuses and transitions an issue undergoes during its lifecycle. Once the issue is created, the workflow encompasses five main stages.
- Open Issue.
- Resolved Issue.
- InProgress Issue.
- Reopened Issue.
- Close Issue.
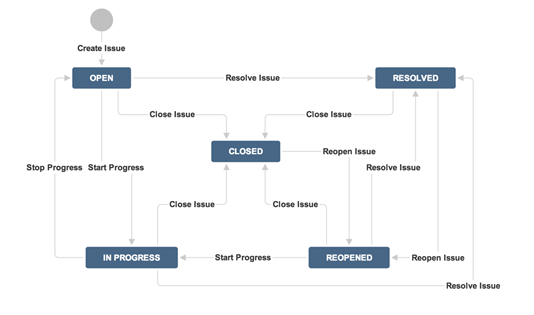
Workflow in Jira comprises statuses, assignees, resolutions, conditions, validators, post-functions, and properties.
- Statuses: These represent the positions of the issues within a workflow.
- Transitions: Transitions are the bridges between statuses, the way a particular issue moves from one status to another.
- Assignee: The assignee dictates the responsible party for any given issue and determines how the task will be executed.
- Resolution: It explains why an issue transitions from an open status to a closed one.
- Conditions: Conditions control who can perform a transition.
- Validators: It can ensure that the transition can happen, given the state of the issue.
- Properties: Jira recognizes some properties on transitions.
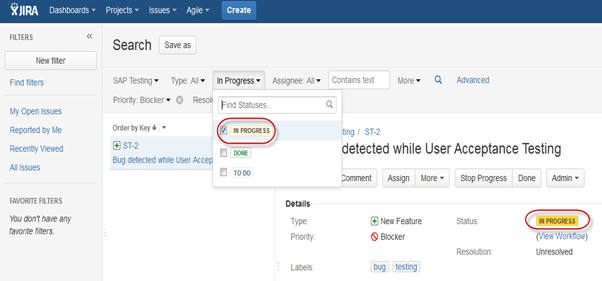
You can assign the issue’s status from the window itself when you click on the check box for IN Progress status, as shown in the screenshot below. The status will be reflected in the issue panel highlighted in yellow.
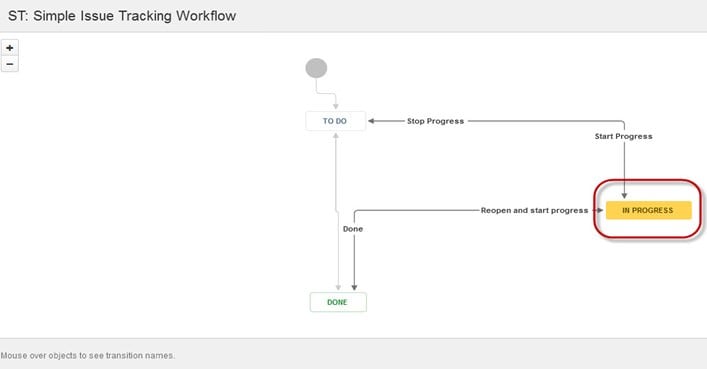
For the issue we have created, Jira will present a workflow that maps the project’s progress. As shown in the screenshot, whatever status we have set in the Issue panel will be reflected in the Workflow chart. We have set the issue status to “In Progress,” and the same status is updated in the workflow, highlighted in yellow. Workflow can give a quick overview of the work in process.
Plug-ins in Jira
There are plug-ins available for Jira to work more effectively; some of these plugins are Zendesk, Salesforce, GitHub, Gitbucket, etc. Some of them enable the support team to report issues directly to Jira, create unlimited private repositories with full-featured issue and test management support, etc.
Jira Agile
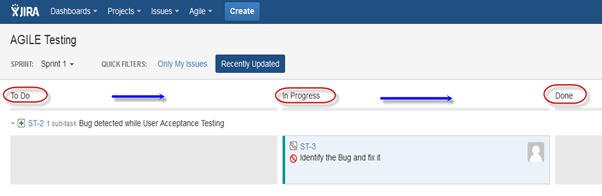
The Agile or Scrum method is generally used by development teams that follow a roadmap of planned features for upcoming versions of their product. Agile follows the same roadmaps to track its issues as in other Jira methods: To do -> In Progress -> Done. As shown in the screenshot below, we have one issue in To Do and the second in In Progress. Once the issue in In Progress is resolved, it will move to Done status, and in the same way, the issue in To Do will move to the next stage, In Progress.
Creating an issue in Agile
To create an Agile issue, go to the main menu under the Agile tab and click on “Getting Started.” When you click on it, it will ask you to create a new board for the issues for Scrum or Kanban. You can choose your option as per your requirement; here we have selected the Scrum method.
How to create an Epic in Agile

In Jira Agile, an epic represents a large user story that can be divided into smaller stories. The epic captures a large body of work. It is a large user story that can be broken down into several small stories. To complete Jira Epic, it may take several sprints. You can either create a new epic in Agile or use the issue you have created in a normal Jira board. Likewise, you can also create a story for agile scrum.
Plan Mode in Agile:
Plan mode displays all the user stories created for the project. You can use the left-hand side menu to decide the basis on which the issues must be displayed. While on the right-hand side menu, clicking on the issue, you can create subtasks, logwork, etc.
Work Mode in Agile
It will display the active sprint information. All the issues or user stories will be displayed in three categories, as shown in the screenshot below: To do, In Progress, and Done, to show the progress of the project or issues.
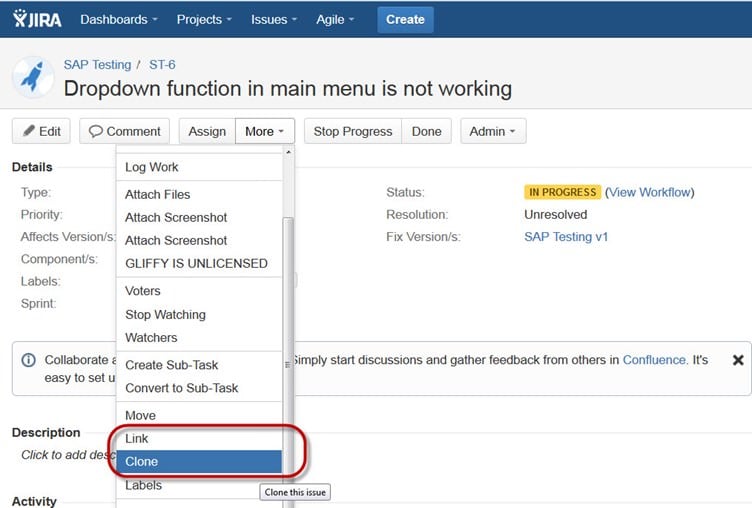
Use of Clone and Link in Jira
In Jira, you can also clone the issue; one advantage of cloning an issue is that different teams can work separately on the issue and resolve it quickly.
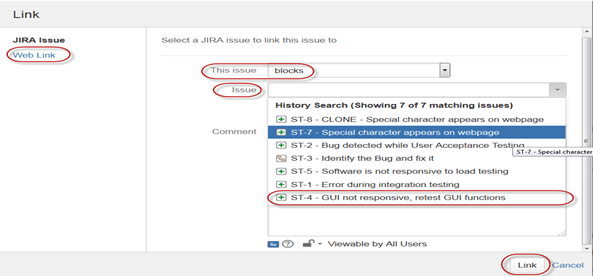
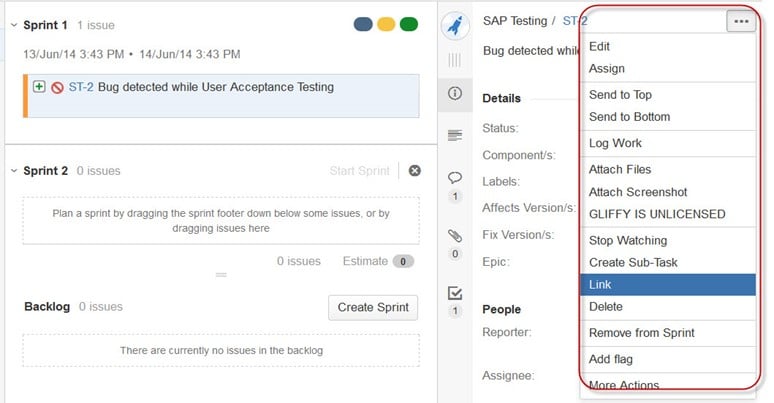
There is another useful function, Jira Link. Issue linking allows you to create an association between two existing issues on either the same or different Jira servers. As shown in the screenshot, we have linked the current issue, “ST-6 Drop down menu is not working,” with another issue, ” ST-4 GUI is not responsive- retest GUI functions.”
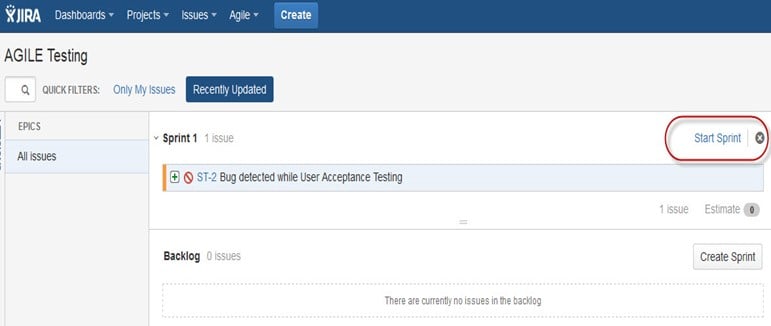
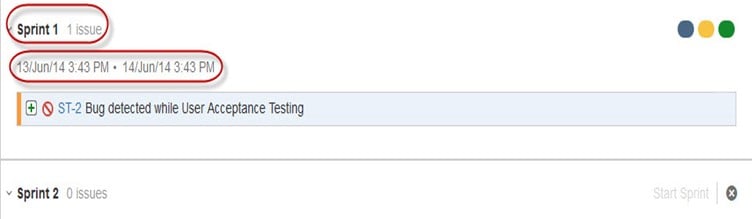
Like here, we have set a sprint for 1 day, and it will run for that specific time period, as shown in the screenshot below. If you are working with Scrum and want to prioritize the issue or rank the issue, then you just have to drag and drop the issue into the backlog.
Apart from this, there are multiple tasks that you can do; for instance, if you click on the right-hand corner of the window, a list of functions will pop up that you can use as per your need.
Reports in Jira
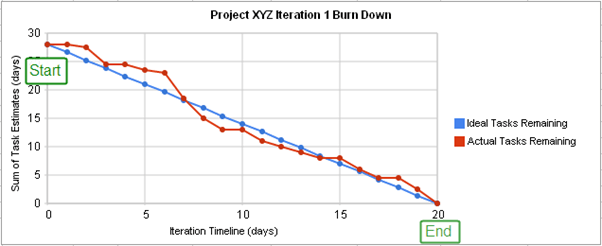
To track the progress in Agile, a Burndown Chart shows the actual and estimated amount of work to be done in the sprint. A typical burndown chart will look somewhat like this, where the red line indicates the actual task remaining while the blue line indicates the ideal task remaining during the scrum cycle.
Apart from the burn-down chart, there are other options available in Jira automation, like Sprint Report, Epic Report, Version Report, Velocity Chart, Control Chart, and Cumulative flow diagram. You can also use different chart options to represent the progress of your project.

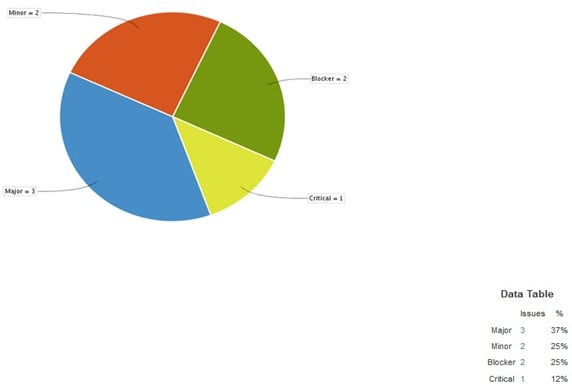
Like the screenshot above, we have selected a pie chart for issue priorities. It will generate a Pie Chart representing the priorities and severity of the issues in percentage for the whole project, as shown below. You can view the pie chart from different perspectives, like Assignee, Components, Issue Type, Priority, Resolution, Status, etc.
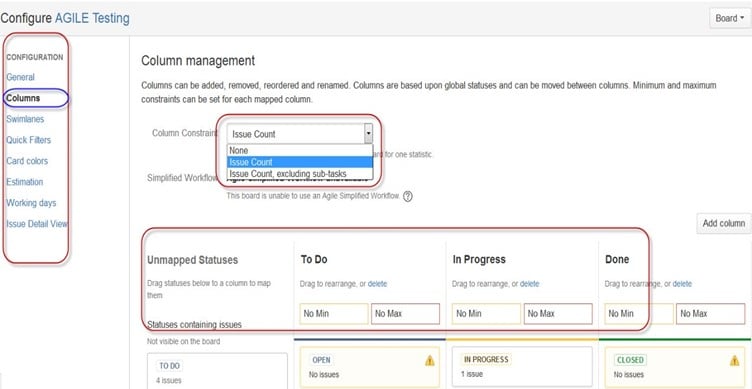
You can also configure how you want to see the Scrum board. The Scrum board gives various options through which you can make changes to your board’s appearance. Various features you can configure using Scrum are Columns, Swimlanes, Quick Filters, Card colors, and so on. Here, we have selected column management and selected the option Issue count, and it will show the total number of issues in progress, to do, or done. In column management, we can add an additional column as per our requirement; likewise, there are different features you can configure on the board.
Filters
You can also set filters other than the default filters to filter the issues. The filters that you can use are date, component, priority, resolution, and so on.
Kanban Board and Managing issues
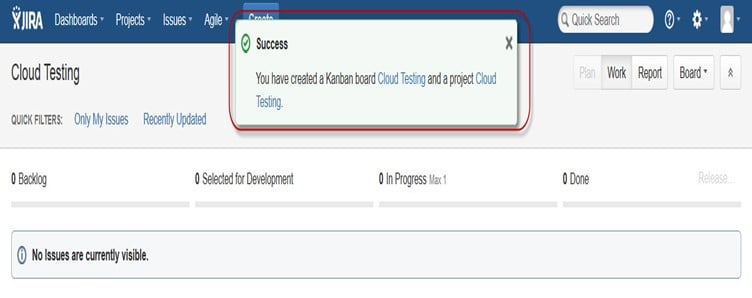
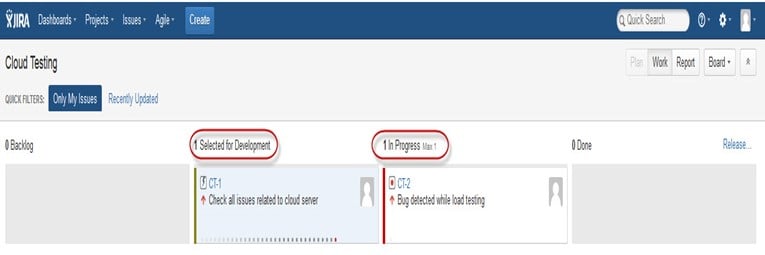
Like the Agile Scrum board, we can also create a Kanban Board. We have created a project named Cloud Testing. A Kanban board is useful for the team that manages and constrains their work in progress. Kanban boards are visible in Work mode but not in Plan mode.
Here we have created an issue ” Bug detected while load testing” and “Check issues related to cloud server” in the Kanban Board as shown in the screenshot below, which also shows their status as highlighted in red.
Kanban is considered the best methodology for bug fixing and maintenance releases, where incoming tasks are prioritized and then worked on accordingly. There are a few measures that can make Kanban more efficient.
- Visualize your workflow.
- Limit the work in progress.
- Work on Issues.
- Measure the cycle time.
Jira Scrum vs. Jira Kanban
From my experience, I can highlight the significant contrasts between Jira Scrum and Jira Kanban.
| Scrum | Kanban |
|---|---|
| Reports Burndown Chart: The chart shows all the changes and scope changes while the sprint is still on; other charts include the Sprint Report, Velocity Chart, Epic Report, etc. |
Reports Control Chart: It allows you to measure the cycle time for issues, showing the mean time and actual time taken to complete issues. |
| Agile Board It allows the team to see the progress of sprints. This is the work mode, where you can see the board itself broken down into different statuses. |
Constraints The team can decide whether to increase or decrease the number of issues that should be displayed in each status. |
| Backlog This is where the team will plan sprints and estimate stories going into each sprint. |
Workflow You can map columns to the statuses of your workflow. Simply by adding or removing columns, the workflow can be changed when required. |
How Can AI Tools Transform the Way You Use Jira?
Jira integrates seamlessly with hundreds of tools to automate workflows and boost productivity. You can connect Jira with Slack, GitHub, Jenkins, and Confluence for real-time updates and collaboration. With AI-powered integrations like Atlassian Intelligence, Tricentis Test Management, and Zapier, teams can automate repetitive tasks, generate test cases, and gain predictive insights into project performance. AI assistants can summarize issues, recommend assignees, and even prioritize tickets automatically. By combining Jira’s flexibility with AI automation, organizations reduce manual effort, improve accuracy, and accelerate delivery. These intelligent integrations turn Jira into a proactive project partner — helping teams plan smarter, execute faster, and deliver better results.