MANTIS Bug Tracker Tutorial
What is Mantis Bug Tracker?
Mantis is an open source bug tracking software that can be used to track software defects for various software projects. You can easily download and install the Mantis for your use. Mantisbt now also provides a hosted version of the software. You can easily customize Mantis to map your software development workflow.
Some salient features of Mantis Bt are
- Email notifications: It sends out emails of updates, comments, resolutions to the concerned stakeholders.
- Access Control: You can control user access at a project level
- Customize: You can easily customize Mantis as per your requirements.
- Mobile Support: Mantis supports iPhone, Android, and Windows Phone Platforms.
- Plugins: An ever-expanding library of plugins to add custom functionality to Mantis Issue Tracker.
How to Report an Issue
There is no need to download Mantis, you use the online demo
Step 1) Log into Mantis

Step 2) Once you login to Mantis your user-name will be displayed on the top of the Mantis main screen and now you can report your issue into the Mantis by clicking on the option “Report Issue” as shown below.

Step 3) In the next Screen
- Enter Bug Category
- Enter Reproducibility
- Enter Severity
- Enter Priority
- Enter Platform Details
- Enter Summary of the Bug Report
- Enter Description
- Enter Steps to reproduce the error
- Click Submit Report

NOTE: The fields you see in your version of Mantis will defer. Refer our section on Custom Fields for the same.
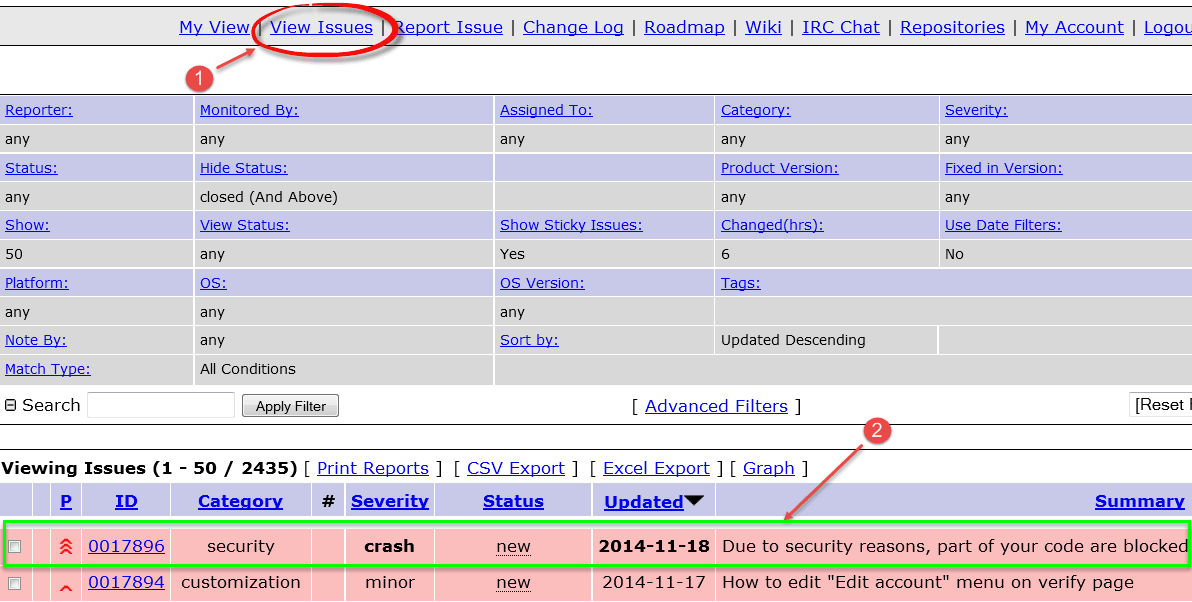
Step 4)After entering all the details in the report window, we will submit a report and soon our report will be displayed on the main window. As show in the screen-shot below, when you click on view issue, the issue will appear on the screen with the id “0017896” also, it shows the status as new and also the date when it was created.
The issues in the Mantis Tool are highlighted according to the status of an issue. For example here the issue is in acknowledged status, therefore, highlighted in light orange.

For different statuses, different colors are allotted.
Step 5) When you click on your issue #id 0017896, it will show the issue in more details like project reporter, its status, date submitted and last updated.

Step 6) Apart from these, you can add a file, documents, images to your bug as shown below –

Step 7) You can also add comments addressing your issue as shown in the screen-shot below.

Step 8) You can click history at top of the Issue Report, to see issue history. This issue history has details like when the issue was created, or when the file was added to the issue or if there is any note added to the issue.

Step 9) Once the issue is submitted the developer receives an email.

How to Add a Project
Step 1) Under Manage Tab, go to Manage Projects
- Enter Project Name
- Select Status
- Enter Description
- Click Add Project
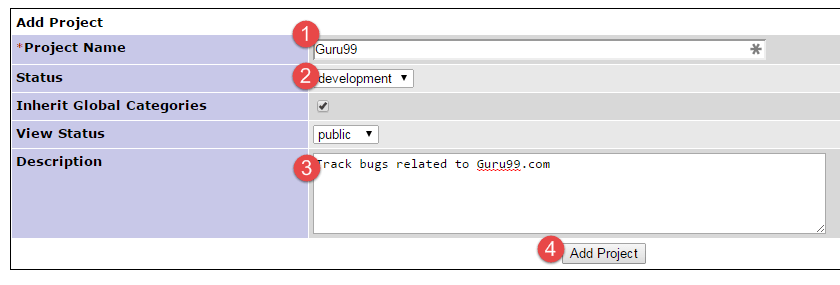
Step 2) Project is created.

How to Create a User
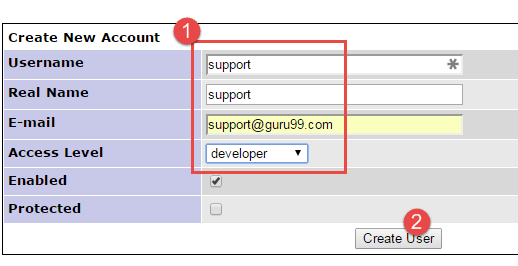
Step 1) Go to Manage > Manage Users. Click “Create New Account”

Step 2)
- Enter
- Username
- Real Name
- Access Level
- Click Create User
Step 3) In the next screen assign user to the desired project.

Step 3) Update Email and other Account Preferences as desired

Step 4) Login credentials are sent to the user on him email.

How to Create Custom Field
Step 1)
- Go to Manage Custom Fields
- Enter Field Name
- Click Button “New Custom Field”

Step 2)
- Select Field Type
- Enter Field Specific Data
- Hit Update Custom Field

Step 4) Custom Field is created

Step 5) Click the Custom Field Again and Link Custom Field to your Project

Step 6) In the Report Issue section, the new custom field is reflected
