How to Find the Source of an Image: 7 Methods

Identifying the source of an image ensures authenticity, supports copyright compliance, and upholds digital ethics. Educators, for example, may want to cite the original creator accurately. They would look for reliable tools or methods to find the source of an image. Understanding where an image came from not only helps maintain credibility but also supports ethical digital practices. That said, online businesses also rely on image verification to prevent misuse or unauthorized representation of their products. Using poor tools or methods can lead to misinformation and copyright infringement. They can produce unreliable or misleading outcomes, causing reputational harm.
After investing over 175 hours and testing 16 different methods, I compiled this guide to simplify the process of finding the source of an image. I aimed to cut through the noise, highlight what truly works, and provide you with clear, actionable steps.
Read more…
Social Catfish is an online tool designed for reverse image searching. The platform searches social media, dating sites, and public records. It is well-suited for tracking down the source of photos and verifying online identities.
Methods to Find the Origin of an Image
Here are the methods that I found to be reliable enough to be used for finding the source of an image safely:
Method 1: Using Reverse Image Search Engines
Reverse image search tools are helpful for bloggers, journalists, analysts, or anyone trying to find information related to an image. These tools can help users trace scams and find the true source of an image. I’ve checked stolen images using several tools. Some results weren’t accurate. In those moments, switching methods or trying other tools really helped. Here are the two tools that I used to perform a reverse image search:
1) Social Catfish
Social Catfish is an online tool designed for reverse image searching. With it, you can upload an image and find where it appears online. The platform searches social media, dating sites, and public records. Social Catfish is well-suited for tracking down the source of photos and verifying online identities. Its results are clear and user-friendly, making the process quick and straightforward.
Reverse-Image Upload: Upload Photo Check
Quick Search: Tracks Millions Fast
Exact Match Engine: More Accurate than Google
Free Trial: 3-Day Trial for $6.87
How to Find the Source of an Image Using Social Catfish
Here are the steps to find the source of an image using Social Catfish:
Step 1) Open Social Catfish website
Open your web browser and visit the official site of Social Catfish. On the homepage, click on the “Image” to search by a photo.

Step 2) Upload image
Click the “upload” button. Select your saved image from your device. Now, press “Continue” to let Social Catfish start the search. Social Catfish will scan its sources for matches.

Step 3) Check result
Review the list of websites and profiles where the image appears. Check each link for details about the image’s origin. Compare the results. Focus on the earliest or most reputable source. This is likely the original. Look for the Original Source.
3-Day Trial for $6.87
2) Spokeo
Spokeo is a comprehensive people search platform that excels at reverse lookups using multiple data points. Unlike traditional image-only searches, Spokeo aggregates information from social networks, public databases, and digital footprints to provide detailed person profiles. The platform’s strength lies in its ability to cross-reference various identifiers, making it ideal for verifying identities and uncovering comprehensive background information with complete privacy protection.

How to Find the Source of an Image Using Spokeo
Follow these steps to find the source of an image with Spokeo:
Step 1) Navigate to the official Spokeo website. Choose your preferred search method from the available options: name, phone number, email or address.

Step 2) Input the available information about the person you’re researching. This could be their full name, email address, phone number, or social media handle. Click “Search Now” to initiate the comprehensive data scan across Spokeo’s extensive database network.
Step 3) Examine the preliminary information displayed, including age estimates, location history, and associated social media accounts. For complete access to detailed reports containing contact information, relatives, and background data, upgrade to the full report for just $0.95 during the trial period.
7-Day Trial for $0.95
3) TinEye
To verify the outcome from Social Catfish, I have taken the help of TinEye. It is another specialized reverse image search engine designed to help users trace the origin and usage history of images online. Unlike standard keyword-based searches, TinEye allows you to upload a photo or enter its URL to discover where it appears on the internet, find higher resolution versions, or identify its source.

Here are the steps to find the source of an image using TinEye:
Step 1) Go to the TinEye website in your web browser. There, you can paste, drag, or upload the image. You can even insert the image URL in the space provided.

Step 2) After uploading the image, click the search button. TinEye will process the image and return results, typically within seconds.
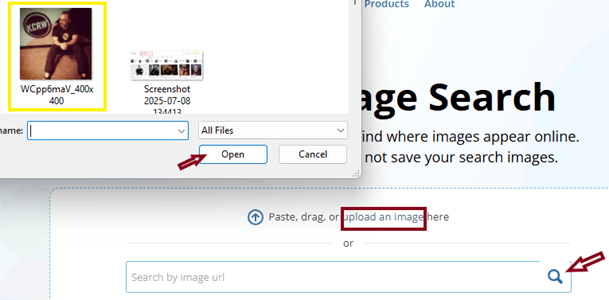
Step 3) Browse through the list of matched images. TinEye displays websites where the image appears, along with date stamps, file sizes, and minor visual variations.

Step 4) Use TinEye’s sorting options to arrange results by “Oldest” (to find the earliest appearance), “Best Match,” or “Biggest Image” (for higher resolution).

Link: https://tineye.com/
Method 2: Using Browser-Based Method
The Browser-based method is a good free alternative to those who don’t want to invest in paid reverse search tools discussed above. Designers and creative teams can avoid copyright claims and legally license images this way. I’ve used Google image search to verify images for client decks and found it critical for risk-free publishing. The issue came when results were too vague or mismatched, so I refined image resolution and keywords to improve accuracy. I even used Bing Visual Search to cross-check the information, which helped me with the results.
Below, I have discussed how I used Google and Bing to find the source of an image:
1) Google
Step 1) Enter the name in Google’s search space and click on the search icon to initiate the search.
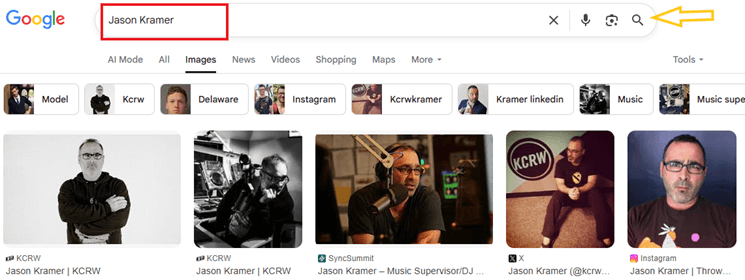
Step 2) From the results generated, right-click on the image that matches your requirement and click on “Search with Google Lens”.

Step 3) This will quickly initiate a reverse image search without leaving the page. It will describe the person in the image and other details, like available photographs, workplace, etc.

Link: https://images.google.com/
2) Bing Visual Search
Step 1) Open the Microsoft Bing search engine and type the name of the person in the search bar to generate the results.

Step 2) From the selected picture, right-click to open “Visual Search”. Bing will generate information related to the image, including the actual source of the image.

Link: https://www.bing.com/
Method 3: Image Metadata Analysis
Image Metadata Analysis is a powerful way to trace where an image came from. For cyber-fraud analysts, it helps expose scam listings, deepfakes, or identity theft attempts. Also, if you’re in brand protection, this method can flag unapproved use of logos or visuals in counterfeit listings. I used Exif.tools to inspect metadata fields and identify the source of a scam image, which helped build a solid evidentiary chain. Some files were scrubbed of metadata, so I combined reverse image searches to cross-verify the details. I always recommend taking the help of multiple methods and tools to keep your analysis sharper and more reliable.

Method 4: Manual Search Techniques
Using manual search techniques to find the source of an image involves analyzing visual clues, watermarks, signatures, filenames, and embedded credits. This helps identify original creators or verify authenticity. It can help academic researchers or students trace back the original creators, uphold plagiarism standards, and meet academic integrity guidelines. These techniques provide a reliable, hands-on approach when reverse image tools fall short.

Method 5: Searching through Social Media Apps
Searching through social media apps like Facebook, Instagram, or Snapchat makes tracking image origins less of a guessing game compared to metadata searching. As a regular user, I’ve used this method to avoid spreading altered content and to stay credible online. Also, this method can help researchers cite original image creators and comply with thesis standards. I found the meme’s creator by digging through repost chains and hashtags. It strengthened my argument in a blog. However, I had to deal with outdated posts and even rotten links, so I used image metadata and timestamp filters to find newer leads.
Method 6: Technical and Advanced Methods
You can also consider using the Content-Based Image Retrieval (CBIR) process to trace an image’s origin by analyzing features like color, shape, and texture. Even cropped or altered files can be tracked. Additionally, you may employ SIFT or SURF algorithms to detect image patterns across edits, rotations, and scaling. Digital Forensics Experts use the CBIR technique to detect image tampering, verify authenticity, and trace the origin of altered visuals. I have also noticed researchers in Computer Vision going for these advanced techniques to improve image recognition systems and machine learning applications.

Method 7: Additional Ways to Find an Image Source
When conventional tools fall short, blend intuition, community help, and basic search strategies to trace an image’s origin.
- Ask Friends or Colleagues: A quick chat may uncover who shared the image first. The most common users are casual social media users, educators, and journalists.
- Hire a Private Investigator or Use Forensic Services: For legal or sensitive cases, professionals may hire a private investigator to trace sources using specialized tools. Usually, victims of fraud and legal teams consider this method.
- Post on Reddit or Similar Forums: Crowdsource knowledge by uploading the image and inviting insights. Researchers and digital detectives are very commonly seen using this method.
- Browse Stock Photo or Hosting Sites (Shutterstock, Getty): Check if the image exists on paid or free repositories. Designers, marketers, and content creators frequently use this process.
- Crop or Edit Then Search: This method is great for reposted or edited content. Whether you are a meme tracker, verification team, or moderator, this approach lets you modify the image slightly to focus on distinct regions or features.
Common Issues in Finding Image Sources (and how to resolve them)
- Issue: Image metadata is often missing, inconsistent, or altered, making it difficult to trace the source or verify authenticity.
Mitigation: I recommend using an advanced metadata analysis tool like Exif.tool to extract and examine any available metadata. It will also help you cross-reference details for inconsistencies. You can even supplement with visual analysis or social media monitoring when metadata is unavailable. - Issue: Images are widely shared and reposted, obscuring the source.
Mitigation: You can combine multiple reverse image search engines and social media monitoring to track the earliest appearance and spread of the image. It helps in identifying the actual source. - Issue: Lack of context or anonymous sharing limits verification.
Mitigation: It is necessary to investigate the accompanying text and seek corroborating evidence from reputable sources. Also, contact the poster for more information. - Issue: Language barriers and regional platforms obscure sources.
Mitigation: You need to use multilingual search tools. Additionally, if you are backed by local experts, it helps in expanding your search and verification efforts.
How can I verify if an online image is authentic or fake?
To verify an image’s authenticity, start with a reverse image search using Social Catfish or TinEye to find its origin. You can even examine metadata using Exif.tools for camera and location info. Additionally, you can scrutinize the image to find out editing signs like pixel mismatches, lighting issues, and blurring scenarios. Finally, look for visual clues like unusual shadows or reflections, and cross-check the context for accuracy.
FAQs
Conclusion
Finding an image’s source is part detective work, part smart searching. You can use free tools like Google or Exif.tools, or consider advanced options like Social Catfish. Whichever route you choose, always cross-verify your findings for accuracy. In a digital world flooded with visuals, tracing origins isn’t just helpful, it’s essential for authenticity and credibility.
Social Catfish is an online tool designed for reverse image searching. The platform searches social media, dating sites, and public records. It is well-suited for tracking down the source of photos and verifying online identities.