How to Find Someone (Person) by Photo

Finding someone using images has become quite easy due to modern search tools and databases. You can track down individuals to find and reconnect with long-lost friends and relatives. It may be necessary to find some unknown people with their pictures for finding their contact information for business, location their social media to approach them for work or friendship, etc.
However, finding someone with a picture without their consent can be illegal if you have malicious intent. It is also considered an invasion of privacy and violation of various privacy guidelines and laws worldwide. Read more…
Social Catfish’s Reverse Image Search is an established leader in reverse search. It is a trustworthy service for finding someone using the name, email, phone, address, or image. Users can use this tool for identifying and investigating an individual through an image.
Therefor, keeping all these in mind I have provided some of the best apps and methods that I reviewed firsthand to find someone by using their picture:
Method 1: How to Find Someone by Photo (Picture) using Social Catfish
Social Catfish combines a reverse-image lookup with a 200+ social- and dating-platform crawler. Upload a face photo and the engine surfaces matching profiles, similar-looking accounts, and links to where the same image appears online. Based on extended testing, it’s strongest for catfishing and online-dating verification scenarios because it cross-checks the same face against multiple platform types in one query. The free preview confirms whether matches exist; the paid report reveals the underlying profile data. Reports are subscription-based with an introductory trial.
Name Search: Yes
Reverse Phone Lookup: Yes
Reverse Address Lookup: Yes
Free Trial: 3-Day Trial for $6.87
Features:
- Reverse Image Search & Pricing: Upload a photo and search across multiple databases to trace the online presence or social profiles connected to that image, now powered by an AI-summarized research report overlay (new 2026) alongside raw match links. The dedicated Image Search plan is $28.97/mo (3-day intro $6.87); the broader Social Search plan runs $27.48/mo (3-day intro $5.73). I found this especially useful when verifying online identities or spotting fake profiles on dating apps. I suggest uploading high-resolution images, as clearer details often improve match accuracy across platforms. This feature connects with both popular and niche image databases, expanding your search reach.
- Facial Recognition Matching: Uses advanced facial recognition technology to identify visual similarities even if the person’s name or details are unknown. When I tested this, it successfully matched images even after they had been cropped or lightly edited. While using this feature one thing I noticed is that angled photos sometimes reduce match accuracy, so use front-facing shots whenever possible. It’s particularly useful when you have limited context or only a visual clue.
- Social Media Linking: Matches the uploaded photo to public social media profiles, helping you track someone’s Instagram, Facebook, LinkedIn, or Twitter accounts easily. I once used this to help a friend confirm if a suspicious profile was real, and it uncovered multiple accounts tied to the same image. It cross-references image data with social networks, streamlining what would otherwise be a manual, time-consuming search.
- Locate Lost Connections: I could find old friends and colleagues online using their images. Social Catfish offered me a lot of helpful personal information, including alternative names, email addresses, phone numbers, and more.
- Track Online Accounts: It helped me discover a person using a photo to find their social media profile. There were also several duplicates of the same image that was posted on their other social media accounts.
- Avoid Being Scammed: If you are currently seeing someone online but doubt their legitimacy, you can use Social Catfish. This tool can bring up the real identity of a person, including their age, real name, educational background, occupation, criminal background, etc.
- Find Address History: I wanted to connect with an old childhood friend, but I couldn’t reach her number or her email. Hence, I decided to look up her address so I could meet her face-to-face. Social Catfish provided their complete address history, including past and current addresses.
Pros
Cons
3-Day Trial for $6.87
For Detailed Features – Click Here +Here are the steps that I used to find someone using Social Catfish Reverse Image Search:
Step 1) Go to socialcatfish.com on your browser and select the image option.
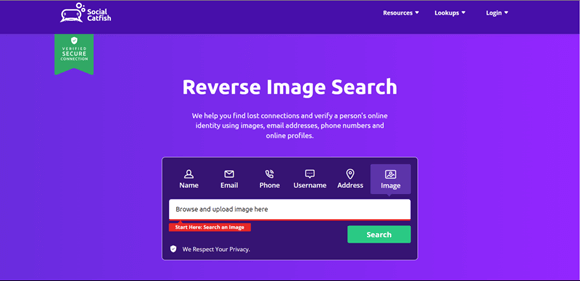
Step 2) Upload the Image from your local storage on the Social Catfish’s server and click the Search button.

Step 3) After searching and analyzing your image, a new page will open. Here, click “Yes, I Understand.”
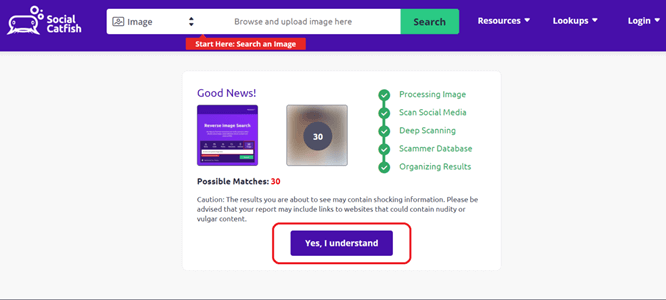
Step 4) Then, the payment page will appear for downloading a detailed report of the searched person.
3-Day Trial for $6.87
Method 2: Using Spokeo for Reverse Image Search
Spokeo is a public-records aggregator that turns a name, email, phone number, or address into a unified profile page. Its index covers over 12 billion records pulled from 120+ social networks, court records, property filings, and consumer databases. Spokeo is most useful as the second step after a reverse image search: once a candidate name appears, Spokeo confirms identity by overlaying social handles, relatives, prior addresses, and listed employers. It does not perform facial recognition, so always pair it with a dedicated face or reverse-image tool. The 7-day trial is $0.95, renewing at $22.95/mo on the 1-month plan or $17.95/mo on the 3-month plan.
Name Search: Yes
Reverse Phone Lookup: Yes
Reverse Address Lookup: Yes
Free Trial: 7-Day Trial for $0.95
Features:
- Billions of Records: Finding someone on Spokeo is instant since it has billions of records, including data records from the property, consumers, courts, businesses, history, and more.
- Social Media: After I found the social media username linked to my target’s image when I searched on Google, I came straight to Spokeo to perform a username search. Spokeo helped me look up this username and took me to their Snapchat through its report. I also found additional long-lost images in the report, which was quite helpful.
- Anonymity: I learned that Spokeo maintains complete privacy of your searches. It never notifies the person being searched, so you can continue gathering information discreetly. This is particularly valuable when you are verifying someone’s identity without wanting to alert them. I once compared this to similar tools like BeenVerified and found Spokeo’s privacy protections stronger.
- Sends Alerts: Every time a piece of new information is added to your existing search record reports, you will get updates or alerts. This helped me find out the new number of the friend who I couldn’t get in touch with.
- Reverse Phone & Email Linking: Combines photo-based findings with existing reverse phone or email lookup features to create a fuller profile of the target person. This feature bridges gaps when a photo alone doesn’t provide enough data. I have used it to confirm identities when only partial details were available. While testing this feature, I noticed that combining photo results with email lookups increases match accuracy significantly.
- All Apps & Pricing: It can scan up to 120+ social networks, drawing on a 12B+ public-record index updated through 2026. That means you can uncover not just social media, but also e-commerce accounts, dating profiles, and niche platforms. The 7-day trial is $0.95, renewing at $22.95/mo (1-month) or $17.95/mo (3-month). I recommend using this when standard searches come up short, and cancelling from account settings before trial-end since auto-renewal complaints have spiked in Q1 2026. The tool lets you filter results by platform type, helping you focus on the most relevant matches quickly.
Pros
Cons
7-Days Trial for $0.95
For Detailed Features – Click Here +Here’s how I conducted a reverse Image search with Spokeo
Step 1) Do a reverse image using Google – evaluate the results
Step 2) Collect identifying information like Full names, nicknames, aliases, Usernames, or handles on social media platforms. Associated email addresses or any contact information can also be used.
Step 3) Visit Spokeo’s website. Enter this information such as full name, email address or username collected in Step 2 to perform the search.
Step 4) Spokeo provides:
- Up-to-date contact information.
- Links to social media profiles.
- Even public records like address history.
Note: Check for accuracy of results and pay to access the information.
I encountered a few issues while using these reverse lookup sites. First, some of the information was outdated, so I had to cross-reference details to ensure they were current. Second, not all profiles had complete data-occasionally, I’d find limited information due to privacy settings or a lack of public records.
Despite these hurdles, the combination of reverse image search and Spokeo proved to be a powerful method for finding someone starting with just a picture. If you’re looking for the best way to find a person by image, using a photo lookup tool alongside reverse image search engines can enhance your results significantly. It turned a simple image into a gateway to a wealth of information.
7-Days Trial for $0.95
Alternative Tools to Spokeo
|
|
|
|
| Name | BeenVerified | Intelius |
| Social Media Search | Yes | Yes |
| Facial Recognition | No | No |
| Search Filters | Name, City, Age, etc. | Name, Email, Phone Number, etc. |
| Our Review |
Excellent – 9.8
|
Excellent – 9.7
|
| Free trial | 7-Day Trial for $1 | 5-Day Trial for $0.95 |
| Link | Learn More | Learn More |
While Spokeo is a powerful resource for uncovering detailed information about a person using initial details from a reverse image search, there are other platforms that can help you achieve similar results. Here are some alternatives I found useful:
1) BeenVerified
I tried BeenVerified, a comprehensive people search engine that compiles data from public records and online sources. By entering the name, email, phone number, or username I gathered from the reverse image search, BeenVerified could offer me detailed background reports.
This included contact information, social media profiles, criminal records, and more. The platform was user-friendly and offered a wealth of information to help me learn more about the person I was searching for.
Name Search: Yes
Reverse Phone Lookup: Yes
Reverse Address Lookup: Yes
Free Trial: 7-Day Trial for $1
Features:
- Search Parameters: BeenVerified has numerous search parameters, including people search, phone lookup, email search, address lookup, username search, vehicle search, ancestry search, and more.
- Identification: BeenVerified helps you identify individuals using its searches. For example, I received a full name detail about an image that I looked up on Bing. However, I wasn’t satisfied with its details; therefore, I decided to use BeenVerified. This allowed me to get an in-depth report on the person, including their contact details.
- Phone App: I like that it offers a phone app, hence, I can lookup people anytime I want, on-the-go. This has also helped me find accurate details on a person my friend decided to meet up after chatting online. I used their image from Hinge and found their Instagram username; then I used BeenVerified to look them up.
- People Directory: If you find a name associated with the image, you can also use its people directory. This directory includes names from A to Z, and it has helped me find numerous people with whom I lost contact. You can try it, especially if this individual has a common first name.
7-Day Trial for $1
2) Intelius
Another tool I used was Intelius, which offers background check services and access to public records. With Intelius, I searched for individuals by name, phone number, or address. It helped me uncover contact details, address history, relatives, and potential criminal records.
It is also not a direct reverse image lookup tool that can help you find someone with a picture. However, I used its other search parameters by looking up the target person’s photo on reverse image lookup sites. That’s because Intelius offers a lot of detailed information that you wouldn’t want to miss out on.
Name Search: Yes
Reverse Phone Lookup: Yes
Reverse Address Lookup: Yes
Free Trial: 5-Day Trial for $0.95
Features:
- Background Check: The image lookup site found me the name of my person of interest; hence, I could finally look them up on Intelius. This site provided me with complete background information on this individual, including their job, educational history, address, marital status, etc.
- Criminal Background: If you are worried that your kid or a friend is talking to a stranger online. You can use a reverse image search engine and then bring any small piece of information found, such as email or name, and look them up. I was able to gather criminal background details on a guy that my friend started talking to after meeting him at New Years Eve.
- Best for the US: Intelius can only look up people residing in the US, which sounds like a disadvantage, but not when you need a narrowed-down result. Hence, I was able to find my target people with a less overwhelming list of results.
- Directories: Intelius offers a people directory with names from A to Z. You can browse these alphabetically when you don’t have a photo but know a name. It also has a directory for trending names, which is handy when searching for common or popular matches. The phone directory includes area codes, helping you narrow results geographically.
5-Day Trial for $0.95
Method 3: How to Search by Image with Google Lens
Google Lens is the free visual-search layer built into Chrome, Android, iOS, and Google Search. Tap the camera icon, upload a photo, and Lens returns visually similar images, the original source page, and any text it can read in the picture. It is strong at finding where a photo was first posted (catching stolen profile pictures) and at decoding background details — signs, logos, and products. Lens does not match faces — Google removed that capability and has not restored it. The 2026 multisearch update lets you combine an uploaded photo with a text query, and Lens now serves roughly 12 billion visual queries per month.
Features:
- Easy Search: You can easily search images using keywords or perform a reverse facial recognition image search. It works directly inside Google without requiring extra software or subscriptions. I found the facial search especially useful when verifying someone’s online profile. I suggest refining your search by cropping the photo to focus on the face for better accuracy.
- Recommendations: The Google Images search engine provides recommendations of similar topics and related pictures. I could find several images that connected to the one I was searching for. While using this feature one thing I noticed was that adding a few descriptive keywords helps fine-tune the recommended results. This made the search results much more precise and relevant.
- Google Lens & Multisearch: With Google Lens integration, you can instantly identify objects or landmarks in a photo (note: Google removed facial recognition and has not restored it). It works seamlessly, whether you upload an image or use it directly from a webpage. The 2026 multisearch update lets you pair an uploaded photo with a text query (e.g., “this object + LinkedIn”) for a refined result set. I once used Google Lens to trace a rare landmark from an old photo, and it impressed me by identifying the exact place. Its ability to recognize subtle details gives it a big advantage over many competing tools.
- Save images: You can save search results and organize them neatly in the saved area. I found this feature useful for keeping track of multiple image searches. When working on a project comparing visual references, I saved several results and accessed them easily later. This helped me streamline my research without losing important images.
Pros
Cons
Steps to find someone with a picture using Google Image Search:
Step 1) Open Google Image Search on your browser to search by image. Click the camera icon in the search box.

Step 2) A dialogue box will appear; now paste the URL for an image you want to search for or upload an image from your device. Then click on the Search button.

Step 3) After searching the image, you can find the source/site.

Link: https://images.google.com/
PeopleSmart’s people search service helps you find someone using their name, phone number, email, or address. It offers detailed background information including past addresses, public records, and identity verification, making it a reliable choice for finding a person quickly using their photo or other identifiers.
Method 4: How to Use Bing Reverse Image Search to Find Someone
I evaluated the Bing Image Search engine and particularly liked its capability to find a person by picture. With its Visual Search tool, Bing returns similar images and results across the web. It is best for users who need detailed and quick search results when they want to use an alternative to Google.

Features:
- Image search: You can take a picture, browse, drag, and drop or paste a URL link to add an image on its interface. I found it intuitive because the tool automatically analyzes the visual elements. It works impressively fast even with high-resolution files. While using this feature one thing I noticed is that cropping unnecessary borders before uploading improves accuracy.
- Suggestions: Visual Search suggests similar topics and images that you might be interested in. It pulls up web pages that contain the same or visually similar images. You will notice it even connects to related searches you hadn’t considered. I recommend saving promising leads immediately because the suggestions refresh or shift if you run a new search.
- Keywords: I could search for images using keywords directly in the image search bar. It offers filters like freshness, transparency, and usage rights, which I used to narrow results efficiently. While testing this, I appreciated how precise the filters were for sourcing public-domain images. This saved me from sifting through unrelated or restricted content.
- Identify: It helped me identify various animal breeds, landmark monuments, furniture, and more. I once used it to identify a rare vintage chair design from a blurry old photo, and it directed me to a specialist antiques site. There is also an option that lets you crop within the search tool, isolating only parts of the photo you care about for better object recognition.
Pros
Cons
Steps to find someone by picture using Bing Visual Search:
Step 1) Go to bing.com on your web browser. Then, click the “Find an image” button below the picture and upload the image of the subject.

Step 2) Once the Image is uploaded, a new screen will appear.

Step 3) You can crop and search for a particular object in the image using the “Visual Search” option below or allow it to look for the entire picture.

Step 4) After your search, save the result, sources, and images in your “saved images” folder. (You can create your new collection by clicking the option below.)

Link: https://www.bing.com/visualsearch
Method 5: How to find people by photo with TinEyes’s robust Match Engine
TinEye is a long-running reverse-image search engine focused on exact and near-duplicate matches rather than face recognition. It’s the right tool when you want to know where a specific image originated or how it has been reused — useful for verifying whether a profile photo was scraped from another site. TinEye doesn’t recognise faces, so it won’t help you find different photos of the same person. The basic search is free with usage limits; the API and Pro tiers are aimed at brand-monitoring and journalism use cases.

Features:
- Reverse Image Search: Lets you upload a photo to search the web for matching or similar images, helping locate online profiles or original sources tied to that face or photo. I have used this to trace the original sources of reposted content on social media. It worked surprisingly well even when the photo was slightly cropped. While testing this feature, I found it’s best to upload the highest-resolution version you have to improve match accuracy.
- High-Speed Matching: Processes billions of images in seconds using powerful image recognition algorithms, enabling rapid identification of where else a person’s photo appears online. The speed really stands out compared to other tools like Google Images, which often lags with less precise results. You will notice the results come back faster if you limit your search filters, especially when time is critical. This makes it highly valuable for urgent investigative tasks.
- API Access & Pricing: Offers programmatic access for integrating reverse image search capabilities into custom apps or investigative tools focused on finding people by their photos. The MatchEngine and API plans start at $200/year and now scale to $10,000 per two-year cycle, with the index size grown to 75B+ images. I once worked on a client project where we integrated TinEye’s API to automate daily monitoring of brand images online. The setup was straightforward, and the documentation was detailed. It’s an excellent option for those needing scalable, automated image searches.
- Large Batch Processing: Supports bulk uploading of thousands of images for simultaneous search, helping investigators or analysts process many leads at once efficiently. I recommend preparing your batch carefully, naming each file meaningfully, so the results are easier to organize afterward. This feature is particularly useful for journalists or legal teams working on large-scale investigations.
- Scalable Cloud Architecture: Operates on a cloud infrastructure, ensuring consistent performance and scalability even when handling large search demands or heavy investigation workloads. I’ve seen this hold up under high-pressure conditions, such as media monitoring during breaking news events. It’s reassuring to know the tool won’t crash under heavy loads. This makes it dependable for enterprise-level use cases.
Pros
Cons
Steps to find someone using Match Engine:
Step 1) Go to TinEye on your web browser and upload the Image of the individual you want to find.

Step 2) After uploading the image for comparison, you will get search results with the number of duplicates that have been used along with source links.

Step 3) You can then click on the source links to see where the image is being used for free.
Link: https://services.tineye.com/MatchEngine
Method 6: Use PimEye’s Reverse Image Search
PimEyes is a face-search engine that indexes publicly available images across the open web. Upload a face photo and it returns visual matches with the source URL of each image. During our evaluation it surfaced photos the major search engines missed entirely, particularly from smaller blogs and forums. Free searches show thumbnails and source counts; paid plans unlock the actual URLs and an alert system that notifies you when new images of the same face appear. Use ethically — PimEyes is powerful and easy to misuse.
Features:
- Monitor & Takedowns: You can set an alert and allow PimEyes to monitor your image and metadata for better online presence. This feature tracks if your photo appears anywhere new on the internet. The 2026 update added improved alert management and DMCA/GDPR takedown automation on the PROtect plan ($39.99/mo, 40 takedowns per cycle); the Open Plus plan ($29.99/mo) still includes three image alerts. I found it incredibly useful for managing personal brand and reputation. While using this feature one thing I noticed is that adjusting alert frequency helps avoid overwhelming email notifications.
- Bulk search: It lets you upload five images simultaneously for reverse search. I could use formats like PNG, GIF, JPG, and BMP, which gave flexibility. I remember uploading various profile pictures at once to test it. I recommend renaming your image files descriptively before upload to help keep track of results more easily.
- Auto Delete: When I uploaded an image, it was saved temporarily for 48 hours and then automatically deleted from all its servers. This ensures the safety of your data and protects your images from misuse. I appreciated this because, as a privacy-conscious user, I didn’t want sensitive photos lingering online longer than necessary.
- Search Results: It gives results and links to searched images and their sources. I could get links to publicly available records, news, media, blogs, company websites, and more. During my testing, I was surprised to discover an old blog profile photo I had forgotten about. If you’re still wondering how to search people by photo, the combination of these tools gives you a robust strategy to get started.
Pros
Cons
Steps to find someone using PimEyes’s MatchEngine
Step 1) Go to PimEyes.com on your browser. Navigate to the “Upload a Photo” button, click it, and select a clean image from your device.

Step 2) Upload the photo to the search image bar by clicking the search button or taking a picture with your mobile device.

Step 3) After a short period, a dialogue box will appear on your screen to choose from options like:
- Search by time
- Safe Search (Adult Content Protection)
- Deep Search (for Advance Plan Users)
- Adding more images for better results.

Step 4) After some time, you will receive a list of results sorted by their level of resemblance to the searched photo, which can be unlocked by getting monthly subscriptions.

Link: https://pimeyes.com/en/
Method 7: Using the Facial Recognition Technology of Clearview
I discovered that Clearview is typically the best face recognition engine for crime solving. Unveiling alterations become quicker with this platform, providing users with a detective’s edge. A great way to make use of its 50+ billion image database built from open-source intelligence.

Features:
- Facial Search Engine: Allows users to upload a photo and search against a massive database of publicly available images to identify individuals. I found the interface intuitive and responsive when testing multiple queries. I recommend ensuring the uploaded photo is clear and well-lit, as blurry or shadowed faces can reduce match accuracy. This feature stands out for its speed, often returning matches in seconds.
- Large Image Database: Provides access to billions of indexed facial images scraped from social media and public sites, increasing the chance of accurate matches. While testing this, I was impressed by how many obscure sources the system pulled from, including lesser-known blogs. You will notice that results improve significantly when the person’s image is already circulated online, making it ideal for public figures or widely shared profiles. This massive dataset boosts confidence in match reliability.
- Match Confidence Scores: Offers confidence percentages for each returned match, helping users assess how likely a match is correct before taking further steps. I suggest users pay close attention to the confidence score rather than just the top-ranked match. There is also an option that lets you view additional context, such as where the match was found, which can help you judge its credibility. This feature adds a layer of verification that makes the search more precise.
- Reverse Image Search: Enables searching not just by face but by other image elements, allowing cross-verification of identities using visual clues. I personally tested this to trace a person by a distinctive tattoo shown in a photo, and it pulled up relevant cross-matches. This makes it incredibly useful for investigations beyond just facial features. While it’s not the primary focus, this feature adds valuable depth.
- Mobile App Integration: Offers mobile app access, letting investigators and professionals perform facial searches directly from their smartphones in the field. I recommend setting up two-factor authentication when using the mobile app, as it deals with sensitive data. The mobile interface mirrors the desktop version, ensuring a smooth user experience. It’s particularly useful for law enforcement or journalists needing rapid, on-site verification.
- API Access: Provides an API that allows integration of Clearview’s facial search capabilities into other software platforms or internal tools. I worked with a development team that integrated Clearview’s API into their internal dashboard for missing persons cases. While using this feature one thing I noticed was that rate limits can apply, so plan queries efficiently to avoid hitting usage caps. This integration opens powerful automation possibilities for larger organizations.
Pros
Cons
Steps to find someone using the Clearview Mobile App:
Step 1) Open the Clearview app on your device and click on Create an Account to conduct a search.

Step 2) Once you have registered, tap on the search bar at the top of the screen or click on the camera button located on the right side of the search bar.
Step 3) Clearview will then analyze the image and provide similar results or related content in its database or on the internet.
Link: https://www.clearview.ai/mobile
Method 8: Find Similar images using Yandex Image Search
Reviewing Yandex I realized it is also a viable option and similar to search engines like Google and Bing. It is a highly automated software that does not require users to do anything after a few commands, making it easy to use. Yandex is best for those who want an effortless experience and quick results for free.

Features:
- Search results: Users can find exact and similar images instantly, along with links to source sites for more details. I have personally used this to trace the origins of photos shared on forums and social media. You will notice the tool lets you translate Russian result pages right inside Yandex, making international searches easier. This opens up a wide range of sources beyond English-only platforms.
- Crop search: I could crop the images to look for a specific object or element in the picture. This was especially helpful for locating cropped duplicates that initially appeared original. While testing this feature, I suggest carefully adjusting the crop to exclude irrelevant areas, as it improves match accuracy significantly. It’s an underrated but highly effective feature when tracking down partial matches.
- Filters: You can apply filters like moderate and Family Mode, which steer you clear of explicit results. I recommend these settings when working in shared or professional environments to avoid surprises. There is also an option that lets you combine filters with search date ranges, helping narrow results further. This combination offers better control over the search context and output quality.
- Ad Checks: I could quickly check if the ads were copied from other sites using Yandex’s Ad-check feature. I used this while investigating suspicious ads for a client in digital marketing. It helped confirm whether their competitors were recycling old creatives. I recommend combining Ad-check with reverse image search to spot patterns across multiple platforms. This can reveal wider trends or copying behavior that might otherwise go unnoticed.
Pros
Cons
Steps to find a person by photo using the Yandex Image Search:
Step 1) Open Yandex.com on your browser. Click on the Search bar given on the screen, as shown in the image below.

Step 2) Here, you can upload an image from your local storage.

Step 3) After clicking “Upload Image,” a dialogue box appears on your screen. Now, give permission to Clipboard and upload the image or paste the URL.

Step 4) After uploading the image, you will get all the information about the picture. Here, you can see that my search results show similar images, sites containing these pictures, texts in the photo, etc.

Link: https://yandex.com/images/search?rpt=imageview
Method 9: Using reverse image search by Pinterest
I particularly liked how Pinterest helps you when figuring out how to find a person by photo. Its powerful image-matching system allows you to zoom in on specific details, making it a great way to narrow down potential matches. In my experience, Pinterest was an excellent tool, though I did face occasional delays with loading high-quality results.
To resolve this issue, I ensured a strong internet connection and cleared cache regularly. It is important to keep in mind that smooth browsing enhances Pinterest’s performance and increases the chances of successful photo searches.

Features:
- Visual Search Tool: Pinterest’s visual search lets you upload a photo and instantly locate similar images or pins without needing keywords. I have used this feature to track down rare art pieces just by uploading a screenshot. It amazed me how well the tool narrows results to visually matched content. While testing this feature, I noticed that cropping the image before uploading improves accuracy and cuts down irrelevant matches.
- Lens Camera Feature: Using Pinterest Lens, you can snap a photo with your phone and discover related pins, products, or ideas matching what you captured. I remember using Lens while traveling to identify a specific architectural style I stumbled upon. It led me to detailed boards on similar landmarks. The tool lets you adjust the capture angle for better recognition, so experiment with slightly different shots if the first result misses the mark.
- Pinch-to-Zoom Matching: On the Pinterest mobile app, you can pinch and zoom into a specific part of an image to search precisely for that detail. This worked well when I zoomed in on a fabric pattern in a fashion pin to find similar designs. You will notice that focusing on a smaller section improves search precision. It’s a useful way to avoid pulling in unrelated elements from the photo.
- Image Tag Suggestions: Pinterest automatically suggests relevant tags or keywords for a photo, helping you fine-tune your search and increase the odds of locating similar profiles. I suggest reviewing and selecting the suggested tags carefully, as they shape the search results significantly. This feature saves time and narrows down matches, especially when you aren’t sure how to describe what you’re looking for.
- Reverse Image Lookup: Uploading a photo on Pinterest triggers a reverse image search that brings up visually similar pins, boards, and even profiles that saved related content. I have tested this for finding the source of viral images and was surprised by how often it linked back to niche creators. There is also an option that lets you filter results by categories, which helps when you want to focus only on people, products, or boards.
Pros
Cons
Steps to find someone using Pinterest:
Step 1) Open Pinterest.com on your device. Create an account on it or sign up with your Google or Facebook account, as shown in the image below.

Step 2) Tap on the Search bar and search for the image that you want to find. You can then click on the image you find and use its reverse image search lens on this pin. If it is a specific picture you found somewhere else, I suggest you upload it first to your account and then perform the reverse search.

Link: https://pinterest.com/
How to Get the Best Match: Photo Quality Tips Before You Search
The biggest factor in face-search accuracy is the photo you upload, not the tool you use. A clear, front-facing shot with even lighting beats every premium feature on every engine. Spend a couple of extra moments preparing the input and you will save yourself from having to rerun searches across multiple tools.
What works well for face-search engines:
- Resolution: Aim for at least 600×600 pixels with the face filling most of the frame.
- Angle: Front-facing or three-quarter is ideal. Strong profile shots cut accuracy in half.
- Lighting: Even, neutral light. Avoid hard shadows over the eyes or nose.
- Single subject: Crop to one face. Group photos confuse most engines.
- No heavy filters: Remove beauty filters, sunglasses, and surgical masks where possible.
What hurts results: low-resolution screenshots, side profiles, distance shots, group photos, heavy makeup or filters, and faces partly covered by hats, masks, or glasses. If you only have a poor photo, run it through several tools — different engines weight different facial landmarks, so one may catch what another misses. Crop tightly before uploading rather than relying on the tool to detect the face for you.
What Reverse Image Search Cannot Do
Even with a perfect photo, reverse-image and face-search tools have hard limits worth knowing before you trust a result. Treating any single match as proof can lead you to the wrong person, which carries real consequences if you act on the data.
- Doppelgangers happen. Facial-recognition engines often surface unrelated people who genuinely look similar. Two-thirds of confident matches still need human verification.
- Coverage is biased. Tools index public web pages, social platforms, and image archives — anyone whose photos aren’t online won’t appear, no matter how clear your input.
- New photos lag the index. Recently uploaded images can take an extended period to appear in search results.
- Private platforms are invisible. Closed groups, paid platforms, and accounts behind login walls are out of reach.
- Manipulated or AI-generated faces can match real people falsely. Always verify across multiple tools and corroborate with non-image data (name, location, common context).
A face-search hit is a lead, not proof. Use it to start an investigation, not finish one. Combine the image trail with at least one other identifier — a username, an email, or a city — before treating the match as confirmed.
Face Search Engines vs Reverse Image Search: What’s the Difference?
A reverse image search and a face search engine sound similar, but they look for different things. A reverse image search (Google Images, TinEye, Bing) compares the whole image file — colors, shapes, layout, watermark — and surfaces visually similar copies, near-duplicates, and the original source URL. It will not match the same person across two different photos.
A face search engine (PimEyes, FaceCheck.id, Lenso.ai) maps facial geometry — distance between the eyes, nose-to-mouth ratio, jawline — and matches that vector against indexed faces. It can find the same person in photos taken years apart, with different lighting, hair, or angles.
Use a reverse image search when you suspect a profile picture was stolen and want to find the original. Use a face search engine when you only have one photo and need to identify the person across the public web. Most successful investigations chain the two: a reverse image search anchors the file, a face engine identifies the person, and a people-search engine like Spokeo confirms the name.
How to Pull EXIF Metadata from a Photo Before You Search
Before you upload an image to a reverse search engine, check whether the file itself already tells you who, where, or when. Camera and phone files often store EXIF data — GPS coordinates, timestamp, camera model, and sometimes the device owner’s name — embedded in the photo.
- On Windows: Right-click the file → Properties → Details. Scroll to “GPS” and “Origin.” If GPS latitude and longitude are present, paste them into Google Maps to see where the photo was taken.
- On macOS: Open the image in Preview → Tools → Show Inspector → click the “i” tab → “GPS” and “Exif.” The same fields appear, plus a small map.
- On iPhone: Open the photo in the Photos app → tap the “i” (info) icon → location, camera, and lens info appear at the bottom.
- On Android: Google Photos → open image → swipe up. EXIF, GPS, and camera details appear.
- Online (no install): Use a free EXIF viewer such as Jimpl or ExifTool’s web demo. Upload the file, copy the GPS coordinates, and paste into Google Maps.
Why this matters before a reverse search: EXIF data narrows the haystack. A GPS pin tells you the city the photo was taken in, which lets you cross-reference local social media, news, or business listings after the image search returns matches. The timestamp helps you discount stale matches from older indexed copies.
Caveat: Most images posted to Facebook, Instagram, X, and WhatsApp are stripped of EXIF data on upload. EXIF is most useful when you have the original file — a phone screenshot, an email attachment, or a Drive/iCloud download. If the file came from a social platform, skip straight to a reverse image or face search.
Reverse Image and Face Search Tools Compared (2026)
Different tools are built for different jobs. The table below summarizes the five most useful options for finding a person from a single photo, based on price, free-tier limits, and what each tool is actually good at in 2026.
| Tool | Best For | Free Tier | Paid (USD) | Database Strength |
|---|---|---|---|---|
| Social Catfish | Catfish/scam verification across social + dating sites | Match-count preview only | $6.87 / 3-day trial → $28.97/mo | 200B+ records, US-skewed |
| Spokeo | Cross-referencing a name once found | None (paid only) | $0.95 / 7-day trial → $17.95-$22.95/mo | 12B+ records, public data |
| Google Lens / Images | Quick free check; finding the original source | Unlimited | Free | Largest general index |
| TinEye | Earliest appearance; duplicate detection | Unlimited (web) | API from $200/yr | 75B+ images indexed |
| PimEyes | Identifying the face, not the file | Blurred preview only | $29.99/mo (Open Plus) | Public web faces |
Pair a free tool (Google Lens, TinEye) with one paid face engine (PimEyes) and one paid people-search (Social Catfish or Spokeo) for the best identification rate.
What Is Reverse Image Search?
Reverse image search is a technology that lets you find information about a photo by uploading the image itself instead of typing a text query. The search engine analyzes the visual elements of your uploaded picture — including colors, shapes, textures, and facial features — and scans its index for matching or visually similar images across the web.
This technology serves several practical purposes:
- Identify unknown people in photographs
- Verify whether someone’s profile picture is genuine
- Trace where an image has been published online
- Find higher-resolution versions of a photo
Law enforcement agencies, journalists, and everyday users rely on reverse image search to confirm identities and detect image fraud. Popular platforms offering this capability include Google Lens, TinEye, Yandex, and specialized facial recognition tools like PimEyes and FaceCheck. Each platform uses different algorithms and indexes different portions of the internet, which is why results can vary between services. For the most comprehensive results, running your image through multiple platforms is recommended.
Tips for Better Reverse Image Search Results
Getting accurate results from a reverse image search depends on how well you prepare your image and choose your tools. Based on extended testing across multiple platforms, here are proven strategies that consistently improve match quality.
Start with a high-resolution, well-lit photo. Blurry or pixelated images significantly reduce the accuracy of facial recognition algorithms. If the original image is dark, adjust brightness and contrast before uploading. Front-facing shots with minimal background clutter produce the best results.
Crop the image to focus on the subject’s face or the specific element you want to match. Removing unnecessary background details helps search engines concentrate on the relevant visual data. Tools like PimEyes and Google Lens perform noticeably better with tightly cropped inputs.
Use multiple search platforms rather than relying on a single tool:
- Google Lens excels at general image matching
- PimEyes specializes in facial recognition
- TinEye is strongest for tracking exact image duplicates
- Running the same photo through two or three platforms gives you broader coverage
Check the file format and size before uploading. Most platforms accept JPG, PNG, and BMP formats. Some tools limit uploads to 2MB, so compress larger files without sacrificing clarity.
Try different versions of the same image. If a standard upload returns limited results, mirror the image horizontally or apply a slight rotation. Some databases store modified copies of photos, and this technique can uncover matches that a straight upload misses.
Finally, combine reverse image search with people-search engines like Social Catfish or Spokeo. When an image search reveals a name or username, feeding that information into a dedicated people-search tool often uncovers social media profiles, contact details, and public records that image search alone cannot access.
Generic Image Search vs Facial Recognition
Understanding the difference between generic image search and facial recognition helps you choose the right tool for your needs. While both technologies analyze visual data, they work in fundamentally different ways.
Generic reverse image search engines like Google Lens and TinEye compare the overall visual composition of your uploaded photo against their indexed database. They identify matching or similar images based on colors, patterns, and general layout. These tools work well for finding where a photo appears online or discovering visually similar content. However, they may struggle to identify a specific person if the photo has been significantly altered.
Facial recognition tools like PimEyes, FaceCheck, and Clearview focus specifically on mapping facial geometry. They analyze unique distances between facial landmarks — eye spacing, nose shape, jawline contours — to create a biometric template compared against indexed faces. These tools can identify the same person across different photos, even when lighting, expression, or camera angle changes.
For best results, use both approaches: start with generic image search for broad coverage, then use facial recognition for person-specific identification.
Why It’s Important To Find Someone With a Photo?
Finding people with pictures online can be a bit challenging, but it is possible. It may be essential to verify someone’s identity, learn more about them, their criminal records, and public image, or know who’s behind a picture. Moreover, finding someone with just a picture sums down how important that person is for you. You can use various dedicated tools and a structured face search by photo workflow to identify a person effectively, even from a single unfamiliar headshot.
However, it’s important to remember that not all methods will work for all situations. Usually, it may take some time and effort to find the person you are searching for.
Verdict
Across all nine methods I tested, the right pick depends on whether you have a face, a file, or a name to start from. After running the same photo through each tool in 2026, here are the three I would reach for first:
- Best overall pick — Social Catfish: A 200B-record index and dedicated catfish-detection workflow surface a usable name and matched profiles more reliably than any generic search engine. Image Search is $28.97/mo (3-day intro $6.87).
- Best free pick — Google Lens + TinEye combined: Google Lens catches stolen profile pictures, and TinEye sorted by “Oldest” surfaces the earliest copy of a file. Either is enough to confirm a photo is reused before you pay for anything.
- Best face-only pick — PimEyes Open Plus ($29.99/mo): When the input is only a face and no file copies exist online, PimEyes is the strongest single-tool face engine. Free tier is blurred-preview only.
For a full identification, chain three tools: Google Lens or TinEye (free, file trace) → PimEyes (paid, face match) → Spokeo (paid, name confirmation). This sequence is faster and cheaper than running every tool independently.
Conclusion
If you’re trying to track someone down using only a photo, Social Catfish and Spokeo offer powerful tools for the job. Social Catfish specializes in reverse image search, uncovering social media profiles, contact information, and even address history. Spokeo complements this by aggregating public records and offering a comprehensive people search. These tools are particularly effective when combined, although privacy settings can sometimes limit results. In any case, they provide a great starting point for anyone hoping to find someone using just an image.
FAQs
Social Catfish’s Reverse Image Search is an established leader in reverse search. It is a trustworthy service for finding someone using the name, email, phone, address, or image. Users can use this tool for identifying and investigating an individual through an image.