
HP ALM Interface: Filter Conditions, Flags & Send Mail
 Editorial Team
⚡ Smart Summary
HP ALM ships a set of common commands — Filter, Find, Replace, Flags, History, Send Mail, Column Chooser, Set Defaults and Favorites — that behave identically in the Requirements, Test Plan, Test Lab and Defects modules.
There are plenty of common functions in HP ALM that are available across modules. These shared commands behave identically whether you are sitting in Requirements, Test Plan, Test Lab or Defects, so learning them once pays off everywhere in the tool.
Note on naming: the product shown here was released as HP ALM / Quality Center. It passed to Micro Focus in 2017 and to OpenText in 2023, and current releases ship as OpenText Application Quality Management (formerly ALM/Quality Center). Menu paths such as Edit > Find and Edit > Replace are unchanged, as the current online help confirms.
Let us look into each of them, one by one.
How to use Filter
The Filter dialog allows ALM users to perform a filter operation based on defined criteria. This option is available in the following modules.
- Requirements
- Test Plan
- Test Lab
- Defects.
Let us perform a filter operation in the defects module.
Step 1) To perform a filter operation:
- First check if there is any preexisting filter. If the status is ‘NO Filter Defined’ then the user is NOT currently seeing filtered data.
- Click on ‘Filter Button’

Step 2) The Filter dialog opens. Now Let us do a filter based on ‘Severity’. Click on the ‘Severity’ field button as shown below.

Step 3) Upon clicking the button, the ‘Select Filter Condition’ dialog opens up.
- Select the condition based on which one has to filter.
- The condition would be displayed in the condition field.
- Click ‘OK’

Step 4) The Filter dialog is displayed back to the user
- With the selected ‘Filter Condition’ as shown below.
- Click ‘OK’.

Step 5) The Defect screen is displayed to the user
- With the filtered data.
- The Filter condition that is applied on the data.

Filtering narrows the whole grid. When you only need to jump to one record, Find is the faster route.
How to use Find
The Find functionality enables ALM users to search for a particular record in a tree or grid based on the value of a particular field, folder or subfolder.
This feature is available in the following modules.
- Requirements
- Test Plan
- Test Resources
- Test Lab
- Defects.
Step 1) The Find functionality can be accessed by either pressing the keystroke ‘ctrl+F’ or by accessing ‘Find’ Functionality directly from ‘Edit’ Menu. For demo purposes, let us perform a search on the Test Plan module, where each test case is stored.

Step 2) The Find Dialog opens up for the user as shown below.
- It shows the Folder and Field against which the search has to be made.
- The value that needs to be found.
- The search area has to be selected. It can be a folder name or test name.
- The search criteria can be specified.
- Exact Match – Only the words that match the entered string would be displayed
- Case Sensitive – The entered search string would be searched for case sensitiveness. Let us say, the entered string is ‘Account’. ALM will display the results if and only if the grid values matches the exact case. Only the occurrences of ‘Account’ would be displayed and NOT ‘account’ or ‘aCcount’.
- Use Wildcard – The entered string would be matched against the wild card criteria specified by the user. Wild Card characters are helpful if the user is NOT aware of the exact search string. The only supported wild character is ‘*’. For Example, if we want to see the occurrences of ‘Accounts’, we can use wild characters to match the target by searching the string as *acc*.
- Click ‘Find’

Step 3) The search results would be displayed as shown below.

Find locates a value; Replace goes one step further and rewrites it.
How to Replace
The Replace functionality in ALM enables users to find and replace specific field values in a tree or grid. Users have an option of replacing a field value for a selected record or replacing for all records in the tree or grid.
This feature is available in the following modules.
- Requirements
- Test Runs
- Defects
For Demo purpose, let us search and replace a string in ‘Defects’ Module.
Step 1) Let us say we want to replace occurrences of the word ‘Account’ with ‘A/c’. There are 3 instances where the text ‘Account’ appears in defect description field as shown below.

Step 2) The Replace Functionality can be accessed by navigating to ‘Edit’ Menu.

Step 3) The Replace Dialog box is displayed to the user.
- Enter the ‘Search’ Field Name
- Enter the Value that needs to be found.
- Enter the value that has to be replaced with the search string value.
- Click ‘Replace All’ to replace all the occurrences or Replace for just replacing a specific occurrence.
Note: User can replace a specific occurrence by clicking on ‘Find Next’ to focus on the appropriate record which can then be replaced by clicking on ‘replace’ button.

Step 4) The Replace results are shown to the user with the number of occurrences it has replaced and the number of times it has skipped the search string in the entire module.
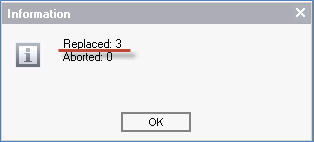
Step 5) User can now navigate to the defects module and we can find that all the occurrences of ‘Account’ are replaced by ‘A/c’.

Beyond searching and editing, ALM also helps you remember what still needs attention.
How to use Flags
The Flags functionality in ALM helps users track follow-up work by adding a follow-up flag against a specific work item.
This feature is available in the following modules.
- Requirements
- Test Plan
- Test Lab
- Defects
For demo purposes, let us understand the ‘Flag for Follow up’ functionality by flagging a work item in the requirements module.
Step 1) The Flag functionality can be accessed by
- Selecting the requirement against which the flag for follow up should be done.
- Click on ‘Flag’ Icon.

Step 2) Upon clicking on the “Flag” icon, the “Flag for Follow up” Dialog is displayed to the user.
- Enter the Date on which the follow up should be done.
- Enter a brief description on why it has to be followed up.
- Click ‘OK’
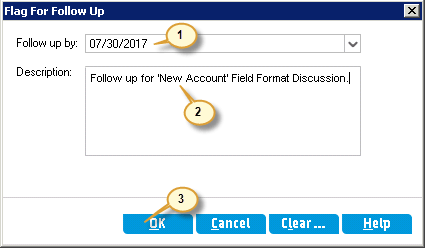
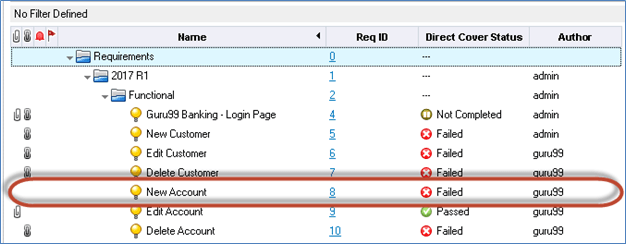
Step 3) The Flag for Follow up is created and user will be able to see the flag icon against that work item as shown below.

Step 4) When the follow up date matches with the current date, the flag for follow up would be displayed in RED color as highlighted below.

Step 5) User can also clear the flag once the follow up is complete. To perform the same,
- Click on the Follow up icon against the work item
- The Flag for follow up dialog opens. User can click on ‘Clear’ Button as shown below.

Step 6) Upon clicking on ‘Clear’ button, the confirmation dialog is displayed to the user. User can click ‘Yes’ to clear the flag for follow up against that work item.

Step 7) Upon clicking ‘Yes’ from the confirmation dialog, the flag for follow up is cleared against that requirement.
Every one of those edits is recorded, and the History tab is where that audit trail lives.
All About History Tab
The History tab enables ALM users to view all the changes made to the selected work item. The History includes date, time, the old value and the new value (changed value) for that work item.
This feature is available in the following modules.
- Requirements
- Test Plan
- Test Lab
- Test Resources
- Test Runs
- Defects
For demo purposes, let us see the history of a selected defect, which is the evidence trail behind the defect management process.
Step 1) Open a defect and defect details dialog is displayed to the user.
- Navigate to History Tab
- User can find the list of all the changes for this defect.

Step 2) Let us understand the history of the selected defect.
- In Change#1 only new value columns are populated as the defect is created for the first time.
- In Change#2 the Field ‘Status’ is changed from ‘New’ to ‘Open’
- In Change#3 the Field ‘Severity’ is changed from ‘High’ to ‘Low’, a decision that normally comes out of defect triage

Once you know what changed, the next step is usually telling somebody about it.
How to send Email
The Send Mail functionality in ALM allows users to send an email about the details of an entity to other users. The user has an option to include attachments and history while sending an email.
This feature is available in the following modules.
- Requirements
- Test Plan
- Test Resources
- Test Runs
- Defects
Step 1) The ‘send mail’ feature can be accessed by directly performing a click on ‘Send by E-mail’ icon as shown below.

Step 2) The ‘Send E-mail’ Dialog is displayed to the user.
- Add users who need to be in ‘To’ List.
- Add users who need to receive mail in ‘CC’ List.
- The Subject is prepopulated, however user can edit the subject before sending an email.
- User has capabilities to include ‘Attachments’ as well. This option corresponds to the attachments against a work item. Hence user cannot add any additional attachments from their hard drive while sending an email using the below dialog.
- If’ History’ checkbox is checked the history of the work item will also be included in the mail.
- Click ‘Send’.

Note:
- We can also send email to the other users who are NOT in ALM database by directly entering their email addresses in To or CC list.
- It is also understood that we will be able to add ALM users if and only if the user’s email ID is updated in ALM database.
- Sending an Email option sends all details such as test data, steps, status of each one of those steps.
- User also has an option to include attachments and history of that specific work item while sending the email (You cannot add attachments from your local hard drive)
Step 3) The Status of the email would be displayed to the user upon clicking ‘send’ button.

Communication aside, the grid itself can be tuned to show only the fields your role cares about.
How to use Column chooser
The Column Chooser option in ALM allows users to choose which columns are shown against each work item. Columns that are not chosen stay hidden from that user’s view.
This feature is available in the following modules.
- Requirements
- Test Plan
- Test Runs
- Defects
For demo purpose, we will understand the column chooser option by selecting only the relevant columns in defects module.
Step 1) Click ‘Column Chooser’ icon as shown below.

Step 2) The Column Chooser Dialog is displayed to the user.
- Select the Fields under ‘Visible Columns’ Section that you would like to hide it from your view
- Click ‘<‘ Button to push the selected column to ‘Available Columns’ List
- After pushing all the unnecessary columns from ‘Visible Columns’ list to ‘Available Columns’ list, Click ‘OK’.
- The order of the columns can be controlled with the help of the ‘up’ and ‘down’ arrows under ‘Visible Columns’ pane.

Note: The order of columns displayed in defects module would be same as that of the order specified under ‘Visible Columns’ section.
Step 3) Now, only the selected columns are displayed to the user as shown below.

Trimming columns saves reading time; setting defaults saves typing time.
How to Set Defaults
Set Defaults allows ALM users to set default values for certain fields, which are then prepopulated whenever that user creates a new work item of that type.
This feature is available in the following modules.
- Tests.
- Defects.
For Demo purpose, let us understand how to set default for a list of fields in ‘Defects’ Module.
Step 1) The ‘Set Default Values’ Option can be accessed by navigating to ‘Edit’ Menu as shown below.

Step 2) The ‘Set Default Values’ Dialog box is displayed to the user.
- Select the Field name to which you would like to have a default value.
- Enter the Value of the field name which has to be defaulted every time.
- Click ‘Add’

Likewise, we will add default values for other fields
Step 3) Upon adding all the default values, the ‘Set Default Values’ dialog appears as shown below.
- The list of all fields and their default values are listed.
- Enable ‘When creating an entity use these values automatically’ so that whenever user clicks on ‘New Defect’ Icon from defects module these fields would be defaulted to the preset values.
- Click ‘OK’

Step 4) Now click on ‘New Defect’ button in defects module. The default values are populated against those fields that are added under ‘Set Defaults’ dialog as shown below.

Finally, any combination of the settings above can be stored and recalled in one click.
How to use Favorites
Favorites in ALM behave the same way as bookmarks in a web browser. A favorite lets the user return to a specific view with a single click.
Favorites can be saved either private or public.
- Private – The added Favorite is available only for the current user.
- Public – The added Favorite is available across all project users.
Usually in ALM, the favorites are added on a filtered page. Let us say, as a tester I want to access the medium severity open defects that are assigned against my name. To achieve the same I need to apply 3 filters – one for filtering the severity, second for filter the defect status, third for filtering the name.
But using favorites we can access the defect which meets the above said criteria in a single click.
This feature is available in the following modules.
- Requirements.
- Test Plan.
- Test Lab.
- Defects.
For Demo Purpose, Let us apply favorites for accessing defects that are in ‘Open’ Status and that are having ‘medium’ severity.
Step 1) Before adding a favorite, let us apply filter for displaying medium severity open defects.

Step 2) Now navigate to ‘Favorites’ Menu and select ‘Add to Favorites’.

Step 3) The ‘Add Favorite’ Dialog box opens.
- Enter the name of the Favorite
- Select the folder (private or public) where the favorite has to be saved.
- Click ‘OK’

Step 4) The added favorite can be accessed by navigating to favorites menu and selecting the same as shown below.

Step 5) The favorite page is displayed.
- Displays the status with favorite name and favorite type (private in this case) along with the filter applied on the data.
- We can see that medium severity open defects are displayed to the user.
Video on Favorites
Click here if the video is not accessible.
Points to Note
- You can create a favorite view in the Quality Center window with your own custom settings. For example, in the defects grid you may want to create a favorite view to show only defects detected by you or assigned to you.
- A favorite view can be public or private.
- Private favorite is visible only to you.
- Public favorite is visible to all Quality Center users.
- Release and cycle planning uses the same shared views — see releases and cycles in ALM for that side of the tool.
