
Requirements Module in HP ALM (Quality Center)
 Thomas Hamilton
⚡ Smart Summary
Requirements Module in HP ALM (Quality Center) lets teams define, organize, and trace every project requirement. This walkthrough covers folder creation, manual entry, bulk upload through the Microsoft Excel add-in, coverage analysis, and traceability matrix generation.

What is the Requirements Module in HP ALM?
The Requirements module in HP ALM (Quality Center) is the workspace where a project team records what must be delivered in a release, organises those items into a hierarchy, and links them to tests and defects. It is the entry point of the ALM workflow, and every later module depends on the data captured here.
- Defining requirements is one of the preliminary phases of the software development lifecycle.
- A requirement describes what has to be delivered to the client at the end of a specific release.
- Establishing requirements with brevity and clarity upfront results in minimal rework after development is completed.
- This module lets users define, manage, and track requirements, and it supports parent-child nesting so a large requirement can be broken into smaller ones.
- Every requirement receives a unique Requirement ID, which is what the coverage and traceability reports use for identification.
The module is reached from the ALM sidebar, alongside Test Plan, Test Lab, and Defects. If you are new to the interface, the HP ALM GUI walkthrough explains each pane shown below.

Throughout this article we will use the sample application GURU99 Banking so that the requirements shown on screen map to a real feature set. The screen below shows the sample application whose features we will capture as requirements.

Why Requirements Management Matters in HP ALM
Storing requirements in a spreadsheet on a shared drive works until the first change request arrives. From that point nobody knows which test protects which requirement, or whether a defect belongs to an agreed scope item at all. Managing requirements inside ALM removes that ambiguity because the requirement record itself becomes the anchor for the rest of the project.
Four practical gains come from keeping requirements in the module rather than outside it:
- Single source of truth. Analysts, developers, and testers read the same record, and the History tab shows who changed what.
- Automatic coverage. Once a requirement is linked to tests in the Test Plan module, ALM calculates coverage without any manual tally.
- Impact analysis. When a requirement changes, the linked tests are flagged, so the team knows exactly what to re-run in the Test Lab.
- Release alignment. Target Release and Target Cycle fields tie each requirement to the plan defined in Releases and Cycles.
💡 Tip: Agree on the requirement type list with your business analysts before the first upload. Changing types later means re-mapping every Excel template your team already uses.
How to create Requirements
Step 1) Click on ‘Requirements’ in the ‘Requirements’ module.

Step 2) Maintain all the requirements for this release (2017 R1) in a specific folder so that they are easy to access. In addition, show the distinction between ‘Functional’ and ‘Non Functional’ requirements by placing them in different folders.
- Click the ‘New Folder’ icon under the Requirements module.
- Enter the name of the folder as “2017 R1” to easily identify the requirements for this release.

Step 3) The created folder is shown as displayed below.

Step 4) Now create a folder for ‘Functional‘ requirements, where all the functional requirement documents and work items are maintained.

Step 5) The created folder is displayed in the ‘Requirements‘ module as shown below.

Step 6) Similarly, create a ‘Non Functional’ folder. After creating both the Functional and Non Functional folders, the folder structure looks as shown below.

Step 7) Click the ‘New Requirement’ icon on the requirements page as shown below.

The ‘New Requirement’ dialog opens and the user has to enter the following mandatory fields.
- Enter the name of the requirement.
- Select the requirement type.
The dialog below shows both mandatory fields filled in.

Step 8) The user can also enter the following non-mandatory fields.
- Author
- Priority
- Reviewed
- Target Release
- Target Cycle
- Description and Comments
Step 9) The module also allows users to enter requirement text in ‘Rich Text‘ format directly, as shown below.

Step 10) Usually, requirements are captured in a Word document. They can be uploaded under the Attachments tab as shown below. ALM also supports other file types such as .xls and .jpg. After uploading, click the Submit button.

Step 11) The saved requirement is displayed to the user as shown below.

How to Upload Requirements using Microsoft Excel
Creating requirements manually is fine for a handful of items, but it becomes slow once a release carries dozens of them. Uploading in bulk is far quicker than adding each requirement one by one. To make that possible, HP ships an add-in that exports rows directly from Microsoft Excel or Microsoft Word into ALM. The procedure below covers the whole path, from downloading the add-in to verifying the uploaded records.
Before starting, it helps to see the workflow end to end. The three parts that follow map to the three stages in this diagram.

Part A – Downloading the Excel Add-in
Step 1) Navigate to the ALM home page http://localhost:8181/qcbin and click on “Tools” from the list of links.

Step 2) Click on the “More HP ALM Add-ins” link from the add-ins page as shown below.

Step 3) Select ‘Add-ins for Microsoft Applications’ and then select ‘Microsoft Excel’ from the list, because the MS Excel add-in is the one used to upload data into HP ALM.

Step 4) Select the ‘HP ALM Microsoft Excel Add-in for ALM 12.00’ link that matches your server version.
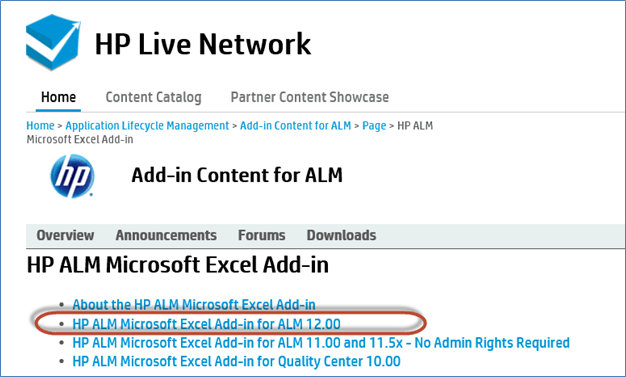
Step 5) The download page also offers a ‘Read-me’ guide and an ‘Add-in’ guide, which are worth keeping. On clicking the download link, the add-in setup file is saved to the default or user-selected location.

⚠️ Warning: The add-in version must match the ALM server version. An add-in built for ALM 12.00 will refuse to connect to a server on a different major release, and the export wizard fails at the authentication step with a generic error.
Part B – Installing the Excel Add-in
Step 1) Select the downloaded add-in, right-click the file, and choose ‘Run as administrator’ so that the add-in can register itself for Excel.

Step 2) The setup wizard opens. Review the welcome screen and click ‘Next’ to continue.

Step 3) Select the installation type. Here ‘For All Users’ is selected, which is the default setting. To install only for the logged-in account, select ‘For Current User Only’ and click ‘Next’.

Step 4) On completion of the installation, the user gets a status message. Click the ‘Finish’ button.

Step 5) To verify that the add-in installed successfully, open Excel and navigate to the ‘Add-ins’ tab. The option ‘Export to HP ALM’ confirms that the add-in is registered.

Part C – Uploading Requirements into ALM
Step 1) Before uploading the requirements from Excel, prepare the worksheet so that it can be read by the wizard.
- Select the fields that you wish to upload into ALM and create a header row in Excel for those fields.
- Enter valid data in each one of those fields as shown below.

Step 2) After selecting the data to upload, click ‘Export to HP ALM’ from the ‘Add-ins’ tab.

Step 3) The ALM Export Wizard opens. Enter the HP ALM server URL and click ‘Next’.

Step 4) Enter the user name and password for authentication and click ‘Next’.

Step 5) Select the domain and project name into which the requirements should be uploaded, then click ‘Next’.

Step 6) Select the type of data to upload. In this case it is Requirements. Tests and defects can be uploaded through the same wizard.

Step 7) Enter the new map name. The first option, ‘Select a map’, is disabled because no map has been created so far. Create a new map name and click ‘Next’. ‘Create a temporary map’ is left unselected because this map will be reused every time requirements are uploaded.

Step 8) In this dialog, the user has to choose the requirement type behaviour. If only one type of requirement is being uploaded, select ‘Single Requirement Type’. Because this example uploads different requirement types, the type must be mapped against the corresponding column in Excel. In this template, column ‘E’ carries the requirement type.

Step 9) On clicking ‘Next’, the mapping dialog opens as shown below.
- The left pane lists the fields that are available for upload in HP ALM. Note that the fields marked in red are mandatory and must be mapped.
- The right pane lists the fields that are already mapped, so that values in Excel flow into the corresponding fields of ALM.

Step 10) To map a field, select the ALM field you would like to map and click the arrow button as shown below.
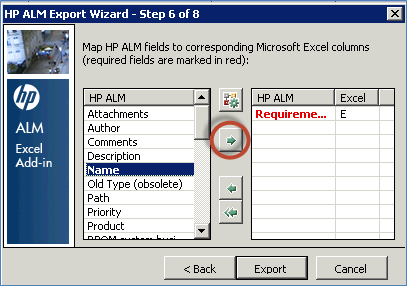
Step 11) Enter the Excel column letter that corresponds to the selected HP ALM field.

Step 12) Map all the required columns in Excel against the appropriate fields in HP ALM. After mapping every required field, click ‘Export’.

Step 13) On a successful upload, ALM displays the message shown below. If errors appear, fix the flagged rows and re-run the export.

Step 14) Verify the result under the ‘Requirements’ tab. All the requirement details, including attachments, are uploaded as shown below.

How to do Coverage Analysis (Requirement Traceability)
Once requirements, tests, and defects are mapped, ALM can generate a coverage analysis and a traceability matrix. Coverage analysis shows the test coverage against a specific requirement, together with the number of tests passed, failed, and not executed. It is the fastest way to prove that every scope item has at least one test case behind it.
Step 1) Navigate to the Requirements module, click the ‘View’ menu, and select ‘Coverage Analysis’.

Step 2) The coverage analysis is generated against each requirement placed under the ‘Requirements’ tab, with a consolidated status at folder level.

Step 3) On expanding the folder, the coverage analysis is displayed as shown below.

Step 4) Click any coverage analysis status to get a drill-down report.
- Click the status of a specific requirement. The coverage analysis is displayed with the number of failures.
- Click ‘Show Test Coverage’, which shows the detailed test status attached to the selected requirement.

Step 5) On clicking ‘Show Test Coverage’, the test execution status against the selected requirement is displayed. Failed entries here are the ones that usually turn into records in Defect Management.

Traceability Matrix
- The Traceability Matrix enables users to determine the extent of the relationships between requirements and other requirements, or between requirements and tests.
- The matrix lists source requirements together with their associated requirements and tests, and displays the total number of relationships for each source requirement.
Step 1) Navigate to the ‘View’ menu and select ‘Traceability Matrix’.

Step 2) The Traceability Matrix page opens as shown below.
- Click ‘Configure Traceability Matrix’.
- The ‘Configure Traceability Matrix’ dialog opens.
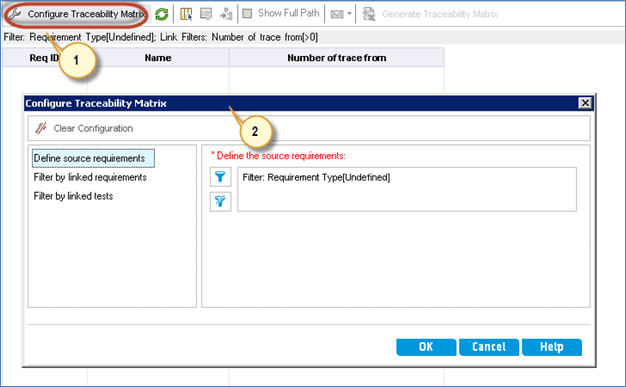
Step 3) Set the criteria for generating the traceability matrix as shown below.
- Click ‘Filter’ under ‘Define Source Requirements’.
- The ‘Filter Requirements’ dialog opens. Click the filter criteria button.
- The Select Filter Criteria dialog opens. Select ‘Functional’ from the list.
- Click ‘OK’.
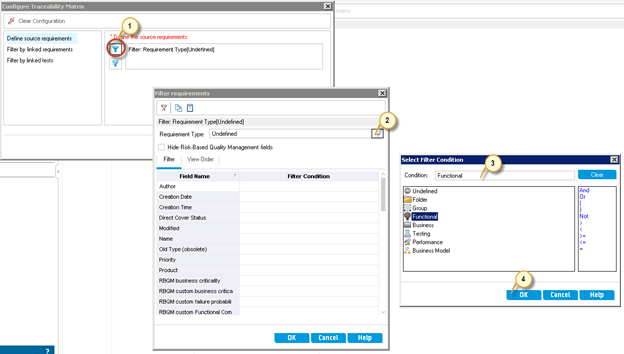
Step 4) The Filter Requirements dialog displays the filter criteria selected by the user. Click ‘OK’.

Step 5) The Configure Traceability dialog is displayed.
- The selected ‘Requirement Type’ is shown.
- Click on the ‘Filter by linked tests’ link.

Step 6) Generate the traceability matrix between requirements and tests. On clicking ‘Filter by linked tests’, the following dialog is displayed.
- Enable ‘Filter by linked tests’.
- Select ‘Linked to’ the following tests.
- To generate the matrix for requirements that have more than 5 tests, select the filter criteria ‘more than’.
- Enter a value. In this case it is ‘5’.
- Click ‘OK’.

Step 7) The following screen is displayed with all the requirements and their corresponding tests, provided the specified traceability criteria are met.

Step 8) The user can also click ‘Generate Traceability Matrix’ to export the result to Excel.
- Select the details for which the traceability matrix has to be generated.
- Click ‘Generate Traceability Matrix’.

Step 9) The File Save dialog is displayed to the user.
- Choose the location where the traceability matrix has to be saved.
- Enter the file name.
- Click ‘Save’.

Step 10) On clicking the ‘Save’ button, the traceability matrix is generated and opened for the user.

The short video below walks through the same Requirements module screens.
Requirement Types and Field Choices Compared
ALM ships with a small set of requirement types out of the box, and each one changes which fields appear on the Details tab. Choosing the right type early keeps the Excel mapping stable and the coverage reports meaningful.
| Requirement type | Typical use | Covered by tests? |
|---|---|---|
| Undefined | Placeholder created during the first import, refined later | No |
| Business | High-level business goal owned by the analyst | No |
| Folder | Grouping node such as “2017 R1” or “Functional” | No |
| Functional | Behaviour the application must exhibit | Yes |
| Testing | Requirement written specifically to drive test design | Yes |
Only types flagged as testable can be linked to tests, which is why a Business requirement never shows a coverage percentage. Two habits keep the module clean:
- Keep the folder tree shallow. Release, then category, then requirements, is usually enough.
- Reuse a saved Excel map instead of a temporary one so that repeated uploads produce identical field mapping.
Project administrators can add custom requirement types and fields, as described in project customization.
To carry these requirements forward, continue with the Test Plan module to design linked tests, then run them from the Test Lab and log findings through Defect Management. If you are still setting up, review what HP ALM is and the installation steps, and prepare for interviews with the HP ALM interview questions.
FAQs
Click here if the video is not accessible
