Test Plan Module in HP ALM (Quality Center) Tutorial
- After defining requirements, development team kick starts their design and development process while Testing team start designing tests that can be executed once the build is deployed.
- Success of any product depends on the testing processes and the quality of testing that is being carried out. A Good Test Plan results in a bug free product.
- ALM supports maintenance and execution of manual, automation and performance tests as ALM is seamlessly integrated with all HP products such as HP UFT and HP Load Runner.

How to Create Test Plan
Step 1 ) Similar to requirements, let us create a placeholder/folder for each one of the test types such as Functional and Non Functional.
- Click on Test Plan link from the ALM Home page
- Click ‘New Folder’ Icon
- Enter the Folder Name as ‘Functional’ and click ‘OK’

Step 2) The created folder would be displayed as shown below.

Step 3) Similarly let us creates subfolders for ‘Manual’ and ‘Automated’ Tests under ‘Functional’ Folder. Hence the Final Folder Structure will be as shown below:
Note: We will NOT be able to create automated test scripts/Performance test scripts from ALM; instead it has to be created from respective HP tools such as UFT for functional and Load runner for performance. It is then saved into ALM so that they can be scheduled, executed, monitored and reported.

Step 4) It would be better to create a New folder for each one of the modules of the application so that we don’t dump all manual tests in one folder. For Complex applications there would be thousands of tests which would be difficult to handle if they are not aligned properly.

Step 5) Now Let us create a Manual Test for the ‘Login’ Module by clicking on the ‘New Test’ Icon in ‘Test Plan’ Tab.

Step 6) Enter the following details for creating the new test successfully.
- Enter the New test Name
- Enter the Type of the Test. In this case it is ‘Manual’ Test.
- User can also enter other non-mandatory fields such as date, Description as shown below.
- Click ‘Submit’ once all the details are entered.

Step 7) Once the test is created, the created test will appear under the ‘Manual’ tests folder with other tabs generated as shown below. Let us discuss each one of these tabs in details in upcoming steps.

Step 8) Click ‘Design Steps’ tab and click on ‘New Step’ icon as shown below. The Design step details dialog box opens
- Enter the Step Name
- Enter the Step Description
- Enter the Expected Result
- Click ‘OK’

Step 9) Repeat the Step#6 and enter all the relevant steps to test the functionality. After creating all the required steps, ‘Design Steps’ tab displays all the created steps as shown below.

Step 10) Parameters, helps the user to assign a value to a variable that allows the user to execute the same test with different sets of data. In this case, the user name and password can be two parameters which would be assigned with a value. We will understand the importance of having parameters while test execution which will be dealt in Test Lab module.
Now, Let us see how to create parameters.
- Select the test step against which we would like to add the parameter.
- The ‘Parameter’ Icon will be enabled. Click on the same as shown below.

Step 11) The Parameter dialog will open as shown below. Click on ‘New Parameter’ button.

Step 12) The test parameter details dialog opens.
- Enter the parameter name
- Assign a Value to the Parameter
- Click ‘OK’.

Step 13) The ‘parameters’ dialog is displayed back to the user
- With the created variable
- The value
- Click ‘OK’.

Step 14) Now we can notice that the parameter is added in the ‘Test Step’ itself as shown below.
Repeat the same for password field as well.

Similarly, create parameter for Password Filed
Step 15) The created parameters can be viewed/edited in the parameters tab. This dialog also helps us to create, delete the parameters associated with the tests.

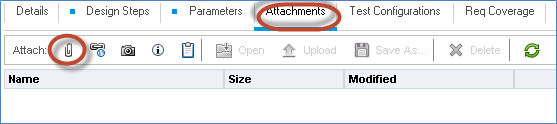
Step 16) The attachment tab allows the user to upload any type of file such as ‘xls’, ‘jpg’ etc.
Step 17) The test configuration helps us to reuse the test for different use case scenarios. Let us understand how to work with test configurations with an example. By default there is a test configuration that is specified as that of test name.
Note: We CANNOT delete the default test configuration but we can edit the same.

Step 18) Let us say the login functionality can be performed by three types of business users such as ‘helpdesk’, ‘manager’ and ‘cluster head’.
Let us rename the default test configuration to ‘helpdesk’ by editing the name field of the ‘Test Configuration’.

Step 19) Now let us add the other two more test configurations viz – manager and cluster head. Click ‘+’ icon under test configurations.

Step 20) The ‘New test Configuration’ dialog opens up.
- Enter the Test configuration name
- Enter other non-mandatory parameters such as ‘created by’ , ‘creation date’, ‘description’
- Click ‘OK’.

Step 21) Repeat the same step as above to create one more test configuration for ‘cluster head’ and the entire test configuration will be displayed to the user as shown below. This will allow the testers to execute the same test individually against all the created configurations during test execution which will result in no rewriting of tests.
Test Configuration should NOT be confused with test parameters. Hence we should understand the difference between parameter and test configurations. The Parameters are used to create variable and assign values for a specific step (parameterizing the test) while test configuration is applicable for all the steps and generally used to test different business use cases/Workflow. During Execution users can change values of the created parameters while a Test Case is executed for the selected configuration.
For Example, An online bill payment Application, user can select the payment mode. In case of ‘Credit Card’ Payments, user can either select master card, visa or American express. Each one of those having its own customer reward points. In order to test it, we can design a test such that each one of them are added into test configurations to verify the reward points.

Step 22) The ‘Req Coverage’ Tab helps the testers to map the test against a particular requirement(s) which helps users to generate coverage and traceability.
- Click on ‘Req Coverage’ Tab.
- Select the ‘Requirement’ which should be mapped against this particular test case
- Click ‘<=’ button to map the selected requirements against the test. We can also map multiple requirements against the same test.

Step 23) The Tab ‘Linked Defects’ shows empty as we haven’t executed any test/raised any Defect against the test case. This tab will be populated with the defect details if the defects are posted against the test case at the time of creating the defects.

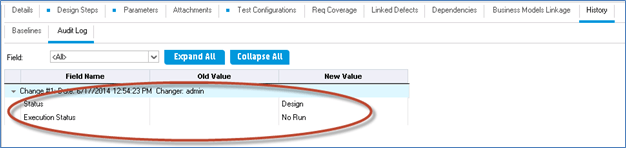
Step 24) History tab shows the list of changes made over time against this particular test case right from time of creating the test.
Uploading Tests
Sometimes, user won’t be creating test cases manually as it is pretty much time consuming process. Most Organizations develop manual tests in Excel and upload into ALM in bulk rather than creating each manual tests one by one. In order to facilitate uploading into ALM, HP has come up with an Addin with which the user can upload from MS excel/MS Word directly. Let us understand the step by step procedure to upload requirements into QC from Excel.
How to Upload Tests using Microsoft Excel
Step 1) Before uploading the tests from excel, we need to prepare the Excel such that it can be uploaded.
- Select the Fields that you wish to upload into ALM and create a header in Excel for those fields.
- Enter a valid data in each one of those fields as shown below.

Step 2) After selecting the data to upload, click ‘Export to HP ALM’ from ‘Add-Ins’.

Step 3) The ALM Export Wizard opens. Enter the HP ALM Server URL and Click ‘Next’.

Step 4) Enter the user name and password for authentication and Click ‘Next’.

Step 5) Select the Domain, Project Name into which we would like to upload the tests and Click ‘Next’.

Step 6) Select the type of data that we would like to upload. In this case, it is tests. We will also upload Defects in the upcoming chapters.

Step 7) Enter the New Map name. The first option, ‘Select a map’ is disabled because we haven’t created a map so far. Hence we should create new map name and click ‘Next’. We haven’t selected ‘Create a Temporary map’ as we would like to reuse every time for uploading ‘tests.

Step 8) Upon Clicking ‘Next’, the mapping dialog opens as shown below.
- The left pane grid items that are listed correspond to the fields that are available for upload in HP ALM. Please note that the fields marked in ‘RED’ should be mapped as they are mandatory fields.
- The right pane grid items refer to the fields that are mapped so that values in Excel will flow into those corresponding fields of ALM.

Step 9) Now let us understand how to map the fields in Excel against the fields in ALM.
- Select the Field that user would like to map and click on the arrow button as shown below.

- Enter the column name in Excel that corresponds to the appropriate column name in HP ALM.

- Map all the required columns in Excel against the appropriate fields in HP ALM. After mapping all the required fields, click ‘Export’.

Step 10) Upon successful upload, ALM displays the message as shown below. If errors appear please fix the issue and try re-uploading the same.
Some of the common errors are listed below :
- The Subject/Path is invalid/unavailable or NOT mapped by the user.
- The Field ‘Test Type’ has a value other than Manual. Automated tests CANNOT be uploaded using Excel.
- Test Name field is Empty or NOT Mapped.
- Status shouldn’t have values other than Design, ready, Imported, Repair.

Step 11) Now let us verify the same under ‘Tests’ Tab. All the test details are uploaded as shown below.
Note : Users can also perform re-uploading of tests. In case of re-uploading the test cases, if the test name already exists and if there is just a change in step description then the test will be overwritten with the existing one. If the test name is different from the uploaded one, it uploads as a new test.

How to create Test Resources
The Test Resources enables users to manage resources that are usually picked up by automated/performance tests. Users can upload the script which can be used by one or more tests. They can also be downloaded/edited and uploaded back again into test resources.
Let us see how we can make use of Test Resources module effectively. This module is demonstrated by uploading the same excel file into test resources that we used for importing the tests from excel into ALM.
Upload of Test Case excel is recommended so that we can edit the tests whenever required and re-upload only the modified test cases. It is also easy to add new tests and upload just the newly added tests.
However we can also upload other types of files such as .xls, .vbs, .qfl etc.
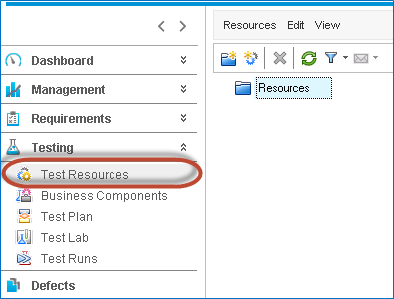
Step 1) Navigate to Test Resources module as shown below. The test resources module page opens.
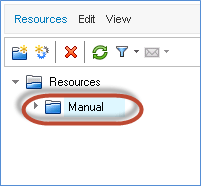
Step 2) Create a ‘New Folder’ by clicking on New Folder Icon as shown below. The New folder dialog opens. Let us create test resource for all three tests viz – Manual, Automation and Performance.

Step 3) The folder is created as shown below.
Step 4) Similarly let us create two more folders viz – Automation and Performance. After Creating a folder for each one of the test resources, the final folder structure will be as shown below:

Step 5) Let us create a New test resource by uploading the excel file that we have created for writing manual tests which were uploaded into ALM. Select the folder where user would like to upload the test resource.

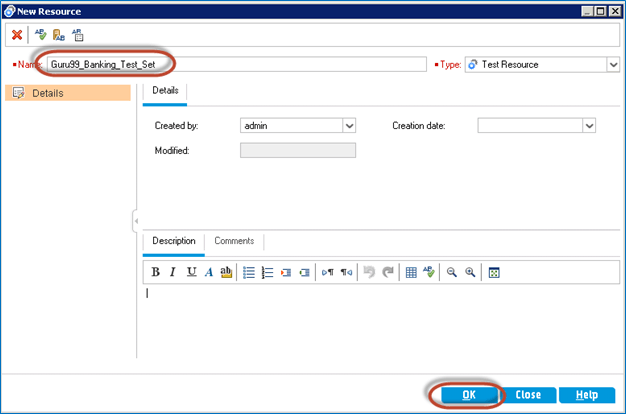
Step 6) Enter the name of the test resource and also select the type of the resource and click ‘OK’.
Step 7) Upon creating the test resource, now we need to upload the resource so that it is available under ‘Resource Viewer’ Tab which will be used across tests.
- Click ‘Resource Viewer’ Tab
- Click ‘Upload File’ and select the file for upload

Step 8) After uploading the file, the Status will be shown to the user and it will be available for download.

Note: The Following types of Test Resources are uploaded that can be used for executing the automated tests.
- DataTable
- Environmental Variables
- Function Libraries
- Recovery Scenarios
- Shared Object Repository
Video on Test Plan
Click here if the video is not accessible
key takeaways:-
- You will use the Test Plan module in QualityCenter to design and create your test cases/scripts.
- You can link your Tests in Test Plan Module with Requirements in the Requirement Module for easy tracking.
- QualityCenter provides many a features like copying test steps , emailing scripts for review , adding attachments etc. to facilitate faster development of test cases.