
Defect Management Life Cycle in HP ALM (Quality Center)
 Thomas Hamilton
⚡ Smart Summary
Defect Management Life Cycle in HP ALM enables testers to log, track, and report defects across a release. The Defects module records each defect from New to Closed, links defects to requirements, and supports Excel upload and email alerts.

What is Defect Management in HP ALM?
- A Defect is logged during the test execution, when the expected result and actual result do not match with each other.
- The Defect module in HP ALM not only helps users to post the defects but also enables them to track and gives the overall quality of the release at any stage of the development process.

Default Defect Life Cycle in ALM:

| Status | Explanation |
|---|---|
| New | When a defect is posted, the default status is ‘New’. |
| Open | When the defect is accepted by developers, it is moved to ‘Open’ status. |
| Rejected | When the defect is rejected by developers, it is moved to ‘Rejected’ status. |
| Fixed | When the defect is fixed by developers, it is moved to ‘Fixed’ status. Testers would pick up all defects for Testing that are in status ‘Fixed’. |
| Reopen | If the testing has failed, the defect is moved to ‘Reopen’ status. |
| Closed | If the testing has passed, the defect is moved to ‘Closed’ status. |
Note: Users can also configure the defect life cycle by adding new defect statuses. Adding a new defect status would be dealt with in the project customization chapter.
How to Create a New Defect
Step 1) Navigate to the Defects tab in Quality Center and click on the “New Defect” button.

Step 2) The “New Defect” dialog opens up. Fill in the following mandatory information.
- Enter the Detected By field.
- Enter the Detected on Date – by default, the current date would be picked up.
- Set the severity level of the defect.
- The user can also enter other information and a brief description about the defect.

Step 3) The tester can also attach screenshots or other relevant files associated with the defect using the ‘Attachments’ tab.
- Click ‘Attachments’ tab.
- Click ‘Attachments’ button.
- Select a file from the File explorer dialog.
- Click ‘Open’.

Step 4) Upon clicking ‘Open’, we will be able to see that the file is attached under the attachment section.
- The selected file has been uploaded.
- Click ‘Submit’ to post a defect, after which it generates a defect ID.

Step 5) The defect is posted, and the same can be accessed in the Defects tab as shown below. You can also notice that the defect ID is generated upon posting the defect.

How to Link Defect to a Requirement
Users can link a defect with other defects or link a defect with requirements. By linking defects and requirements, we can generate a coverage analysis graph and traceability matrix.
Step 1) After creating the defect, testers can map the linked requirements against it. To do the same:
- Click on ‘Defect ID’.
- The defect details dialog opens as shown below.

Step 2) To link entities:
- Navigate to ‘Linked Entities’.
- Click ‘Others’ for linking requirements against this defect.
- Click ‘Link’ button and choose ‘by Id’ (we can also select based on a requirement name).
- Enter the Requirement ID against which this defect has to be mapped.
- Click ‘Link’ button.

Step 3) After clicking the link button, the defect details window is displayed back to the user with the added link as shown below.

Step 4) Once the requirement is linked against a defect, the requirement displays with the link symbol against it as shown below.

Step 5) Once the requirement is linked against a defect, the requirement Traceability Matrix can be generated. To generate the Traceability Matrix, navigate to the view menu of ‘Requirements’ and select ‘Traceability matrix’. The generated Traceability Matrix would be generated as shown below.
Note: Please refer to the tutorial ‘Requirements Module‘ for generating a traceability matrix where the steps are elaborated in detail.

How to Upload Defect using Excel
- Every time, users would not be in a position to create each one of those defects manually.
- This module helps users to upload the defects from Excel into ALM. This really helps when users want to migrate from one defect management system to ALM.
- The process remains the same as that of uploading Tests and requirements.
- One has to ensure that the Excel file is prepared in a format such that ALM allows importing of the data.
Step 1) Create the Excel file with the required columns that the user wishes to upload as shown below.
The field ‘attachments’ takes the local path where the screenshot or any other attachment is kept. Users have to just mention the path of the attachment so that it would be picked up for uploading into ALM along with the other details of the defect.

Step 2) Now:
- Navigate to the ‘Add-ins’ tab.
- Select ‘Export to HP ALM’.

Step 3) The ALM Export Wizard opens. Enter the HP ALM Server URL and click ‘Next’.

Step 4) Enter the user name and password for authentication and click ‘Next’.

Step 5) Select the Domain and Project Name into which we would like to upload the tests and click ‘Next’.

Step 6) Select the type of data that we would like to upload. In this case, it is Defects.
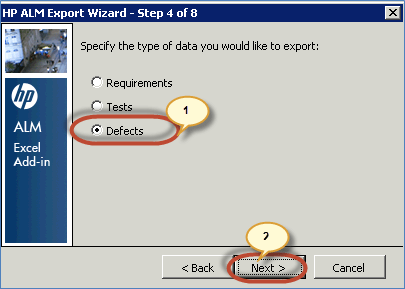
Step 7) Enter the new map name. The first option, ‘Select a map’, is disabled because we have not created a map so far for uploading defects. Hence, we should create a new map name and click ‘Next’. We have not selected ‘Create a Temporary map’ as we would like to reuse it every time for uploading defects.

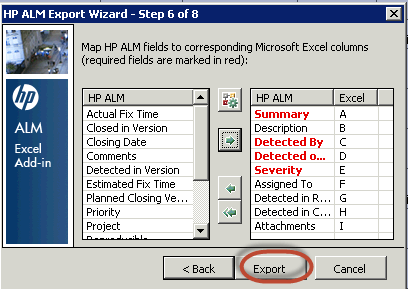
Step 8) Upon clicking ‘Next’, the mapping dialog opens as shown below.
- The left pane grid items that are listed correspond to the fields that are available for upload in HP ALM. Please note that the fields marked in ‘RED’ should be mapped as they are mandatory fields.
- The right pane grid items refer to the fields that are mapped so that values in Excel will flow into those corresponding fields of ALM.

Step 9) Now let us understand how to map the fields in Excel against the fields in ALM.
- Select the field that the user would like to map and click on the arrow button as shown below.

- Enter the column name in Excel that corresponds to the appropriate column name in HP ALM.

- Map all the required columns in Excel against the appropriate fields in HP ALM. After mapping all the required fields, click ‘Export’.
Step 10) Upon successful upload, ALM displays the message as shown below.

How to search a Defect
The Defect module contains all the defects that are logged, right from the very first defect that has been logged. Hence, a user would be in a position to search defects based on certain criteria.
Step 1) Navigate to the ‘Edit’ menu and choose ‘Find’.

Step 2) The Find dialog would be displayed.
- Enter the field name based on which the search has to be performed (in this case we use Defect ID to search).
- Enter the value.
- Click ‘Find Next’.

Step 3) ALM displays the item in the background as shown below.

Email Notification of Defects
- Assigned users will automatically receive an email if there is a change in the status or assigned-to fields, provided the email configurations are set appropriately by the ALM admin.
- The email would be triggered based on the setting under the ‘Alerts’ tab of the project customization module (refer to Project Customization for details).
Let us say the assigned user ‘Glenn’ has to receive an email when the defect status moves to ‘Fixed’ status. The email would be sent as shown below. The screenshot is taken after receiving an email (from MS Outlook).
- The mail is sent to ‘Glenn’.
- The mail has the details about the defect.
- The mail is triggered because the status has moved from ‘Reopen’ to ‘Fixed’ as shown below.

Video on Defect Management
Click here if the video is not accessible
