
HP ALM Admin: How to Create Domain, Project & User
 Editorial Team
⚡ Smart Summary
HP ALM Admin work begins inside Site Administration, where you create a domain, add a project beneath it, register users, and map those users to project areas. Every step runs from the Site Administration console, which ordinary end users cannot open.

What is HP ALM Site Administration?
Site Administration is the server-level console of HP ALM (Application Lifecycle Management), the tool formerly sold as HP Quality Center and now marketed as OpenText ALM/Quality Center. It is opened from a separate link on the ALM home page and is reserved for the Site Administrator account created during installation. From this single console the administrator builds the container structure that every tester later works inside: domains, projects, and user accounts.
Site Administration is often confused with Project Customization, but the two consoles do very different jobs. Site Administration decides which projects exist and who may open them. Project Customization decides how one project behaves once it is open.
| Aspect | Site Administration | Project Customization |
|---|---|---|
| Scope | The whole ALM server | One single project |
| Opened from | Site Administration link on the ALM home page | Tools > Customize inside a project |
| Typical tasks | Create domains, create projects, add site users, assign licences | Add project users to groups, edit fields, build lists and workflow |
| Who uses it | Site Administrator only | Project Administrator or lead |
| Effect of a change | Affects every project on the server | Affects only the current project |
If you have not installed the server yet, start with the HP ALM installation walkthrough, because the Site Administrator password used below is set during that installation.
HP ALM Domain, Project and User Hierarchy
ALM stores everything in a strict three-level structure. A domain sits at the top as a logical folder, one or more projects sit under each domain, and each project holds its own database schema with requirements, tests, test runs and defects. User accounts sit outside this tree: they are defined once for the entire site and are then granted access to individual projects.
| Level | What it is | Example used in this article | Created by |
|---|---|---|---|
| Domain | A grouping folder for related projects. Holds no test data of its own. | BANKING | Site Administrator |
| Project | A self-contained repository with its own database schema and file storage. | GURU99_BANK | Site Administrator |
| Site user | A login defined once for the whole ALM server. | Guru99 | Site Administrator |
| Project user group | The permission set that decides what the user can do inside a project. | QA Tester, Project Manager | Project Administrator |
The practical consequence of this design is that a domain must exist before a project can be created, and a project must exist before a user can be mapped to it. That is exactly the order the three sections below follow.
💡 Tip: Group domains by business line or application, not by team name. Teams change far more often than applications, and a domain cannot be renamed casually once dozens of projects report against it.
How to Create a Domain in HP ALM
Step 1) Launch ALM.
Launch ALM and click “Site Administration” on the home page. A login prompt appears. Enter the Site Administrator credentials that were created during installation.

Step 2) Open the Create Domain action.
The Site Administration dashboard opens on the Site Projects tab. Click Create Domain in the toolbar above the project tree.

Step 3) Enter the domain name.
In the pop-up, type the domain name — “Banking” in this example — and click OK.

Step 4) Confirm the domain.
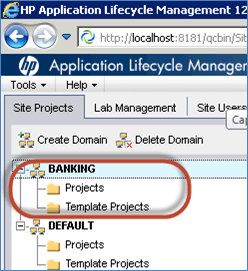
The new domain now appears in the project tree on the left, as shown below. It is empty until you add a project to it.
Also Check:- HP ALM / Quality Center Tutorial
How to Create a Project in HP ALM
Step 1) Select the parent domain.
Select the domain the project belongs under — “BANKING” in this case — and click Create Project.

Step 2) Choose the project type.
The Create Project wizard opens. Select Create an Empty Project from the list and click Next. The other options let you copy an existing project or import one from a saved file.

Step 3) Name the project.
Enter the project name and confirm the domain shown beneath it, then click Next.

Step 4) Supply the database details.
Select the database type that matches your installation. MS-SQL is selected here because HP ALM was installed with SQL Server as the backend; choose Oracle instead if that is your database server. Then enter:
- Database server name
- Database admin user name
- Database admin password
Click Next to continue.

Step 5) Assign a project administrator.
Select the Admin user and click Next. No other names appear yet because no additional users have been created in ALM at this point.

Step 6) Review the summary and create.
The summary dialog lists everything the wizard is about to do. Two check boxes also appear in this window:
- Activate Project — if this is left unchecked, the project is still created but no user can open it until it is activated later.
- Enable Versioning — this turns on version control, which prevents two users from editing the same work item (a requirement or a test) at the same time and overwriting each other’s changes.
Click Create when you are satisfied with the summary.

⚠️ Warning: Versioning cannot be switched on and off casually on a live project. Enabling it later forces a check-in of existing entities, and disabling it discards version history. Decide before the team starts loading requirements.
Step 7) Watch the creation progress.
ALM builds the database schema and repository folders. The project creation status is displayed as shown below.

Step 8) Confirm the project.
The project “GURU99_BANK” has now been created successfully under the “BANKING” domain, as shown below.

Also Check:- How to Customize a Project in HP ALM (Quality Center)
How to Create a User in HP ALM
Step 1) Open the Site Users tab.
In order to access HP ALM, a user profile must exist. To create one, the Site Administrator clicks the Site Users tab.

Step 2) Click the Add User icon.
Click the Add User icon on the Site Users tab, as shown below.

Step 3) Fill in the user details.
The Add User dialog box opens. Enter the login name, full name, email address and any other required details, then click OK.

Step 4) Verify the user list.
The new account is now displayed in the user list, highlighted below alongside the accounts that already existed.

Step 5) Map the user to a project.
The account must now be mapped to project areas, because a newly created user has access to no project at all. A user only has to be created once and can then be granted access to as many project areas as needed.
In this example the user “Guru99” has been added to the “GURU99_BANK” project area, which sits under the “BANKING” domain.
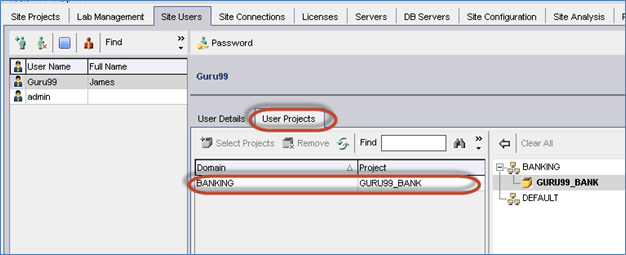
Once the mapping is saved, the user can log in and will see the new project in the domain and project drop-downs on the ALM login screen. What the user can actually do inside the project is controlled separately by the project user group, which is set in Project Customization.
HP ALM Site Administration Best Practices
The domain, project and user structure you create on day one is difficult to unpick later, because project data, licence counts and audit trails all hang off it. A few habits keep a growing ALM server manageable.
- Adopt a naming convention early. Something like DOMAIN_APPLICATION_RELEASE keeps the project tree readable once you pass twenty projects.
- Never share the Site Administrator account. Give each administrator a personal login and add it to the site administrators list so that the audit log identifies who did what.
- Create a template project. Build one project with your standard fields, lists and workflow, then use “Create Project from Template” so that reporting stays consistent across teams.
- Deactivate rather than delete. Deactivating frees the licence seats and blocks logins while preserving the data and the schema for audits.
- Verify projects after every upgrade. The Maintain Project actions repair schema differences before users hit them.
- Watch licence usage. The Licences and Site Connections tabs show how many named or concurrent seats are actually in use, which is the fastest way to find idle accounts.
Back up the ALM database schemas and the file repository together. Restoring one without the other leaves attachments pointing at rows that no longer exist, which is the most common cause of a failed ALM recovery.
With the domain, project and users in place, the next steps are to explore the ALM interface, capture scope in the Requirements module, build test cases in the Test Plan module, execute them from the Test Lab, and log findings through defect management. If you are preparing for a role that involves ALM administration, review these Quality Center interview questions as well.
