How to Customize Project in HP ALM (Quality Center)
- Project Customization enables project administrators to control access to a project by defining the users who can access the project and it also has capabilities to customize what type of tasks each user can perform.
- One can also customize a project to meet the specific requirements of your organization.
- It also helps is adding/editing new customized user fields that can be added to each one of the modules in ALM.
Lets look into them one by one
User Properties
Current logged in user will be able to edit their profile details and it allows user to change their password.
Note: Only the current logged in user password can be changed even if the user is of type ‘Project Admin’.
Step 1) Click on Tools link and select ‘Customize’ as shown below.

Step 2) The Project Customization dialog is displayed as shown below.

Step 3) To Change the password of the current user, click ‘Change Password’ in ‘User Properties’ Tab.

Step 4) The change password dialog opens.
- Enter Old Password
- Enter New Password
- Enter Confirm Password
- Click ‘OK’

Step 5) User will be displayed with the status message.

Step 6) Usercan also edit the following profile details.
- Email ID
- Full Name
- Phone Number
-
Click ‘Save’
Note: Users WILLNOT be able to edit their User Name, even if the user is of type ‘project Administrator’.

Step 7) The Status is displayed to the user as shown below.

Project Users
This module enables users to add and remove users for the current ALM project. One can also assign users to user groups to restrict user access privileges.
Step 1) Now let us Add users to the Project Area.
- Navigate to Project Users
-
Click Add User Drop Down.

Step 2) Upon clicking ‘Add User’ Drop Down,the following methods are displayed to the user as shown below.
- Add User by Name – Project Admin can add the existing user of ALM to this project by giving their user name. (The same has been done on Step 1 & 2)
- Add New User to the Site – Add New User to the Site by entering all details, the same way we have added users from Site Admin.
- Add Users from Site – Add New user by searching based on their name or ID.
Let us see each one of the functionalities.

Step 3) Let us add an userbasedon Name. Ensure that this user is already existing in ALM Admin database(User created using Site Administration module)
- Select ‘Project Users’ from the project Customization window.
- Click ‘Add User’
- Enter User Name
- Click ‘Ok’

Step 4) The Added user is displayed as shown below.

Step 5) Now Let us add user using the option ‘Add new user to ‘Site’.

Step 6) Upon Clicking ‘Add New User to Site’ From ‘Add User’, the following dialog is displayed.
- Enter User Name
- Enter Email
- Enter Full Name
- Enter Phone Number
- Click ‘OK’

Step 7) The user is now added to the current project. The user is added in ‘project users’ as shown below.

Step 8) Now let us add project users using the option ‘add Users from Site’.
Ensure that the user is already in ALM admin database.

Step 9) The following dialog is displayed.
- Enter the User Name and click search icon
- The User Name is displayed
- Click ‘OK’

Step 10) The User is added to the project and displayed as shown below.

Step 11) Project Admin can also remove a user from the project users module.
- Select the user
-
Click ‘Remove User;


Step 12) Confirmation Dialog is displayed. Click ‘Yes’.

Step 13) Upon Clicking ‘Yes’ the user is removed from the project users list.

Step 14) Each one of the user in the ‘Project Users’ has a membership associated with it.
Note : By default, any added user has just ‘View’ Permissions only.
- Select the User Name
- Select ‘Membership’ tab
-
The membership for the selected user would be displayed. The newly added user ‘Cathy’ has ‘Viewer’ permission

Groups and Permissions
This module enables project admin to assign privileges to user groups by specifying permissions.
There are 5 predefined groups in ALM and each one of those user groups has different permissioning levels.
- Developer
- Project Manager
- QA Tester
- TD Admin
- Viewer
Note: By Default any added user to the project area carries just ‘View’ Permission.
Step 1) Let us see the list of users in ‘TDAdmin’ Group.
- Select ‘TDAdmin’
- Under Membership Tab you will notice users not in the group
- Under ‘In Group’ section you will notice the list of user within the group. In this case only ‘Admin’ is displayed.

Step 2) The Predefined group permissions cannot be edited.
- Select ‘TDAdmin’
- Navigate to permissions Tab
- Select any module(Defects in this case)
- The Permissions cannot be edited even if the current user is a project Admin.

Step 3) The Predefined groups Cannot be Renamed or Deleted.

Step 4) In order to change a group permission, project admin has to add a New Group. Let us say we need to create a new user group such that those users have ‘Edit permission’ for defects module and View permission for others. This means all the permission has to be same as that of ‘View’ user except the fact that the user should be able to ‘update’ the defects. To do the same,
- Click ‘New Group’
- Confirmation dialog is shown to the user. Click ‘Yes’.

Step 5) Upon clicking yes, ‘New Group’ Dialog is shown
- Enter the Group Name
- Enter the profile

Step 6) The user group is created as shown below. You can also notice that we can rename/Delete the group because it is created by us. Predefined Groups in ALM cannot be edited or deleted.

Step 7) To change the permission
- navigate to ‘Permissions’ Tab
- Click ‘Defects’ Tab
- Enable ‘Update’ flage for Defects
- Enable ‘Update’ Flag for links

Module Access
This module enables project Admins to control the modules that each user group can access. This will prevent users from accessing restricted modules.
Let us say, Developers have nothing to do with test cases, hence they can be prevented from accessing test plan, test lab modules.
Step 1) The default module access is displayed below. All types of user groups has access to all modules by default.

Step 2) For demo purpose, let us remove all module access to VIEW user type except defects module.
Uncheck all the module access against View user except Defects module as shown below.

Step 3) Now let us login using one of the ‘View’ User Id’s to check if the changes have been applied correctly. From the below snapshot it is very evident that the settings has been applied as per our inputs as it displays only ‘Defects’ Module for the view user ‘Jim’.

Project Entities
- Project Entities Enables project administrators to modify the behavior of ALM system fields or define user defined fields.
- For example, if we are executing the tests on various builds and we would like to add a field ‘Build Version’ in ‘Add Defects Module’ we can do the same using project entities module.
Step 1) User defined fields cannot be added under system fields which are Read-only.
- Select ‘Project Entites’
- Select ‘Defect’ and select the subfolder ‘System Fields’.
-
We can notice that we WILL NOT be able to add ‘New Field’ or Delete it as system fields are read-only.

Step 2) To add a user defined field,
- Select ‘User Fields’ Subfolder under ‘Defects’ Module.
- Click ‘New Field’
- The Field Details would appear as shown below which can be edited.

Step 3) Field details can also be edited as shown below.
- Rename the Label to ‘Build Number’.
- Check ‘Required’ which means this field will be a mandatory field for posting a new defect.
- Click Save

Step 4) Now we can witness the changes made in the defects module. Navigate to defects module and user will be able to see the newly created field ‘Build Number’ which will be part of ‘New Defects’ Module.

Project Lists
- Project lists Enables project admins to add customized lists to a project. A list contains values that the user can enter in system/user-defined fields.
- For example, the Bug Status list has six predefined status viz – New, Open, Fixed, Reopen, Closed, Rejected. If we would like to add one more status, let us say, Duplicate, we can do so using this module.
Step 1) To add an item under predefined lists,
- Click ‘Project Lists’
- Select ‘Bug Status’
- Click ‘New Item’. New Item dialog opens.
- Enter the Item Name.
- Click ‘Ok’

Step 2) Upon clicking OK, the new item is created as shown below.

Step 3) Now we need to save the changes.
- Click ‘save’ button.
- A pop up is shown. Click ‘OK’.

Step 4) Now navigate to defects module and verify whether status has the newly added item in the list.

Automail
This module enables project Admins to set up automatic mail notification rules to notify users via email about the changes made to specified defects. This automail feature is available only to defects module.
Step 1) To activate automail notifications perform the following steps.
- Navigate to ‘Automail’ Link.
- User can trigger email by selecting any number of available fields in the list.
- This grid shows the list of fields that user has selected to send mail about the changes.
- Project Admin can also select the email settings against each one of the available users.
- Click ‘save’.

Step 2) A pop is shown. Click Ok

Alert Rules
This module enables project admins to activate alert rules for the current project. This feature will create alerts and send emails when changes occur in the project. This module holds good for requirements, associated tests , defects.
Step 1) To Activate alert rules,
- Navigate ‘Alert Rules’.
- Enable ‘Alert Associated with’ check box
- Enable ‘send E-mail to’ & add corresponding tester/designer.
- Click ‘Save’

- The First alert : Test Designer is alerted when a requirement is modified so that associated tests can be modified
- The Second alert: The tester is alerted when a Defect changes its status to ‘Fixed’ so that the responsible tester can pick up again for retesting.
Workflow
- This module enables project admins to generate scripts which helps in
Customizing the Defects module (add defect Dialog or View Defect Dialog).
- With the help of this module, project admins can also write scripts to customize dialog boxes in other modules, and control the actions that users can perform.
Now let us customize ‘Add Defect’ dialog for ‘TDAdmin’ group user type.
Step 1) Under project customization,
- Click ‘Workflow’.
- Select ‘Script Generator – Add Defect Field Customization’ Link

Step 2) The Add Defect field customization dialog opens up.
- Select the user group.
- Select the fields that user don’t want to appear during add Defect dialog.
- Click ‘<‘ link to push the fields out of visible fields list.
Note: Mandatory Fields Cannot be moved out of visible fields list.

Step 3) After pushing all the irrelevant fields out of visible fields list the customization field dialog is displayed as shown below.
- The Fields that are pushed out of visible fields list.
- The fields that would be part of Add Defect dialog.
- Apply Script changes.

Note: Though we did customization using this user interface, the changes are done with the help of generating scripts at back end. We will also deal with script editing with an example after this section.
Step 4) Now login as user of type ‘TDAdmin’ and click ‘New Defect’ from defects module. The fields that are selected by the user as visible is displayed in ‘New defects’ window.

Script Editor
The script editor functionality helps users to write scripts to customize dialog boxes of various modules and also control the actions that users can perform within each module.
Let us change the way the ‘View Defect’ Dialog displays to the user with the help of script editor.
Step 1) To access the Script editor –
- Navigate to Workflow Tab
- Click ‘Script Editor’.

Step 2) The Script editor is shown to the user as shown below.
- Select ‘Defects Module Script’
- The comment shows that- this is the area where we need to make changes as it explicitly displays ‘defect details field customization’.
- It is scripted for each user group. The one that we are seeing corresponds to ‘Developer’ user group. We need to make changes to ‘TDAdmin’ user group.

Step 3) Now scroll down to ‘TDAdmin’ user group where we need to make changes. The current settings for ‘TDAdmin’ is displayed as shown below.
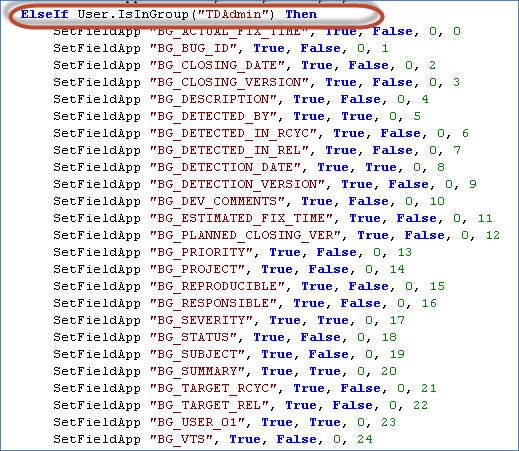
Step 4) Let us understand the script.
Let us consider the following line of code in the script
SetFieldApp “BG_ACTUAL_FIX_TIME”, True, False, 0, 0
Here are the details –
| SetFieldApp | Is the Function call made with 5 parameters |
| Field Name | BG_ACTUAL_FIX_Time – The field name. We are going to change the settings for this field name |
| Visible Flag | Corresponds to Visible Flag. If true, it will be visible. |
| Required Flag | Checks if the field is mandatory. If true, the field is mandatory. |
| PageNo Flag | Starts with 0. If there are more number of fields then user can configure them to be displayed page wise. |
| ViewOrder | User can also arrange the order of the field using this flag. Starts with 0 and increments by 1. Based on this the order of fields are set |
Step 5) Let us make changes to the first field ‘BG_ACTUAL_FIX_TIME’ Field.
The script for the field ‘BG_ACTUAL_FIX_TIME’ in script editor is shown below.
SetFieldApp “BG_ACTUAL_FIX_TIME”, True, False, 0, 0
As per the above script the defect Details dialog is displayed to the user as shown below.

Edit that line of code as shown below.
SetFieldApp “BG_ACTUAL_FIX_TIME”, False, False, 0, 16
The script output has reflected in Defect details dialog as shown below.

Step 6) Let us make changes to all the fields that are available.
- Change the parameters of the function calls as explained in previous step for each one of those fields as shown below.
- Click ‘Save’.

Step 7) Now login as one of the users of type ‘TDAdmin’ and access one of the defects so that ‘View defect details’ dialog opens up. The defect details dialog now displays as shown below.
