Selenium C# Tutorial with NUnit Example
Selenium Overview
Selenium is an open-source, web Automation Testing tool that supports multiple browsers and multiple operating systems. It allows testers to use multiple programming languages such as Java, C#, Python, .Net, Ruby, PHP, and Perl for coding automated tests.
C# Overview
C# is an object-oriented programming language derived from C++ and Java. C# allows developers to build applications using Visual Studio on .Net platform. The following are the key features of C#.
- It is an Object-Oriented programming language
- It supports the development of console, windows and web-based applications
- It provides features such as Encapsulation, Inheritance, and Polymorphism.
Basic Syntax of C#
A program in C# need to contain the following sections
- Namespace declaration
- Classes
- Class Attributes and Methods
- Main method
- Program statements
Example-
Below is a sample Selenium C# example program to print the text ‘Guru99’ on the system console.
using System;
namespace FirstProgram {
class DemoPrint {
static void main(){
    Console.WriteLine("Guru99");
	}
  }
}
Explanation:
- A namespace in the above Selenium C# example is a collection of multiple classes. Each namespace must be declared using the keyword ‘using’.
- The first statement of the code includes the namespace ‘System’ into our program. System namespace defines the fundamental classes and events used in C#. The namespace to be used depends on the program requirement.
- The second statement is declaring a namespace “FirstProgram” for the class “DemoPrint.” A C# file can contain multiple classes within the same namespace.
- The third statement includes the class declaration. A class may contain multiple attributes and multiple methods.
- The fourth statement includes a declaration of the Main method. The main method is the entry point of execution for each class.
- The last statement is the C# syntax used for printing a statement to console. WriteLine is a method of the class ‘Console.
Selenium with C# Setup
How to Set Up Visual Studio with Selenium WebDriver:
Now in this Selenium C# tutorial, let’s learn the step by step process to set up Visual Studio with Selenium WebDriver:
Visual Studio is an Integrated Development Environment (IDE) that is used by developers to build applications across multiple platforms such as Windows, Android, iOS and Cloud-based applications.
Step 1) Navigate to the URL
https://visualstudio.microsoft.com/downloads/ and Click on the ‘Free download’ button displayed on Visual Studio Community tab

Step 2) Open the exe downloaded. Click on ‘Yes’ if asked for Admin Rights.

Step 3) The below popup will appear. Click on ‘Continue’ button.

Files will be downloaded as shown in the popup below.

Step 4) In the next screen,
Select the checkboxes for
- Universal Windows Platform development
- .Net desktop development
Click on ‘Install.’
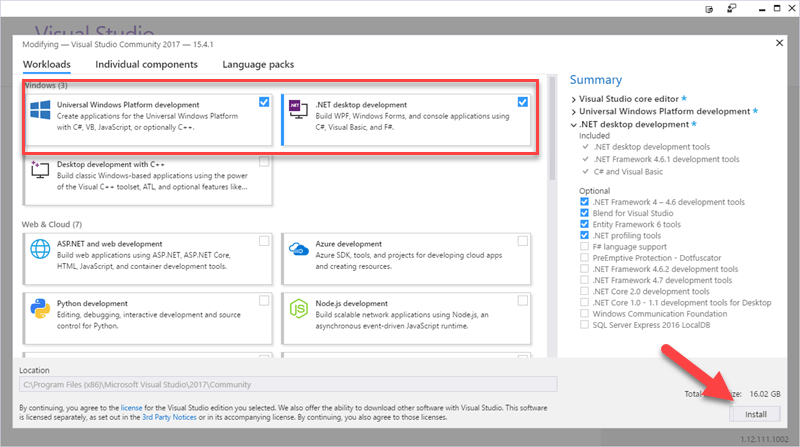
Wait for installation of each component to complete. Files are 16GB in size and will take time.

Step 5) The below pop up will be displayed. Click on ‘Restart’ button.

Step 6) Once the machine is restarted, search for “Visual Studio” on the start menu and click on the search result. The following popup will appear. Click on “Not now, maybe later” link if you do not have an existing account.

Step 7) In the next screen,
- Select color theme of your liking
- Click the button “Start Visual Studio'”

Step 8) Visual Studio ‘Get Started’ screen will appear.

Create a new project in Visual Studio:
Step 1) In the File Menu, Click New > Project

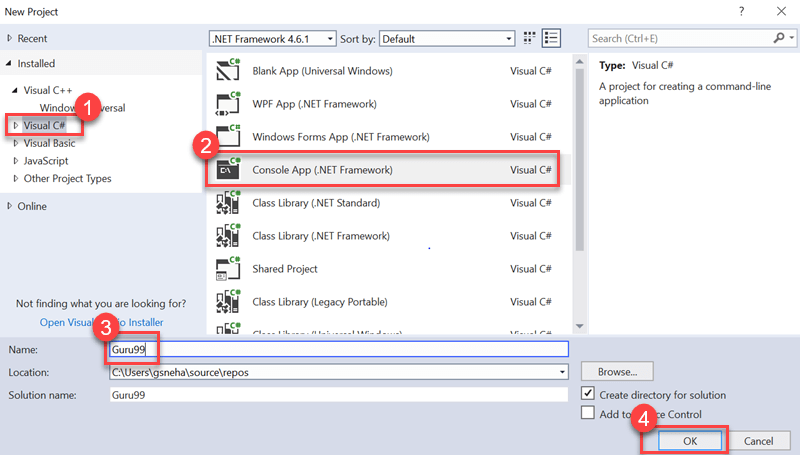
Step 2) In the next screen,
- Select the option ‘Visual C#’
- Click on Console App (.Net Framework)
- Enter name as “Guru99”
- Click OK
Step 3) The below screen will be displayed once the project is successfully created.

Set up Visual Studio with Selenium WebDriver:
Step 1) Navigate to Tools -> NuGet Package Manager -> Manage NuGet Packages for Solution

Step 2) In the next screen
- Search for Selenium on the resultant screen
- Select the first search result
- Check the project checkbox
- Click on ‘Install’

Step 3) Click on ‘OK’ button in the pop-up screen
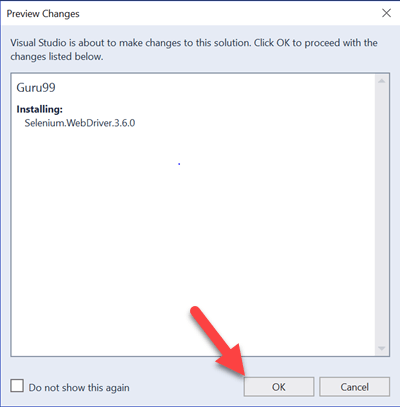
Step 4) The below message will be displayed once the package is successfully installed.

NUnit Framework: Overview
NUnit is the Unit Testing framework supported by Visual Studio and Selenium WebDriver. NUnit is the most widely used Unit Testing framework for .Net applications. NUnit presents the test results in a readable format and allows a tester to debug the automated tests.
We need to install NUnit Framework and NUnit Test Adapter onto Visual Studio inorder to use it.
Steps to install NUnit Framework
Now in this Selenium with C# tutorial, let’s learn the process to install NUnit framework:
Step 1) Navigate to Tools -> NuGet Package Manager -> Manage NuGet Packages for Solution

Step 2) In the next window
- Search for NUnit
- Select the search result
- Select Project
- Click Install

Step 3) The below popup will appear. Click on ‘Ok’ button.
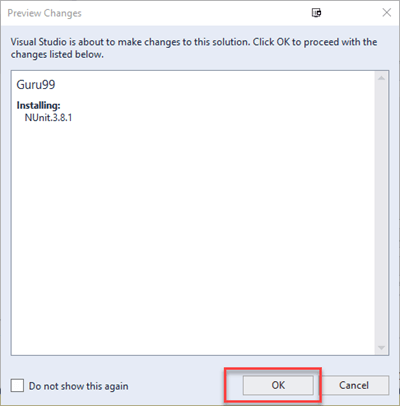
Step 4) The below message will appear once the installation is complete.

Steps to download NUnit Test Adapter
Now in this NUnit tutorial, we will cover the steps to download NUnit Test Adapter:
Please note that the below steps work only for 32-bit machines. For 64-bit machines, you need to download the ‘NUnit3 Test Adapter’ by following the same process as mentioned below.
Step 1) Navigate to Tools ->NuGet Package Manager -> Manage NuGet Packages for Solution. In that screen,
- Search NUnitTestAdapter
- Click Search Result
- Select Project
- Click Install

Step 2) Click OK on the confirmation pop-up. Once install is done you will see the following message-

Selenium and NUnit framework
Integration of selenium with NUnit framework allows a tester to differentiate between various test classes. NUnit also allows testers to use annotations such as SetUp, Test, and TearDown to perform actions before and after running the test.
NUnit framework can be integrated with Selenium by creating a NUnit test class and running the test class using NUnit framework.
Below steps in this Selenium C# framework tutorial are needed to create and run a test class using NUnit framework.
Steps to create a NUnit Test class in Selenium:
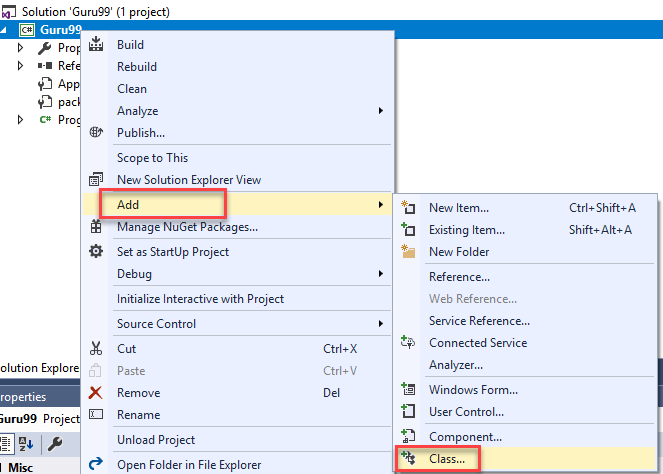
Step 1) In the Solution Explorer, Right click on project > Add > Class
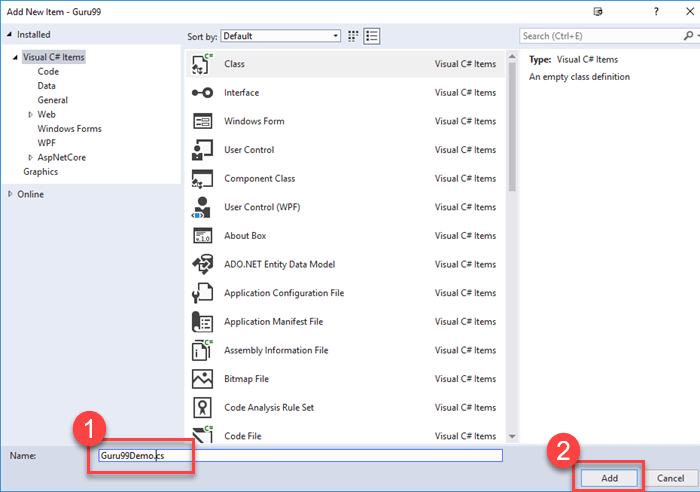
Step 2) Class creation window will appear.
- Provide a name to the class
- Click on Add button
Step 3) The below screen will appear.

Step 4) Add the following code to the created class. Please note that you need to specify the location of ‘chromdriver.exe’ file during chrome driver initialization.
using NUnit.Framework;
using OpenQA.Selenium;
using OpenQA.Selenium.Chrome;
using OpenQA.Selenium.Firefox;
using System;
using System.Collections.Generic;
using System.Linq;
using System.Text;
using System.Threading.Tasks;

namespace Guru99Demo
{
	class Guru99Demo
    {
        IWebDriver driver;

        [SetUp]
		public void startBrowser()
        {
            driver = new ChromeDriver("D:\\3rdparty\\chrome");
        }

        [Test]
		public void test()
        {
            driver.Url = "http://www.google.co.in";
        }

        [TearDown]
		public void closeBrowser()
        {
            driver.Close();
        }

    }
}
Step 4) Click on ‘Build’ -> ‘Build Solution’

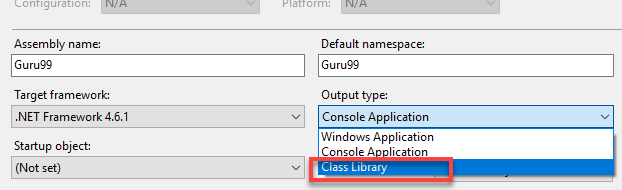
NOTE: You may get an error like “Does not contain a static ‘main’ method suitable for an entry point” when you build

To resolve this Got to Project > Properties and change Output Type to “Class Library.” The default is “Console Application.”
Step 5) Once the build is successful, we need to open the Test Explorer window. Click on Test -> Windows -> Test Explorer

Step 6) Test Explorer window opens with the list of available tests. Right-click on Test Explorer and select Run Selected Tests

Step 7) Selenium must open the browser with specified URL and close the browser. Test case status will be changed to ‘Pass’ on the Test Explorer window.

Selenium WebDriver Commands in C#
C# uses the interface ‘IWebDriver’ for browser interactions. The following are the category of commands available with Selenium in C#.
- Browser commands
- Web Element commands
- Dropdown commands
Now in the Selenium C Sharp tutorial, let’s study the Selenium WebDriver commands one by one
Browser commands:
Following is a list of browser commands available in C# with Selenium.
| Command Name | Description | Syntax |
|---|---|---|
| Url Command | This command is used to open a specified URL in the browser. |
driver.Url = "https://www.guru99.com" |
| Title Command | This command is used to retrieve the page title of the web page that is currently open |
String title = driver.Title |
| PageSource Command | This command is used to retrieve the source code of web page that is currently open. |
String pageSource = driver.PageSource |
| Close Command | This command is used to close the recently opened browser instance. |
driver.Close(); |
| Quit Command | This command is used to close all open browser instances |
driver.Quit(); |
| Back Command | This command is used to navigate to the previous page of browser history. |
driver.Navigate().Back(); |
| Forward Command | This command is used to navigate to the next page of browser history. |
driver.Navigate().Forward() |
| Refresh Command | This command is used to perform browser refresh. |
driver.Navigate().Refresh() |
Webelement Commands
A Webelement represents all the elements on a web page. They are represented by HTML tags. Each of the buttons, textboxes, links, images, tables, and frames fall under Webelements. Operations on web elements can be triggered using the IWebelement interface. To interact with a Webelement, we need to find the element on the webpage and then perform operations on it. Tools like Firebug and Firepath can be used to identify the Xpath of Webelement.
The following are the list of Webelement commands available in C#.
| Command Name | Description | Syntax |
|---|---|---|
| Click command | This command is used to click on a Webelement. For the element to be clickable, the element must be visible on the webpage. This command is used for checkbox and radio button operations as well. |
IWebelement element = driver.FindElement(By.xpath("xpath of Webelement")); element.Click();
|
| Clear command | This command is specifically used for clearing the existing contents of textboxes. |
IWebelement element = driver.FindElement(By.xpath("xpath of Webelement"));
element.Clear();
|
| SendKeys command | This command is used to input a value onto text boxes. The value to be entered must be passed as a parameter to |
IWebelement element = driver.FindElement(By.xpath("xpath of Webelement"));
element.SendKeys("guru99");
|
| Displayed command | This command is used to identify if a specific element is displayed on the webpage. This command returns a Boolean value; true or false depending on the visibility of web element. |
IWebelement element = driver.FindElement(By.xpath("xpath of Webelement"));
Boolean status = element.Displayed;
|
| Enabled command | This command is used to identify if a particular web element is enabled on the web page. This command returns a Boolean value; true or false as a result. |
IWebelement element = driver.FindElement(By.xpath("xpath of Webelement"));
Boolean status = element.Enabled;
|
| Selected command | This command is used to identify if a particular web element is selected. This command is used for checkboxes,radio buttons, and select operations. |
IWebelement element = driver.FindElement(By.xpath("xpath of Webelement"));
Boolean status = element.Selected;
|
| Submit command: | This command is similar to click command, The difference lies in whether the HTML form has a button with the type Submit. While the click command clicks on any button, submit command clicks on the only the buttons with type submit. |
IWebelement element = driver.FindElement(By.xpath("xpath of Webelement")); element.submit();
|
| Text command | This command returns the innertext of a Webelement. This command returns a string value as a result. |
IWebelement element = driver.FindElement(By.xpath("xpath of Webelement"));
String text=element.Text;
|
| TagName command | This command returns the HTML tag of a web element. It returns a string value as the result. |
IWebelement element = driver.FindElement(By.xpath("xpath of Webelement")); String tagName = element.TagName;
|
| GetCSSValue Command: | This method is used to return the color of a web element on the form of a rgba string (Red,Green,Blue, and Alpha). |
IWebelement element = driver.FindElement(By.xpath("xpath of Webelement"));
String color = element.getCSSValue;
Output– If the color of element is red, output would be rgba(255,0,0,1) |
Dropdown Commands:
Dropdown operations in C# can be achieved using the SelectElement class.
The following are the various dropdown operations available in C#.
| Command Name | Description | Syntax |
|---|---|---|
| SelectByText Command | This command selects an option of a dropdown based on the text of the option. |
IWebelement element = driver.FindElement(By.xpath("xpath of Webelement"));
SelectElement select = new SelectElement(element);
select.SelectByText("Guru99");
|
| SelectByIndex Command | This command is used to select an option based on its index. Index of dropdown starts at 0. |
IWebelement element = driver.FindElement(By.xpath("xpath of Webelement"));
SelectElement select = new SelectElement(element);
select.SelectByIndex("4");
|
| SelectByValue Command | This command is used to select an option based on its option value. |
IWebelement element = driver.FindElement(By.xpath("xpath of Webelement"));
SelectElement select = new SelectElement(element);
select.SelectByValue("Guru99");
|
| Options Command | This command is used to retrieve the list of options displayed in a dropdown. |
IWebelement element = driver.FindElement(By.xpath("xpath of Webelement"));
SelectElement select = new SelectElement(element);
List<IWebelement> options = select. Options;
int size = options.Count;
for(int i=0;i<options.size();i++)
{
String value = size.elementAt(i).Text;
Console.writeLine(value);
}
The above code prints all the options onto console within a dropdown. |
| IsMultiple command | This command is used to identify if a dropdown is a multi select dropdown; A multi select dropdown enables user to select more than one option in a dropdown at a time. This command returns a Boolean value. |
IWebelement element = driver.FindElement(By.xpath("xpath of Webelement"));
SelectElement select = new SelectElement(element);
Boolean status = select.IsMultiple();
|
| DeSelectAll command | This command is used in multi select dropdowns. It clears the options that have already been selected. |
IWebelement element = driver.FindElement(By.xpath("xpath of Webelement"));
SelectElement select = new SelectElement(element);
select.DeSelectAll();
|
| DeSelectByIndex command | This command deselects an already selected value using its index. |
IWebelement element = driver.FindElement(By.xpath("xpath of Webelement"));
SelectElement select = new SelectElement(element);
select.DeSelectByIndex("4");
|
| DeSelectByValue command | This command deselects an already selected value using its value. |
IWebelement element = driver.FindElement(By.xpath("xpath of Webelement"));
SelectElement select = new SelectElement(element);
select.DeSelectByValue("Guru99");
|
| DeSelectByText command | This command deselects an already selected value using its text. |
IWebelement element = driver.FindElement(By.xpath("xpath of Webelement"));
SelectElement select = new SelectElement(element);
select.DeSelectByText("Guru99");
|
Code Samples
Example 1: Click on a link using XPATH Locator:
Test Scenario:
- Navigate to Demo Guru99 web page – https://demo.guru99.com/test/guru99home/
- Maximize the window
- Click on the ‘Testing’ menu
- Close the browser
using NUnit.Framework;
using OpenQA.Selenium;
using OpenQA.Selenium.Chrome;
using System;
using System.Collections.Generic;
using System.Linq;
using System.Text;
using System.Threading.Tasks;

namespace Guru99Demo
{
	class CSS
    {
        IWebDriver m_driver;

        [Test]
		public void cssDemo()
        {
            m_driver = new ChromeDriver("D:\\3rdparty\\chrome");
            m_driver.Url = "https://demo.guru99.com/test/guru99home/";
            m_driver.Manage().Window.Maximize();
            IWebelement link = m_driver.FindElement(By.XPath(".//*[@id='rt-header']//div[2]/div/ul/li[2]/a"));
            link.Click();
            m_driver.Close();
        }
    }
}
Example 2: Entering data into TextBox and Click on a button using XPATH locator:
Test Scenario:
- Navigate to Guru 99 demo page – https://demo.guru99.com/test/guru99home/
- Enter data into email text box
- Click on sign up button
using NUnit.Framework;
using OpenQA.Selenium;
using OpenQA.Selenium.Chrome;
using System;
using System.Collections.Generic;
using System.Linq;
using System.Text;
using System.Threading.Tasks;

namespace Guru99Demo
{
	class CSS
    {
        IWebDriver m_driver;

        [Test]
		public void cssDemo()
        {
            m_driver = new ChromeDriver("G:\\");
            m_driver.Url = "https://demo.guru99.com/test/guru99home/";
            m_driver.Manage().Window.Maximize();


			// Store locator values of email text box and sign up button
            IWebElement emailTextBox = m_driver.FindElement(By.XPath(".//*[@id='philadelphia-field-email']"));
            IWebElement signUpButton = m_driver.FindElement(By.XPath(".//*[@id='philadelphia-field-submit']"));

            emailTextBox.SendKeys("test123@gmail.com");
            signUpButton.Click();

        }
    }
}
Example 3: Entering data into TextBox and Click on a button using CSS locator:
Test Scenario:
- Navigate to Guru 99 demo page – https://demo.guru99.com/test/guru99home/
- Enter data into email text box
- Click on sign up button
using NUnit.Framework;
using OpenQA.Selenium;
using OpenQA.Selenium.Chrome;
using System;
using System.Collections.Generic;
using System.Linq;
using System.Text;
using System.Threading.Tasks;

namespace Guru99Demo
{
	class CSS
    {
        IWebDriver m_driver;

        [Test]
		public void cssDemo()
        {
            m_driver = new ChromeDriver("G:\\");
            m_driver.Url = "https://demo.guru99.com/test/guru99home/";
            m_driver.Manage().Window.Maximize();


			// Store locator values of email text box and sign up button
            IWebElement emailTextBox = m_driver.FindElement(By.CssSelector("input[id=philadelphia-field-email]"));
            IWebElement signUpButton = m_driver.FindElement(By.CssSelector("input[id=philadelphia-field-submit]"));

            emailTextBox.SendKeys("test123@gmail.com");
            signUpButton.Click();


        }
    }
}
Example 4: Select a value in the dropdown:
Test Scenario:
- Navigate to Guru 99 demo page – https://demo.guru99.com/test/guru99home/
- Click on SAP link
- Enter data onto name and email text boxes
- Select a value from the Course dropdown
- Close the browser
using NUnit.Framework;
using OpenQA.Selenium;
using OpenQA.Selenium.Chrome;
using OpenQA.Selenium.Support.UI;


namespace Guru99Demo
{
	class TestSelect
    {
        IWebDriver m_driver;

        [Test]
		public void selectDemo()
        {
            m_driver = new ChromeDriver("G:\\");
            m_driver.Url = "https://demo.guru99.com/test/guru99home/";
            m_driver.Manage().Window.Maximize();

            IWebElement course = m_driver.FindElement(By.XPath(".//*[@id='awf_field-91977689']"));

			var selectTest = new SelectElement(course);
			// Select a value from the dropdown
            selectTest.SelectByValue("sap-abap");

        }
    }
}
Summary
- In order to use Selenium WebDriver with C#, you need to install Visual Studio.
- NUnit is the Unit Testing framework supported by Visual Studio and Selenium webdriver
- We need to install NUnit Framework and NUnit Test Adapter onto Visual Studio inorder to use it.
- NUnit framework can be integrated with Selenium by creating a NUnit test class and running the test class using NUnit framework.
- NUnit also allows testers to use annotations such as SetUp, Test, and TearDown to perform actions before and after running the test.
- Selenium WebDriver Commands can be categorized into Browser commands, Webelement Commands and Dropdown Commands.