Selenium Webdriver Java Program Example
Selenium Java Example
Using the Java class “myclass” that we created in the previous tutorial, let us try to create a WebDriver script that would:
Step 1: fetch Mercury Tours’ homepage
Step 2: verify its title
Step 3: print out the result of the comparison
Step 4: close it before ending the entire program.
Selenium WebDriver Sample Code
Below is the actual WebDriver code for the logic presented by the scenario above
package newproject;
import org.openqa.selenium.WebDriver;
import org.openqa.selenium.firefox.FirefoxDriver;
//comment the above line and uncomment below line to use Chrome
//import org.openqa.selenium.chrome.ChromeDriver;
public class PG1 {


    public static void main(String[] args) {
        // declaration and instantiation of objects/variables
    	System.setProperty("webdriver.gecko.driver","C:\\geckodriver.exe");
		WebDriver driver = new FirefoxDriver();
		//comment the above 2 lines and uncomment below 2 lines to use Chrome
		//System.setProperty("webdriver.chrome.driver","G:\\chromedriver.exe");
		//WebDriver driver = new ChromeDriver();

        String baseUrl = "https://demo.guru99.com/test/newtours/";
        String expectedTitle = "Welcome: Mercury Tours";
        String actualTitle = "";

        // launch Fire fox and direct it to the Base URL
        driver.get(baseUrl);

        // get the actual value of the title
        actualTitle = driver.getTitle();

        /*
         * compare the actual title of the page with the expected one and print
         * the result as "Passed" or "Failed"
         */
        if (actualTitle.contentEquals(expectedTitle)){
            System.out.println("Test Passed!");
        } else {
            System.out.println("Test Failed");
        }

        //close Fire fox
        driver.close();
    }

}
Note: Starting Firefox 35, you need to use gecko driver created by Mozilla to use Web Driver. Selenium 3.0, gecko and firefox has compatibility issues and setting them correctly could become an uphill task. If the code does not work, downgrade to Firefox version 47 or below. Alternatively, you can run your scripts on Chrome. Selenium works out of the box for Chrome. You just need to change 3 lines of code to make your script work with Chrome or Firefox
Explaining the code
Importing Packages
To get started, you need to import following two packages:
- org.openqa.selenium.*– contains the WebDriver class needed to instantiate a new browser loaded with a specific driver
- org.openqa.selenium.firefox.FirefoxDriver – contains the FirefoxDriver class needed to instantiate a Firefox-specific driver onto the browser instantiated by the WebDriver class
If your test needs more complicated actions such as accessing another class, taking browser screenshots, or manipulating external files, definitely you will need to import more packages.
Instantiating objects and variables
Normally, this is how a driver object is instantiated.
WebDriver driver = new FirefoxDriver();
A FirefoxDriver class with no parameters means that the default Firefox profile will be launched by our Java program. The default Firefox profile is similar to launching Firefox in safe mode (no extensions are loaded).
For convenience, we saved the Base URL and the expected title as variables.
Launching a Browser Session
WebDriver’s get() method is used to launch a new browser session and directs it to the URL that you specify as its parameter.
driver.get(baseUrl);
Get the Actual Page Title
The WebDriver class has the getTitle() method that is always used to obtain the page title of the currently loaded page.
actualTitle = driver.getTitle();
Compare the Expected and Actual Values
This portion of the code simply uses a basic Java if-else structure to compare the actual title with the expected one.
if (actualTitle.contentEquals(expectedTitle)){
            System.out.println("Test Passed!");
        } else {
            System.out.println("Test Failed");
        }
Terminating a Browser Session
The “close()” method is used to close the browser window.
driver.close();
Terminating the Entire Program
If you use this command without closing all browser windows first, your whole Java program will end while leaving the browser window open.
System.exit(0);
Running the Test
There are two ways to execute code in Eclipse IDE.
- On Eclipse’s menu bar, click Run > Run.
- Press Ctrl+F11 to run the entire code.
.png)
If you did everything correctly, Eclipse would output “Test Passed!”
.png)
Locating GUI Elements
Locating elements in WebDriver is done by using the “findElement(By.locator())” method. The “locator” part of the code is same as any of the locators previously discussed in the Selenium IDE chapters of these tutorials. Infact, it is recommended that you locate GUI elements using IDE and once successfully identified export the code to WebDriver.
Here is a Selenium sample code that locates an element by its id. Facebook is used as the Base URL.
package newproject;
import org.openqa.selenium.By;
import org.openqa.selenium.WebDriver;
import org.openqa.selenium.firefox.FirefoxDriver;

public class PG2 {
    public static void main(String[] args) {
    	System.setProperty("webdriver.gecko.driver","C:\\geckodriver.exe");
    	WebDriver driver = new FirefoxDriver();
        String baseUrl = "http://www.facebook.com";
        String tagName = "";

        driver.get(baseUrl);
        tagName = driver.findElement(By.id("email")).getTagName();
        System.out.println(tagName);
        driver.close();
        System.exit(0);
}
}
We used the getTagName() method to extract the tag name of that particular element whose id is “email”. When run, this code should be able to correctly identify the tag name “input” and will print it out on Eclipse’s Console window.
.png)
Summary for locating elements
| Variation | Description | Sample |
|---|---|---|
| By.className | finds elements based on the value of the “class” attribute | findElement(By.className(“someClassName”)) |
| By.cssSelector | finds elements based on the driver’s underlying CSS Selector engine | findElement(By.cssSelector(“input#email”)) |
| By.id | locates elements by the value of their “id” attribute |
findElement(By.id(“someId”)) |
| By.linkText | finds a link element by the exact text it displays |
findElement(By.linkText(“REGISTRATION”)) |
| By.name | locates elements by the value of the “name” attribute |
findElement(By.name(“someName”)) |
| By.partialLinkText | locates elements that contain the given link text |
findElement(By.partialLinkText(“REG”)) |
| By.tagName | locates elements by their tag name |
findElement(By.tagName(“div”)) |
| By.xpath | locates elements via XPath |
findElement(By.xpath(“//html/body/div/table/tbody/tr/td[2]/table/ tbody/tr[4]/td/table/tbody/tr/td[2]/table/tbody/tr[2]/td[3]/ form/table/tbody/tr[5]”)) |
Note on Using findElement(By.cssSelector())
By.cssSelector() does not support the “contains” feature. Consider the Selenium IDE code below –
.png)
In Selenium IDE above, the entire test passed. However in the Selenium WebDriver script below, the same test generated an error because WebDriver does not support the “contains” keyword when used in the By.cssSelector() method.
.png)
Common Commands
Instantiating Web Elements
Instead of using the long “driver.findElement(By.locator())” syntax every time you will access a particular element, we can instantiate a WebElement object for it. The WebElement class is contained in the “org.openqa.selenium.*” package.
.png)
Clicking on an Element
Clicking is perhaps the most common way of interacting with web elements. The click() method is used to simulate the clicking of any element. The following Selenium Java example shows how click() was used to click on Mercury Tours’ “Sign-In” button.
![]()
Following things must be noted when using the click() method.
- It does not take any parameter/argument.
- The method automatically waits for a new page to load if applicable.
- The element to be clicked-on, must be visible (height and width must not be equal to zero).
Get Commands
Get commands fetch various important information about the page/element. Here are some important “get” commands you must be familiar with.
| Commands | Usage |
|---|---|
| get()
Sample usage: |
|
| getTitle()
Sample usage: |
|
| getPageSource()
Sample usage: |
|
| getCurrentUrl()
Sample usage: |
|
| getText()
Sample usage: |
|
Navigate commands
These commands allow you to refresh,go-into and switch back and forth between different web pages.
| navigate().to()
Sample usage: |
|
| navigate().refresh()
Sample usage: |
|
| navigate().back()
Sample usage: |
|
| navigate().forward()
Sample usage: |
|
Closing and Quitting Browser Windows
| close()
Sample usage: |
|
| quit()
Sample usage: |
|
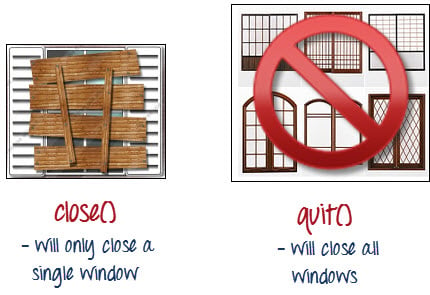
To clearly illustrate the difference between close() and quit(), try to execute the code below. It uses a webpage that automatically pops up a window upon page load and opens up another after exiting.
.png)
Notice that only the parent browser window was closed and not the two pop-up windows.

But if you use quit(), all windows will be closed – not just the parent one. Try running the code below and you will notice that the two pop-ups above will automatically be closed as well.
package newproject;
import org.openqa.selenium.WebDriver;
import org.openqa.selenium.firefox.FirefoxDriver;

public class PG3 {
    public static void main(String[] args) {
    	System.setProperty("webdriver.gecko.driver","C:\\geckodriver.exe");
    	WebDriver driver = new FirefoxDriver();
        driver.get("http://www.popuptest.com/popuptest2.html");
        driver.quit();  // using QUIT all windows will close
    }
}
Switching Between Frames
To access GUI elements in a Frame, we should first direct WebDriver to focus on the frame or pop-up window first before we can access elements within them. Let us take, for example, the web page https://demo.guru99.com/selenium/deprecated.html
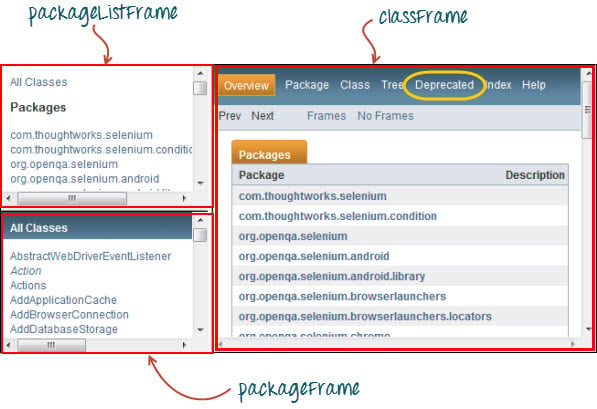
This page has 3 frames whose “name” attributes are indicated above. We wish to access the “Deprecated” link encircled above in yellow. In order to do that, we must first instruct WebDriver to switch to the “classFrame” frame using the “switchTo().frame()” method. We will use the name attribute of the frame as the parameter for the “frame()” part.
package newproject;
import org.openqa.selenium.By;
import org.openqa.selenium.WebDriver;
import org.openqa.selenium.firefox.FirefoxDriver;
public class PG4 {
	  public static void main(String[] args) {
		  	System.setProperty("webdriver.gecko.driver","C:\\geckodriver.exe");
		  	WebDriver driver = new FirefoxDriver();
	        driver.get("https://demo.guru99.com/selenium/deprecated.html");
	        driver.switchTo().frame("classFrame");
	        driver.findElement(By.linkText("Deprecated")).click();
	        driver.close();
	    }
}
After executing this code, you will see that the “classFrame” frame is taken to the “Deprecated API” page, meaning that our code was successfully able to access the “Deprecated” link.
Switching Between Pop-up Windows
WebDriver allows pop-up windows like alerts to be displayed, unlike in Selenium IDE. To access the elements within the alert (such as the message it contains), we must use the "switchTo().alert()" method. In the code below, we will use this method to access the alert box and then retrieve its message using the "getText()" method, and then automatically close the alert box using the "switchTo().alert().accept()" method.
First, head over to https://output.jsbin.com/usidix/1 and manually click the “Go!” button there and see for yourself the message text.
.png)
Lets see the Selenium example code to do this-
package mypackage;

import org.openqa.selenium.By;
import org.openqa.selenium.WebDriver;
import org.openqa.selenium.firefox.FirefoxDriver;

public class myclass {

    public static void main(String[] args) {
    	System.setProperty("webdriver.gecko.driver","C:\\geckodriver.exe");
        WebDriver driver = new FirefoxDriver();
        String alertMessage = "";

        driver.get("http://jsbin.com/usidix/1");
        driver.findElement(By.cssSelector("input[value=\"Go!\"]")).click();
        alertMessage = driver.switchTo().alert().getText();
        driver.switchTo().alert().accept();

        System.out.println(alertMessage);
        driver.quit();

    }
}
On the Eclipse console, notice that the printed alert message is:
.png)
Waits
There are two kinds of waits.
- Implicit wait – used to set the default waiting time throughout the program
- Explicit wait – used to set the waiting time for a particular instance only
Implicit Wait
- It is simpler to code than Explicit Waits.
- It is usually declared in the instantiation part of the code.
- You will only need one additional package to import.
To start using an implicit wait, you would have to import this package into your code.
![]()
Then on the instantiation part of your code, add this.
.png)
Explicit Wait
Explicit waits are done using the WebDriverWait and ExpectedCondition classes. For the following Selenium WebDriver example, we shall wait up to 10 seconds for an element whose id is “username” to become visible before proceeding to the next command. Here are the steps.
Step 1:
Import these two packages:
![]()
Step 2:
Declare a WebDriverWait variable. In this example, we will use “myWaitVar” as the name of the variable.
.png)
Step 3:
Use myWaitVar with ExpectedConditions on portions where you need the explicit wait to occur. In this case, we will use explicit wait on the “username” (Mercury Tours HomePage) input before we type the text “tutorial” onto it.
![]()
Conditions
Following methods are used in conditional and looping operations —
- isEnabled() is used when you want to verify whether a certain element is enabled or not before executing a command.
.png)
- isDisplayed() is used when you want to verify whether a certain element is displayed or not before executing a command.
.png)
- isSelected() is used when you want to verify whether a certain check box, radio button, or option in a drop-down box is selected. It does not work on other elements.

Using ExpectedConditions
The ExpectedConditions class offers a wider set of conditions that you can use in conjunction with WebDriverWait’s until() method.
Below are some of the most common ExpectedConditions methods.
- alertIsPresent() – waits until an alert box is displayed.
.png)
- elementToBeClickable() – Waits until an element is visible and, at the same time, enabled. The sample Selenium Code below will wait until the element with id=”username” to become visible and enabled first before assigning that element as a WebElement variable named “txtUserName”.
![]()
- frameToBeAvailableAndSwitchToIt() – Waits until the given frame is already available, and then automatically switches to it.
.png)
Catching Exceptions
When using isEnabled(), isDisplayed(), and isSelected(), WebDriver assumes that the element already exists on the page. Otherwise, it will throw a NoSuchElementException. To avoid this, we should use a try-catch block so that the program will not be interrupted.
WebElement txtbox_username = driver.findElement(By.id("username"));
try{
        if(txtbox_username.isEnabled()){
            txtbox_username.sendKeys("tutorial");
        }
    }

catch(NoSuchElementException nsee){
            System.out.println(nsee.toString());
 }
If you use explicit waits, the type of exception that you should catch is the “TimeoutException”.
.png)
Summary
- To start using the WebDriver API, you must import at least these two packages.
- org.openqa.selenium.*
- org.openqa.selenium.firefox.FirefoxDriver
- The
get()method is the equivalent of Selenium IDE’s “open” command. - Locating elements in WebDriver is done by using the
findElement()method. - The following are the available options for locating elements in WebDriver:
- By.className
- By.cssSelector
- By.id
- By.linkText
- By.name
- By.partialLinkText
- By.tagName
- By.xpath
- The By.cssSelector() does not support the “contains” feature.
- You can instantiate an element using the WebElement class.
- Clicking on an element is done by using the
click()method. - WebDriver provides these useful get commands:
- get()
- getTitle()
- getPageSource()
- getCurrentUrl()
- getText()
- WebDriver provides these useful navigation commands
- navigate().forward()
- navigate().back()
- navigate().to()
- navigate().refresh()
- The close() and quit() methods are used to close browser windows.
Close()is used to close a single window; whilequit()is used to close all windows associated to the parent window that the WebDriver object was controlling. - The
switchTo().frame()andswitchTo().alert()methods are used to direct WebDriver’s focus onto a frame or alert, respectively. Implicit waitsare used to set the waiting time throughout the program, whileexplicit waitsare used only on specific portions.- You can use the isEnabled(), isDisplayed(),isSelected(), and a combination of WebDriverWait and ExpectedConditions methods when verifying the state of an element. However, they do not verify if the element does not exists.
- When isEnabled(), isDisplayed(),or isSelected() was called while the element was not existing, WebDriver will throw a NoSuchElementException.
- When WebDriverWait and ExpectedConditions methods were called while the element was not existing, WebDriver would throw a
TimeoutException.
Note:
driver.get(): This method is used to navigate to a particular website. However, it does not maintain browser history or cookies. As a result, the forward and backward buttons will not work, and clicking them will not schedule the page navigation.
driver.navigate(): This method is also used to navigate to a particular website, but it maintains browser history and cookies. This allows the forward and backward buttons to be used for navigation between pages while coding a test case.