How to Install Selenium WebDriver
Selenium WebDriver Installation
Selenium installation is a 4-step process:
Step 1: Install Java SDK
Step 2: Install Eclipse
Step 3: Install Selenium Webdriver Files
Step 4: Configure Eclipse IDE with WebDriver
In this tutorial, we will learn how to install Selenium Webdriver. Below is the detailed process
NOTE: The versions of Java, Eclipse, Selenium will keep updating with time. But the installation steps will remain the same. Please select the latest version and continue the installation steps below-
Step 1 – Install Java Software Development Kit (JDK)
Download and install the Java Software Development Kit (JDK) here.

This JDK version comes bundled with Java Runtime Environment (JRE), so you do not need to download and install the JRE separately.
Note: Download the latest available version of the JDK when accessing the download page. The specific version is not important. As of the writing of this tutorial, the current version is 24.
Once installation is complete, open command prompt and type “java”. If you see the following screen you are good to move to the next step.

Step 2 – Install Eclipse IDE
Download the latest version of “Eclipse IDE for Java Developers” here. Be sure to choose correctly between Windows 32 Bit and 64 Bit versions.

You should be able to download an exe file named “eclipse-inst-win64” for Setup.
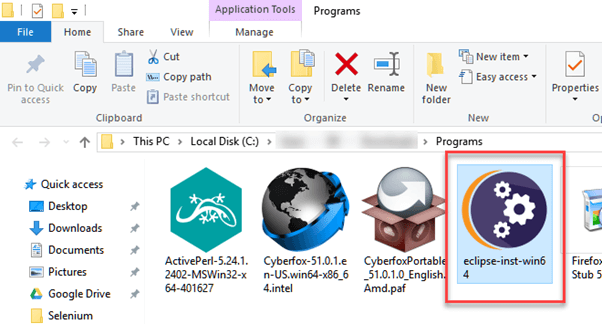
Double-click on a file to Install the Eclipse. A new window will open. Click Eclipse IDE for Java Developers.

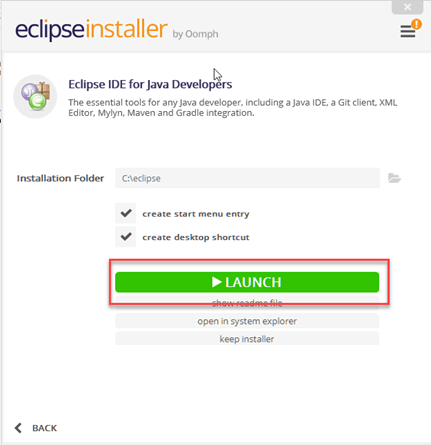
After that, a new window will open which click button marked 1 and change path to “C:\eclipse”. Post that Click on the Install button marked 2

After successful completion of the installation procedure, a window will appear. On that window click on Launch.
This will start eclipse neon IDE for you.
Step 3 – Selenium WebDriver Installation
You can download Selenium Webdriver for Java Client Driver here. You will find client drivers for other languages there, but only choose the one for Java.

This download comes as a ZIP file named “selenium-4.30.0”. For simplicity of Selenium installation on Windows 10 or Windows 11, extract the contents of this ZIP file on your C drive so that you would have the directory “C:\selenium-4.30.0\”. This directory contains all the JAR files that we would later import on Eclipse for Selenium setup.
Step 4 – Configure Eclipse IDE with WebDriver
- Launch the “eclipse.exe” file inside the “eclipse” folder that we extracted in step 2. If you followed step 2 correctly, the executable should be located on C:\eclipse\eclipse.exe.
- When asked to select a workspace, accept the default location.

3. Create a new project through File > New > Java Project. Name the project as “newproject”.

A new pop-up window will open. Enter details as follow
- Project Name
- Location to save a project
- Select an execution JRE
- Select the layout project option
- Click on the Finish button

4. In this step,
- Right-click on the newly created project and
- Select New > Package, and name that package as “newpackage”.

A pop-up window will open to name the package,
- Enter the name of the package
- Click on the Finish button

5. Create a new Java class under newpackage by right-clicking on it and then selecting- New > Class, and then name it as “MyClass”. Your Eclipse IDE should look like the image below.

When you click on Class, a pop-up window will open, enter details as
- Name of the class
- Click on the Finish button

This is how it looks like after creating class.

Now, you need to set Selenium WebDriver’s libraries into Java Build Path. In this step,
- Right-click on “newproject” and select Properties.
- On the Properties dialog, click on “Java Build Path”.
- Click on the Libraries tab, and then
- Click on “Add External JARs..”

When you click on “Add External JARs..”
- It will open a pop-up window. Select the JAR files you download from Selenium website in Step 3
- Clcik open
- Files will be added to Library

6. Add all the JAR files inside and outside the “libs” folder. Your Properties dialog should now look similar to the image below.

7. Finally, click OK and we are done importing Selenium libraries into our project.
Different Drivers
HTMLUnit is the only browser that WebDriver can directly automate, meaning that no other separate component is needed to install or run while the test is being executed. For other browsers, a separate program is needed. That program is called the Driver Server.
A driver server is different for each browser. For example, Internet Explorer has its own driver server, which you cannot use on other browsers. Below is the list of driver servers and the corresponding browsers that use them.
You can download these drivers here
| Browser | Name of Driver Server | Remarks |
|---|---|---|
| HTMLUnit | HtmlUnitDriver | WebDriver can drive HTMLUnit using HtmlUnitDriver as driver server |
| Firefox | Mozilla GeckoDriver | WebDriver can drive Firefox without the need of a driver server Starting Firefox 45 & above one needs to use gecko driver created by Mozilla for automation |
| Internet Explorer | Internet Explorer Driver Server | Available in 32 and 64-bit versions. Use the version that corresponds to the architecture of your IE |
| Chrome | ChromeDriver | Though its name is just “ChromeDriver”, it is, in fact, a Driver Server, not just a driver. The current version can support versions higher than Chrome v.21 |
| Opera | OperaDriver | Though its name is just “OperaDriver”, it is, in fact, a Driver Server, not just a driver. |
| PhantomJS | GhostDriver | PhantomJS is another headless browser, just like HTMLUnit. |
| Safari | SafariDriver | Though its name is just “SafariDriver”, it is, in fact, a Driver Server, not just a driver. |
Summary
Aside from a browser, you will need the following to start using WebDriver
- Java Development Kit (JDK). https://www.oracle.com/java/technologies/downloads/
- Eclipse IDE – http://www.eclipse.org/downloads/
- Java Client Driver – https://www.selenium.dev/downloads/
When starting a WebDriver project in Eclipse, do not forget to import the Java Client Driver files onto your project. These files will constitute your Selenium Library.
With a new version of Selenium, there is no browser that you can automate without the use of a Driver Server.