How to Upload & Download a File using Selenium
⚡ Smart Summary
Upload and Download file using Selenium WebDriver workflows rely on native sendKeys() for input fields, AutoIt or Robot for dialogs, and CDP commands in Selenium 4 to set safe download paths during automation runs.
Uploading files in WebDriver is done by simply using the sendKeys() method on the file-select input field to enter the path of the file to be uploaded. In this tutorial, you will learn how to deal with file uploads and downloads using Selenium WebDriver.
How to Upload File in Selenium
For this section, we will use https://demo.guru99.com/test/upload/ as our test application. This site easily allows any visitor to upload files without requiring them to sign up.

Let’s say we wish to upload the file “C:\newhtml.html”. Our WebDriver code should be like the one shown below.
import org.openqa.selenium.*;
import org.openqa.selenium.firefox.FirefoxDriver;
public class PG9 {
public static void main(String[] args) {
System.setProperty(“webdriver.gecko.driver”,“C:\\geckodriver.exe”);
String baseUrl = “https://demo.guru99.com/test/upload/”;
WebDriver driver = new FirefoxDriver();
driver.get(baseUrl);
WebElement uploadElement = driver.findElement(By.id(“uploadfile_0”));
// enter the file path onto the file-selection input field
uploadElement.sendKeys(“C:\\newhtml.html”);
// check the “I accept the terms of service” check box
driver.findElement(By.id(“terms”)).click();
// click the “UploadFile” button
driver.findElement(By.name(“send”)).click();
}
}
After running this script, you should be able to upload the file successfully and you should get a message similar to this.

Remember the following two things when uploading files in WebDriver:
- There is no need to simulate the clicking of the “Browse” button. WebDriver automatically enters the file path onto the file-selection text box of the <input type=”file”> element.
- When setting the file path in your Java IDE, use the proper escape character for the back-slash.

Handling Non-Input Upload Dialogs with AutoIt
When the page uses a custom Browse button rather than a native <input type=”file”> element, sendKeys() does not work. In that case, you can call an AutoIt script from Selenium to type the file path into the OS dialog and press Enter.
Save the script below as upload.au3, compile it to upload.exe, then invoke it from Java after clicking the Browse button.
WinWaitActive(“Open”)
Send(“C:\newhtml.html”)
Send(“{ENTER}”)
From Java, trigger the helper after the Browse click:
Runtime.getRuntime().exec(“C:\\AutoIt\\upload.exe”);
The java.awt.Robot class is a pure-Java alternative when AutoIt is not available, although AutoIt is more reliable on Windows because it waits for the dialog by title.
How to Download a File in Selenium Webdriver
WebDriver has no capability to access the Download dialog boxes presented by browsers when you click on a download link or button. However, we can bypass these dialog boxes using a separate program called “wget”.
What is Wget?
Wget is a small and easy-to-use command-line program used to automate downloads. Basically, we will access Wget from our WebDriver script to perform the download process.
Setting up Wget
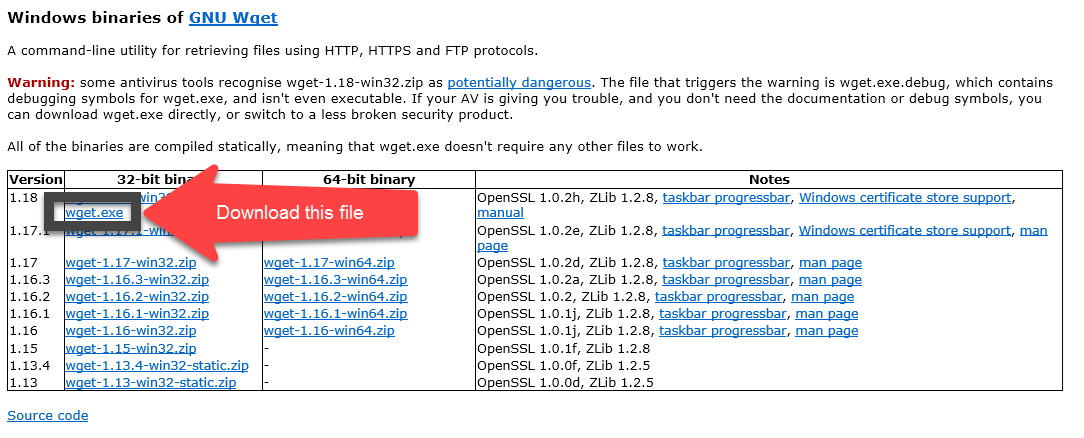
Step 1) In your C Drive, create a new folder and name it as “Wget”.
Download wget.exe from here and place it in the Wget folder you created in the step above.
Step 2) Open Run by pressing Windows key + “R”; type in “cmd” and click OK.

Type in the command “cd /” to move to the root directory.

Step 3) Type in the command to check whether the given setup is working.

There seems to be an issue writing into C drive.
Step 4) You need to debug the wget errors in the command line before you execute the code using Selenium WebDriver. These errors will persist in Eclipse and the error messages will not be as informative. It is best to first get wget working using the command line. If it works in the command line, it will definitely work in Eclipse.
In our example, as shown in Step 3, there is a problem writing into C drive. Let us change the download location to D drive and check the results.
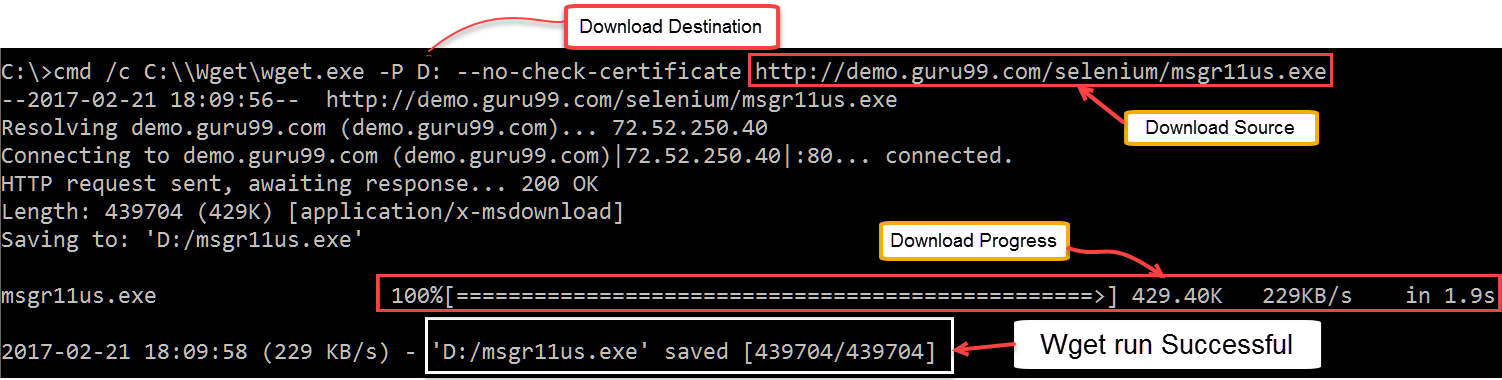
Messenger was downloaded successfully.
Before you proceed further, do not forget to delete the downloaded file.
Using WebDriver and Wget
In the following example, we will use WebDriver and wget to download a popular chat software called Yahoo Messenger. Our base URL shall be https://demo.guru99.com/test/yahoo.html.

Step 1) Import the “java.io.IOException” package because we will have to catch an IOException later in Step 4.
![]()
Step 2) Use getAttribute() to obtain the “href” value of the download link and save it as a String variable. In this case, we named the variable “sourceLocation”.

Step 3) Set up the syntax for wget using the following command.

Step 4) Initiate the download process by calling wget from our WebDriver code.

To sum it all up, your WebDriver code could look like the one shown below.
import java.io.IOException;
import org.openqa.selenium.*;
import org.openqa.selenium.firefox.FirefoxDriver;
public class PG8 {
public static void main(String[] args) {
System.setProperty(“webdriver.gecko.driver”,“C:\\geckodriver.exe”);
String baseUrl = “https://demo.guru99.com/test/yahoo.html”;
WebDriver driver = new FirefoxDriver();
driver.get(baseUrl);
WebElement downloadButton = driver.findElement(By.id(“messenger-download”));
String sourceLocation = downloadButton.getAttribute(“href”);
String wget_command = “cmd /c C:\\Wget\\wget.exe -P D: –no-check-certificate “ + sourceLocation;
try {
Process exec = Runtime.getRuntime().exec(wget_command);
int exitVal = exec.waitFor();
System.out.println(“Exit value: “ + exitVal);
} catch (InterruptedException | IOException ex) {
System.out.println(ex.toString());
}
driver.close();
}
}
After executing this code, check your D drive and verify that the Yahoo Messenger installer was successfully downloaded there.

Setting a Custom Download Path with Selenium 4 CDP
Selenium 4 exposes the Chrome DevTools Protocol, which lets you control browser download behavior without third-party tools. The snippet below points all downloads to a custom folder and skips the Save As prompt, so files land where the test expects them.
Map<String,Object> params = new HashMap<>();
params.put(“behavior”, “allow”);
params.put(“downloadPath”, “D:\\selenium-downloads”);
driver.executeCdpCommand(“Page.setDownloadBehavior”, params);
driver.get(“https://demo.guru99.com/test/yahoo.html”);
driver.findElement(By.id(“messenger-download”)).click();
You can verify the download by polling the target directory for the expected filename and checking its size, which makes the test deterministic without external scripts.