Action Class in Selenium
⚡ Smart Summary
Action Class in Selenium handles advanced keyboard and mouse events such as hover, drag-and-drop, right-click, and key combinations through the Advanced User Interactions API. This tutorial explains the Actions and Action classes, the key methods, and how to chain multiple interactions into one sequence.

Action Class in Selenium
Action Class in Selenium is a built-in feature for handling keyboard and mouse events. It supports operations such as multiple clicks with the Control key, drag-and-drop, and many more. These operations are performed using the Advanced User Interactions API in Selenium WebDriver.
Handling Keyboard & Mouse Events
Handling special keyboard and mouse events is done using the Advanced User Interactions API. It contains the Actions and Action classes that are needed to execute these events. The most commonly used keyboard and mouse events provided by the Actions class are listed below.
| Method | Description |
|---|---|
| clickAndHold() | Clicks (without releasing) at the current mouse location. |
| contextClick() | Performs a context-click (right click) at the current mouse location. |
| doubleClick() | Performs a double-click at the current mouse location. |
| dragAndDrop(source, target) | Click-and-holds at the source element, moves to the target element, then releases the mouse. Parameters: source (element to press on), target (element to release at). |
| dragAndDropBy(source, x-offset, y-offset) | Click-and-holds at the source element, moves by a given offset, then releases. Parameters: source, xOffset (horizontal), yOffset (vertical). |
| keyDown(modifier_key) | Presses a modifier key without releasing it, so later interactions assume it stays pressed. Parameter: a modifier key (Keys.ALT, Keys.SHIFT, or Keys.CONTROL). |
| keyUp(modifier_key) | Releases a modifier key. Parameter: a modifier key (Keys.ALT, Keys.SHIFT, or Keys.CONTROL). |
| moveByOffset(x-offset, y-offset) | Moves the mouse from its current position (or 0,0) by the given offset. A negative x moves left; a negative y moves up. |
| moveToElement(toElement) | Moves the mouse to the middle of the element. Parameter: the element to move to. |
| release() | Releases the depressed left mouse button at the current location. |
| sendKeys(onElement, charsequence) | Sends a series of keystrokes to an element. Parameters: onElement (usually a text field), charsequence (the keystrokes to send). |
In the following example, we use the moveToElement() method to hover over one of the Mercury Tours table rows.
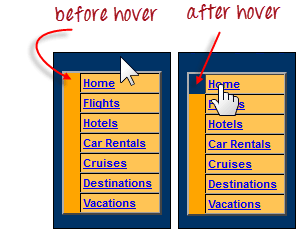
The cell shown above is part of a <TR> element. When not hovered, its color is #FFC455 (orange). After hovering, the cell’s color becomes transparent and matches the background of the surrounding table.
Step 1) Import the Actions and Action classes.
![]()
Step 2) Instantiate a new Actions object.
![]()
Step 3) Instantiate an Action using the Actions object from Step 2.

Here we use the moveToElement() method to hover over the “Home” link. The build() method is always called last so that all listed actions are compiled into a single step.
Step 4) Use the perform() method to execute the Action object designed in Step 3.
![]()
Below is the full WebDriver code that checks the background color of the <TR> element before and after the mouse-over.
package newproject;

import org.openqa.selenium.*;
import org.openqa.selenium.firefox.FirefoxDriver;
import org.openqa.selenium.interactions.Action;
import org.openqa.selenium.interactions.Actions;

public class PG7 {

    public static void main(String[] args) {
        String baseUrl = "https://demo.guru99.com/test/newtours/";
        System.setProperty("webdriver.gecko.driver", "C:\\geckodriver.exe");
        WebDriver driver = new FirefoxDriver();

        driver.get(baseUrl);
        WebElement link_Home = driver.findElement(By.linkText("Home"));
        WebElement td_Home = driver.findElement(By.xpath(
            "//html/body/div/table/tbody/tr/td"
            + "/table/tbody/tr/td"
            + "/table/tbody/tr/td"
            + "/table/tbody/tr"));

        Actions builder = new Actions(driver);
        Action mouseOverHome = builder.moveToElement(link_Home).build();

        String bgColor = td_Home.getCssValue("background-color");
        System.out.println("Before hover: " + bgColor);
        mouseOverHome.perform();
        bgColor = td_Home.getCssValue("background-color");
        System.out.println("After hover: " + bgColor);
        driver.close();
    }
}
The output below shows that the background color became transparent after the mouse-over.

Building a Series of Multiple Actions
You can build a series of actions using the Action and Actions classes. Remember to close the series with the build() method. Consider the sample code below.

public static void main(String[] args) {
    String baseUrl = "https://www.facebook.com/";
    WebDriver driver = new FirefoxDriver();

    driver.get(baseUrl);
    WebElement txtUsername = driver.findElement(By.id("email"));

    Actions builder = new Actions(driver);
    Action seriesOfActions = builder
        .moveToElement(txtUsername)
        .click()
        .keyDown(txtUsername, Keys.SHIFT)
        .sendKeys(txtUsername, "hello")
        .keyUp(txtUsername, Keys.SHIFT)
        .doubleClick(txtUsername)
        .contextClick()
        .build();

    seriesOfActions.perform();
}
