Github Integration with Selenium: Complete Tutorial
What is GitHub?
Git Hub is a Collaboration platform. It is built on top of git. It allows you to keep both local and remote copies of your project. A project which you can publish it among your team members as they can use it and update it from there itself.
Advantages of Using Git Hub For Selenium.
- When multiple people work on the same project they can update project details and inform other team members simultaneously.
- Jenkins can help us to regularly build the project from the remote repository this helps us to keep track of failed builds.
Prerequisite for Selenium and github Integration
Before we start selenium and git hub integration, we need to install the following components.
- Jenkins Installation.
- Maven Installation.
- Tomcat Installation.
You can find this installation steps in the following links:
1) Maven and Jenkins installation Guide (https://www.guru99.com/maven-jenkins-with-selenium-complete-tutorial.html)
2) Tomcat Installation Guide (https://www.guru99.com/apache.html)

Git Binaries Installation
Now let us start by installing “Git Binaries”.
Step 1) Launch the Browser and navigate to URL- https://git-scm.com/
Step 2) Download the latest stable release.
Step 3) Click on downloads for windows once the file is downloaded we can begin with our installation.

Step 4) Go to the download location or icon and run the installer.
Step 5) Click through welcome and General Public license.
Step 6) Click on “next” button in git setup wizard

Step 7) Read the GNU General Public License and click on next

Another window will pop up,
Step 8) In this step,
- Select the Directory where you want to install “Git Binaries” and
- Click on next button

Step 9) Select the component which you want to install and click on next

Step 10) If you want to create a start menu folder for Git, leave the setting default and click on next.

Step 11) In this step,
- Select Use Git from the Windows Command Prompt to run Git from the command line and
- Click on next.

Leave the default setting and click on next to install.
Step 12) In this step,
- Select Use Open SSH It will help us to execute the command from the command line, and it will set the environmental path.
- Click on next button.

Step 13) In this step,
- Select “Checkout windows-style, commit Unix-style line ending”.(how the git hub should treat line endings in text files).
- Click on next button.

Step 14) In this step,
- Select Use MinTTY is the default terminal of MSys2 for Git Bash
- Click on next button


Once git is installed successfully, you can access the git.
Open Command prompt and type “git” and hit “Enter” If you see below screen means it is installed successfully

Jenkins Git Plugin Install
Now let’s start with Jenkins Git Plugin Installation.
Step 1) Launch the Browser and navigate to your Jenkins.
Step 2) Click on Manage Jenkins.

Step 3) Click on Manage Plugins, it will open another window

Step 4) Click on Available TAB
![]()
Step 5) In this step,
- Select GitHub plugin then
- Click on Download now and install after restart button.

Now it will install the following plugins.
Once the Installation is finished. Restart your Tomcat server by calling the “shutdown.bat” file

After Restarting the tomcat and Jenkins we can see plugins are installed in the “Installed” TAB.

Setting Up our Eclipse with GitHub Plugin
Now let’s install GitHub Plugin for Eclipse.
URI for EGit Plugin location https://download.eclipse.org/egit/updates/
Step 1) Launch Eclipse and then
- Click on help button then
- Click on install new software

Step 2) The below screen will open once we click on the install new software. Now click on add

Step 3) In this step,
- Type the name “EGIT” and
- Enter the location https://download.eclipse.org/egit/updates/ then
- Click on ok.

Step 4) Then click on select all and next

Step 5) Click on next and click accept the license agreement then finish the installation.
Then restart the eclipse.

Building a repository on Git
Step 1) Navigate to Git Hub URI: https://github.com/ sign up for git hub
Step 2) Once you have been successfully signed up then click on create new repository

Step 3) In this step,
- Enter the name of the repository and
- click on create repository


Testing Example Of Using Selenium with Git Hub.
Step 1) Once we are done with the new repository, Launch Eclipse
- Click on file
- Then click on new button and then
- Click on other

Step 2) In this step,
- Select Maven Project and browse the location.
- Click on next

Step 3) In this step,
- Select project name and location then
- Click on next

Step 4) Click on next

Step 5) In this step,
- Enter Group Id and
- Artifact Id and
- Click on Finish button.

As soon as you click on finish button, a project will be created.
Step 6)
Now let’s create a sample script

Let’s push the code/local repository to Git Hub.
Step 7) In this step,
- Open eclipse and then navigate to the project
- Right-click on the project and Select “team” then
- Select share project

Step 8) Once we click on the “Share Project” in above screen, we will get another window
In this step,
- Select the local repository and
- Click on finish.

Once we click on Finish, we can see the change in the project structure that we have created a local repository.

Now it’s time to push our code to Git Hub Repository
Step 9) In this step,
- Right-click on the project and team then
- Click on commit

Step 10) In this step,
- Enter a commit message and
- Select the files which we want to send to Git Hub repository
- Click on commit and push

Once you are done with it, you could see the icons in the project is being changed it says that we have successfully pushed and committed our code to Git Hub

We can verify in the Git hub in the repository that our project is successfully pushed into repository

Now it’s time for executing our project from Git Hub in Jenkins
Step 11) Launch browser and open your Jenkins.
Step 12) Click on new Item.

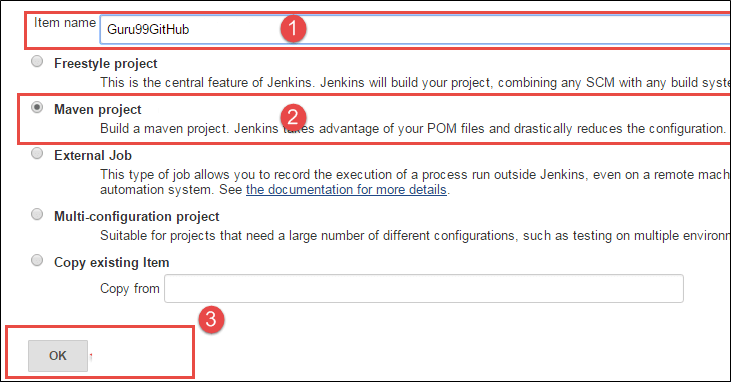
Step 13) In this step,
- Enter Item name
- Select Maven Project
- Click on ok button
Step 14) In this step, we will configure Git Hub in Jenkins
- Click on Git and
- Enter the Repository URI
- Click on Add repository
If you have multiple repositories in Git Hub, you need to add name Refspec field of the repository.

We can get the URI in Git Hub

Step 15) In this step,
- Add the pom.xml file location in the textbox and
- Specify the goals and options for Maven then
- Select option on how to run the test
- Click on save button.

Step 16) once we click on save below screen will appear,
Now we can build our project click on build.

Step 17) It will show the Build, click on build Number or the build date.
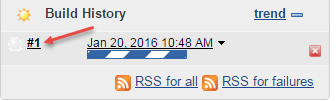
Step 18) once we click on build number below screen will appear where we can see the console output in this step, click on the console output.

Finally, we can verify that our build is successfully completed/executed.
