Selenium Integration with Maven and Jenkins
⚡ Smart Summary
Maven Jenkins Selenium integration creates an automated continuous testing pipeline where Maven manages project dependencies and lifecycle, Jenkins schedules and triggers builds, and Selenium executes browser tests, producing repeatable, reliable, and scalable end-to-end web automation.
What is Jenkins in Selenium?
Jenkins is the leading open-source continuous integration tool originally developed by the Hudson lab. It is cross-platform and runs on Windows, Linux, macOS, and Solaris environments. Jenkins is written in Java and is now distributed as Jenkins LTS for stable production use. Its chief usage is to monitor any job, which can be an SCM checkout, a cron schedule, or any application state. Jenkins fires pre-configured actions when a specific step occurs in jobs.
Important Features of Jenkins
- Change Support: Jenkins generates the list of all changes done in repositories such as Git or SVN.
- Permanent Links: Jenkins provides direct links to the latest build or the last failed build, which simplifies team communication.
- Installation: Jenkins is easy to install using a native installer, a WAR file deployed on an application server, or a Docker image.
- Email Integration: Jenkins can be configured to email the content and status of every build.
- Easy Configuration: Configuring various tasks on Jenkins is straightforward through the web dashboard.
- TestNG Test: Jenkins can be configured to run the automation test build on TestNG after each commit to the repository.
- Multiple VMs: Jenkins can distribute builds across multiple agent machines.
- Project Build: Jenkins documents the details of JARs, JAR versions, and the mapping of build numbers to artifacts.
- Plugins: 3rd party plugins can be added in Jenkins to extend features and additional functionality.
Why Jenkins and Selenium?
- Running Selenium tests in Jenkins lets you execute your tests every time the software changes and deploy the software to a new environment when the tests pass.
- Jenkins can schedule your Selenium tests to run at a specific time.
- You can save the execution history and Test Reports for traceability.
- Jenkins supports Maven for building and Testing a project in continuous integration.
What is Maven in Selenium?
Maven is a powerful project and build management tool based on the concept of a POM (Project Object Model) that includes project information and configuration data for Maven, such as the build directory, source directory, dependencies, test source directory, goals, plugins, and more. Maven 3.x is the current stable line, widely used across Selenium test frameworks.
Why Maven and Jenkins
Selenium WebDriver is great for browser automation. But, when using it for testing and building a test framework, it can feel underpowered. Integrating Maven with Selenium provides the following benefits.
Apache Maven provides support for managing the full lifecycle of a test project.
- Maven is used to define project structure, dependencies, build, and test management.
- Using pom.xml (Maven) you can configure dependencies needed for building, testing, and running code.
- Maven automatically downloads the necessary files from the central repository while building the project.
How to Install Maven and use it with TestNG Selenium
Here are the steps to install Maven and use it with TestNG Selenium.
For this tutorial, we will use Eclipse (Juno) IDE for Java Developers to set up the Selenium WebDriver project. Additionally, we need to add the m2eclipse plugin to Eclipse to facilitate the build process and create the pom.xml file.
Let us add the m2eclipse plugin to Eclipse with the following steps:
Step 1) In Eclipse IDE, select Help | Install New Software from the Eclipse main menu.
Step 2) On the Install dialog, enter the URL https://www.eclipse.org/m2e/. Select Work with and the m2e plugin as shown in the following screenshot:

Step 3) Click on the Next button and finish the installation.
Configure Eclipse with Maven
With the m2e plugin installed, we now need to create a Maven project.
Step 1) In Eclipse IDE, create a new project by selecting File | New | Other from the Eclipse menu.
Step 2) On the New dialog, select Maven | Maven Project and click Next.

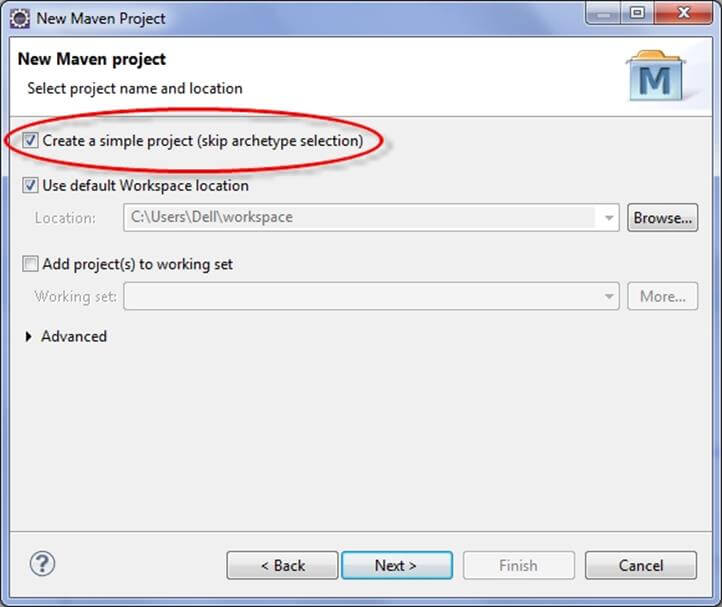
Step 3) On the New Maven Project dialog select Create a simple project and click Next.
Step 4) Enter WebdriverTest in Group Id: and Artifact Id: and click finish.

Step 5) Eclipse will create WebdriverTest with the following structure:

Step 6) Right-click on JRE System Library and select the Properties option from the menu.

On the Properties for JRE System Library dialog box, make sure Workspace default JRE is selected and click OK.

Step 7) Select pom.xml from Project Explorer.

The pom.xml file will open in the Editor section.

Step 8) Add the Selenium, Maven, TestNG, and JUnit dependencies to pom.xml in the <project> node:
	<dependencies>
        <dependency>
             <groupId>junit</groupId>
             <artifactId>junit</artifactId>
             <version>3.8.1</version>
             <scope>test</scope>
        </dependency>
        <dependency>
            <groupId>org.seleniumhq.selenium</groupId>
            <artifactId>selenium-java</artifactId>
            <version>2.45.0</version>
		</dependency>
        <dependency>
            <groupId>org.testng</groupId>
            <artifactId>testng</artifactId>
            <version>6.8.8</version>
            <scope>test</scope>
       </dependency>
</dependencies>
Step 9) Create a New TestNG Class. Enter the package name as “example” and “NewTest” in the Name: textbox and click on the Finish button as shown in the following screenshot:

Step 10) Eclipse will create the NewTest class as shown in the following screenshot:

Step 11) Add the following code to the NewTest class. This code will verify the title of the Guru99 Selenium page.
package example;

import org.openqa.selenium.By;
import org.openqa.selenium.WebDriver;
import org.openqa.selenium.firefox.FirefoxDriver;
import org.testng.Assert;
import org.testng.annotations.Test;
import org.testng.annotations.BeforeTest;
import org.testng.annotations.AfterTest;
public class NewTest {
	    private WebDriver driver;
		@Test
		public void testEasy() {
			driver.get("https://demo.guru99.com/test/guru99home/");
			String title = driver.getTitle();
			Assert.assertTrue(title.contains("Demo Guru99 Page"));
		}
		@BeforeTest
		public void beforeTest() {
		    driver = new FirefoxDriver();
		}
		@AfterTest
		public void afterTest() {
			driver.quit();
		}
}
Step 12) Right-click on the WebdriverTest project and select TestNG | Convert to TestNG.
Eclipse will create testng.xml which states that you need to run only one test with the name NewTest as shown in the following screenshot:

Update the project and make sure the file appears in the tree Package Explorer (right click on the project – Refresh).

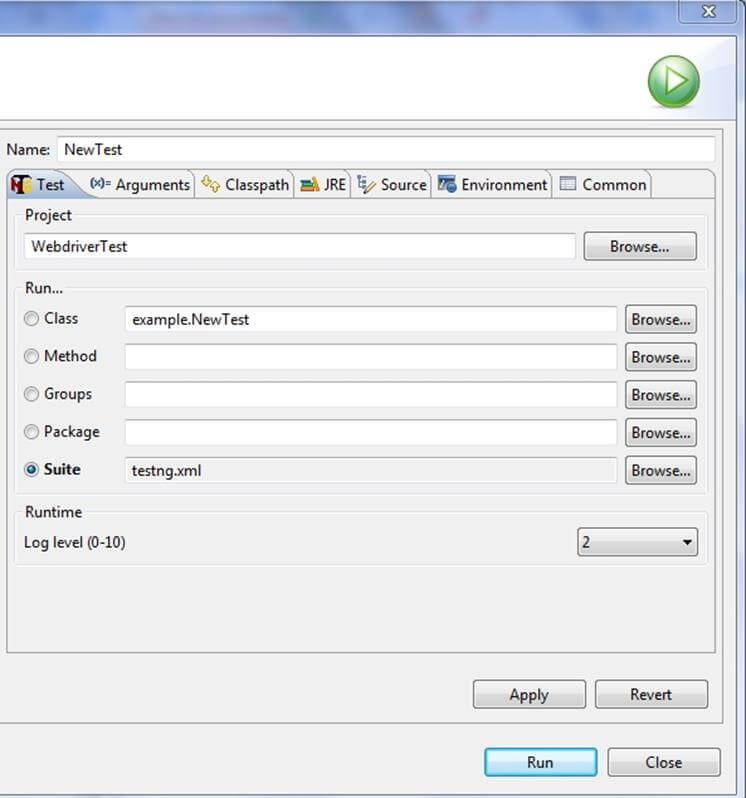
Step 13) Now you need to run the test through this testng.xml.
So, go to the Run Configurations and create a new launch TestNG, select the project, set the field Suite as testng.xml, and click Run.
Make sure that the build finishes successfully.
Step 14) Additionally, we need to add
- maven-compiler-plugin
- maven-surefire-plugin
- testng.xml
to pom.xml.
The maven-surefire-plugin is used to configure and execute tests. Here the plugin is used to configure the testing.xml for the TestNG test and generate test reports.
The maven-compiler-plugin is used to help compile the code and to use a particular JDK version for compilation. Add all dependencies in the following code snippet to pom.xml in the <plugin> node:

Step 15) To run the tests in the Maven lifecycle, right-click on the WebdriverTest project and select Run As | Maven test. Maven will execute the test from the project.

Make sure that the build finishes successfully.
How to Integrate Jenkins with Selenium WebDriver
Here are the steps to install Jenkins LTS and configure it to run Maven with TestNG Selenium.
Installation
Step 1) Go to https://www.jenkins.io/download/ and download the correct Jenkins LTS package for your OS. Install Jenkins.

Step 2) Unzip Jenkins to a specified folder. Run the exe file as shown in the following screenshot:

Step 3) In the Jenkins Setup window, click on the Next button.

Step 4) Click on the Install button at the end.

Step 5) Once installation is done, navigate to the Jenkins Dashboard (http://localhost:8080 by default) in the browser window.

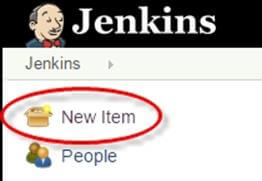
Step 6) Click on the New Item link to create a CI job.
Step 7) Select the Maven project radio button as shown in the following screenshot:

Using the Build a Maven Project option, Jenkins supports building and testing Maven projects.
Step 8) Click on the OK button. A new job named “WebdriverTest” is created in the Jenkins Dashboard.

Step 9) Go to Manage Jenkins => Configure System as shown in the following screenshot.

Click on JDK installations and configure JDK as in the following screenshot:

Step 10) Go to the Build section of the new job.
- In the Root POM textbox, enter the full path to pom.xml
- In the Goals and options section, enter “clean test”

Step 11) Click on the Apply button.

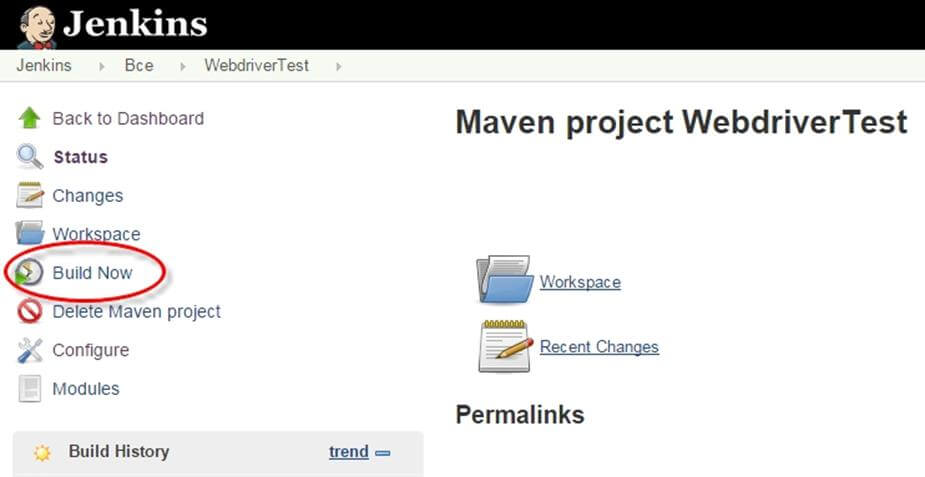
Step 12) On the WebdriverTest project page, click on the Build Now link.
Maven will build the project. It will then have TestNG execute the test cases.
Step 13) Once the build process is completed, in the Jenkins Dashboard click on the WebdriverTest project.

Step 14) The WebdriverTest project page displays the build history and links to the results as shown in the following screenshot:

Step 15) Click on the “Latest Test Result” link to view the test results as shown in the following screenshot:

Step 16) Select a specific build, and you will see the current status by clicking on “console output“.

Scheduling Jenkins for Automatic Execution
Scheduling builds (Selenium tests) is one of the important features of Jenkins, where it automatically triggers the build based on defined criteria. Jenkins provides multiple ways to trigger the build process under the Build Trigger configuration.
For example:
Enter 0 23 * * * in the Schedule textbox as shown in the following screenshot. This will trigger the build process every day at 11 p.m.

Using Jenkins without Maven
To run a pure TestNG script in Jenkins, enter the following in build:
D:>java -cp “Pathtolibfolder\lib\*;Pathtobinfolder\bin” org.testng.TestNG testng.xml

- Click on the Save button.
- Note: The actual path of the lib and bin folders needs to be added in the above command.
- After saving the command, Jenkins will build the project at the predefined time, and this command will be run using TestNG.
- The result will be stored in a custom HTML report file that can be emailed using a Jenkins configuration.
- Output of the code will be:

Benefits of Using Jenkins
- Early issue finding – bugs can be detected in the early phase of software development.
- Automatic integration – no separate effort required to integrate all changes.
- Installer – a deployable system available at any point of development.
- Records – past build records are maintained.
- Support and Plugins – one of the reasons for Jenkins’s popularity is the availability of large community support. Lots of ready-made plugins are also available which help you expand its functionality.