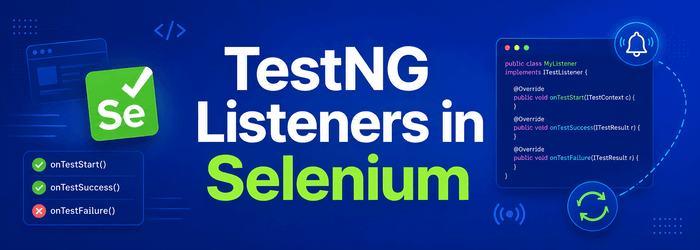
TestNG Listeners in Selenium
⚡ Smart Summary
Listeners in Selenium WebDriver are TestNG interfaces that intercept test events to customize logs, reports, and post-failure actions. This article explains ITestListener methods, walks through a runnable Java example, and clarifies how Selenium 4 replaced the deprecated WebDriverEventListener.
Selenium WebDriver scripts often need to react to test events such as a passed assertion, a failed locator, or a skipped step. Listeners make that possible. Broadly, Selenium projects rely on two listener families:
- WebDriver Listeners
- TestNG Listeners
In this tutorial, we will focus on TestNG Listeners, with a note on how WebDriver-level listeners changed in Selenium 4.x.
What is a Listener in TestNG?
A Listener is an interface that modifies the default behavior of TestNG. As the name suggests, Listeners “listen” to events defined in a Selenium script and react accordingly. You use them by implementing the relevant Listener interface and registering it on your test class or suite. Listeners allow you to customize TestNG reports, attach screenshots, and emit structured logs.
Types of Listeners in TestNG
TestNG ships a family of listener interfaces, and each one targets a different stage of the test lifecycle.
Below are the commonly used TestNG listeners:
- IAnnotationTransformer
- IAnnotationTransformer2
- IConfigurable
- IConfigurationListener
- IExecutionListener
- IHookable
- IInvokedMethodListener
- IInvokedMethodListener2
- IMethodInterceptor
- IReporter
- ISuiteListener
- ITestListener
These interfaces are used in Selenium to generate logs or customize TestNG reports. In this tutorial, we will implement ITestListener.
ITestListener exposes the following methods:
- onStart – called when any test starts.
- onTestSuccess – called when a test passes.
- onTestFailure – called when a test fails.
- onTestSkipped – called when a test is skipped.
- onTestFailedButWithinSuccessPercentage – called when a test fails but is within the success percentage.
- onFinish – called after all tests in the class are executed.
Test Scenario
In this test scenario, we will automate the login process and implement ITestListener against it.
- Launch Firefox and open the site https://demo.guru99.com/V4/

- Log in to the application.

Steps to Create a TestNG Listener
For the test scenario above, we will implement the Listener step by step.
Step 1) Create a class called ListenerTest that implements ITestListener. Hover over the red underline and Eclipse will suggest two quick fixes, as shown below:
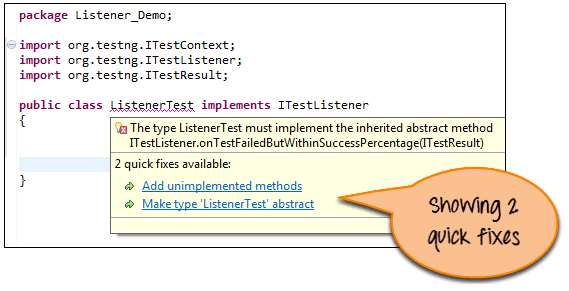
Click “Add unimplemented methods”. Multiple stub methods (without a body) are added to your code, similar to this:
import org.testng.ITestContext;
import org.testng.ITestListener;
import org.testng.ITestResult;
public class ListenerTest implements ITestListener {
@Override
public void onFinish(ITestContext arg0) {
// TODO Auto-generated method stub
}
@Override
public void onStart(ITestContext arg0) {
// TODO Auto-generated method stub
}
@Override
public void onTestFailedButWithinSuccessPercentage(ITestResult arg0) {
// TODO Auto-generated method stub
}
@Override
public void onTestFailure(ITestResult arg0) {
// TODO Auto-generated method stub
}
@Override
public void onTestSkipped(ITestResult arg0) {
// TODO Auto-generated method stub
}
@Override
public void onTestStart(ITestResult arg0) {
// TODO Auto-generated method stub
}
@Override
public void onTestSuccess(ITestResult arg0) {
// TODO Auto-generated method stub
}
}
Now let us modify the ListenerTest class. In particular, we will fill in the following methods: onTestFailure, onTestSkipped, onTestStart, and onTestSuccess.
The change is simple: each method prints the name of the test so the console clearly shows pass, fail, and skip status.
After modification, the code looks like this:
import org.testng.ITestContext;
import org.testng.ITestListener;
import org.testng.ITestResult;
public class ListenerTest implements ITestListener {
@Override
public void onFinish(ITestContext Result) {
}
@Override
public void onStart(ITestContext Result) {
}
@Override
public void onTestFailedButWithinSuccessPercentage(ITestResult Result) {
}
// When a test case fails, this method is called.
@Override
public void onTestFailure(ITestResult Result) {
System.out.println(“The name of the testcase failed is : “ + Result.getName());
}
// When a test case is skipped, this method is called.
@Override
public void onTestSkipped(ITestResult Result) {
System.out.println(“The name of the testcase Skipped is : “ + Result.getName());
}
// When a test case starts, this method is called.
@Override
public void onTestStart(ITestResult Result) {
System.out.println(Result.getName() + ” test case started”);
}
// When a test case passes, this method is called.
@Override
public void onTestSuccess(ITestResult Result) {
System.out.println(“The name of the testcase passed is : “ + Result.getName());
}
}
Step 2) Create another class called TestCases for the login automation. Selenium will execute this class to log in to the demo site.
import org.openqa.selenium.By;
import org.openqa.selenium.WebDriver;
import org.openqa.selenium.firefox.FirefoxDriver;
import org.testng.Assert;
import org.testng.annotations.Listeners;
import org.testng.annotations.Test;
public class TestCases {
WebDriver driver = new FirefoxDriver();
// Test designed to pass, to verify the success listener.
@Test
public void Login() {
driver.get(“https://demo.guru99.com/V4/”);
driver.findElement(By.name(“uid”)).sendKeys(“mngr34926”);
driver.findElement(By.name(“password”)).sendKeys(“amUpenu”);
driver.findElement(By.name(“btnLogin”)).click();
}
// Forcefully failed test, to verify the failure listener.
@Test
public void TestToFail() {
System.out.println(“This method to test fail”);
Assert.assertTrue(false);
}
}
Step 3) Next, attach this listener to our test class TestCases. There are two ways to connect a class to a listener interface.
The first way is to use the @Listeners annotation, as shown below:
We add this annotation above the TestCases class. The class then looks like this:
import org.openqa.selenium.By;
import org.openqa.selenium.WebDriver;
import org.openqa.selenium.firefox.FirefoxDriver;
import org.testng.Assert;
import org.testng.annotations.Listeners;
import org.testng.annotations.Test;
@Listeners(Listener_Demo.ListenerTest.class)
public class TestCases {
WebDriver driver = new FirefoxDriver();
// Test to pass, to verify the success listener.
@Test
public void Login() {
driver.get(“https://demo.guru99.com/V4/”);
driver.findElement(By.name(“uid”)).sendKeys(“mngr34926”);
driver.findElement(By.name(“password”)).sendKeys(“amUpenu”);
driver.findElement(By.name(“btnLogin”)).click();
}
// Forcefully failed test, to verify the failure listener.
@Test
public void TestToFail() {
System.out.println(“This method to test fail”);
Assert.assertTrue(false);
}
}
The project structure looks like:

Step 4) Execute the TestCases class. Methods inside ListenerTest are invoked automatically based on the behavior of methods annotated with @Test.
Step 5) Verify the output shown in the console.
The output of TestCases looks like:

C:\Users\gauravn\AppData\Local\Temp\testng-eclipse–1058076918\testng-customsuite.xml
Login test case started
The name of the testcase passed is : Login
TestToFail test case started
This method to test fail
The name of the testcase failed is : TestToFail
PASSED: Login
FAILED: TestToFail
java.lang.AssertionError: expected [true] but found [false]
Using a Listener for Multiple Classes
If a project has many test classes, adding the @Listeners annotation to each one becomes cumbersome and error prone.
In that case, create a testng.xml file and register the listener there once.
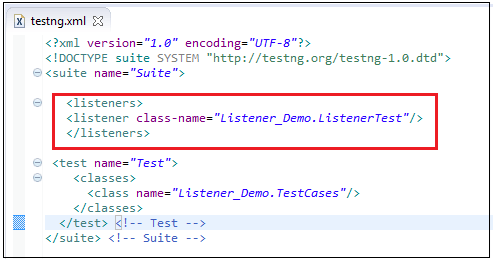
This listener is then applied across the entire test suite regardless of the number of classes. When you run the XML file, the listener fires for every class declared in the suite, and you can chain any number of listener classes inside the same tag.
WebDriverListener in Selenium 4 vs the Deprecated EventFiringWebDriver
While TestNG listeners react to test lifecycle events, WebDriver listeners react to browser-driver actions such as a click, a navigation, or a findElement call. In Selenium 3 the typical approach was the WebDriverEventListener interface wired through EventFiringWebDriver. Both are deprecated in Selenium 4.x.
The modern replacement is the WebDriverListener interface combined with EventFiringDecorator:
import org.openqa.selenium.chrome.ChromeDriver;
import org.openqa.selenium.support.events.EventFiringDecorator;
import org.openqa.selenium.support.events.WebDriverListener;
public class LoggingListener implements WebDriverListener {
@Override
public void beforeGet(WebDriver driver, String url) {
System.out.println(“Navigating to “ + url);
}
}
WebDriver raw = new ChromeDriver();
WebDriver driver = new EventFiringDecorator<>(new LoggingListener()).decorate(raw);
The decorator can wrap any WebDriver, WebElement, or Alert, which is more flexible than the old event-firing wrapper. Use WebDriverListener for browser-side observability and TestNG ITestListener for suite-level reporting.
AI-Powered Listeners: Smarter Logs and Failure Triage
Modern Selenium teams increasingly plug AI services into their listeners to make CI signals more actionable. Inside onTestFailure, an AI-assisted listener can capture a DOM snapshot plus a screenshot, send them to a model that returns a likely root-cause cluster, and write a tag back into the TestNG report or a tool like ReportPortal.
Common AI-driven patterns include:
- Flaky-test detection: Listeners forward pass/fail timelines to a model that classifies a failure as flaky, environmental, or a real regression.
- Smart screenshots: Computer-vision models crop, annotate, and diff UI screenshots so reviewers see the changed region instead of a full page dump.
- Self-healing locators: A WebDriverListener hooks beforeFindElement and asks an AI helper to suggest an alternate locator when the primary one throws NoSuchElementException.
- Natural-language summaries: An IReporter implementation feeds suite results into an LLM that produces a one-paragraph stand-up summary.
The listener layer is the cleanest place to inject these hooks because it stays out of the test logic and applies uniformly across the suite.
Summary
Listeners are required to generate logs or customize TestNG reports in Selenium WebDriver.
- TestNG offers many listener interfaces; pick the one that matches the event you care about.
- Listeners are interfaces used in Selenium WebDriver scripts to react to test lifecycle events.
- The tutorial demonstrated ITestListener with a passing and a failing test.
- You can attach a listener with @Listeners or register it once in testng.xml for the whole suite.
- Selenium 4.x replaces EventFiringWebDriver with WebDriverListener + EventFiringDecorator for WebDriver-level events.