How to Execute Failed Test Cases in TestNG
⚡ Smart Summary
Running failed test cases in TestNG allows testers to isolate and re-execute only the tests that did not pass, saving time and reducing redundant execution across the full suite.

Create a Selenium Project
Prepare the project before converting it to TestNG. The steps below walk through creating a Java project in Eclipse, setting up the package structure, and adding the required JAR libraries.
Step 1) In Eclipse, create a Java project by clicking on New Java Project.

Step 2) In this step:
- Give the project a name.
- Choose the execution environment.
- Select the project layout option.
- Click the Finish button.

After clicking Finish, the TestProject Java project is created and will appear in the Package Explorer.

Step 3) Open the newly created project. You will see the src folder in the Package Explorer.
- Right-click the project and select New.
- Select the Package option.

Step 4) In this step:
- Browse the src folder and select package.
- Give the package a name.
- Click Finish. (Package name: com.test)

After clicking Finish, the project structure will look like this:

Step 5) In this step:
- Right-click on the newly created package.
- Select the Class option.

A new window will open.
Step 6) In this step:
- Give the class a name.
- Select modifiers.
- Browse and select superclass java.lang.Object.
- Click Finish.
Here, you are creating two classes: DemoA and DemoB.
First, create class DemoA.

After clicking Finish, the class will be created:

Similarly, create class DemoB:

Step 7) If you have installed the TestNG library, click on Java Project → Properties.

Step 8) In the Properties window:
- Click on Java Build Path.
- Click on Libraries.
- Click on Add Library.

Next:
- Click on TestNG and then
- Click on Next.

Then click the Finish button.

After this, write the following code.
For Class DemoA:

Code Explanation:
driver.manage().window().maximize();— maximizes the browser window.driver.get("https://www.google.co.in");— enters the specified URL in the address field.driver.findElement(By.name("q")).sendKeys("Hi");— locates the Google search box and enters text using the sendKeys method.
Output: The above program contains errors, so it cannot be executed as-is.
Similarly, for Class DemoB:

The red underlined words indicate errors because the required JAR file has not yet been added. To fix these errors, add the corresponding JAR file. Right-click on the Java Project and select Properties.

Step 8 cont.) In the Properties window:
- Click on Java Build Path in the left navigation pane.
- Click on the Libraries tab.
- Click Add External JARs and select the Selenium standalone JAR file.
- Click OK.

After this step, all errors will be removed automatically. If any remain, hover over the error-marked code and import the necessary classes and interfaces. For @Test errors, hover and select Add TestNG Library.
Step 9) In this step:
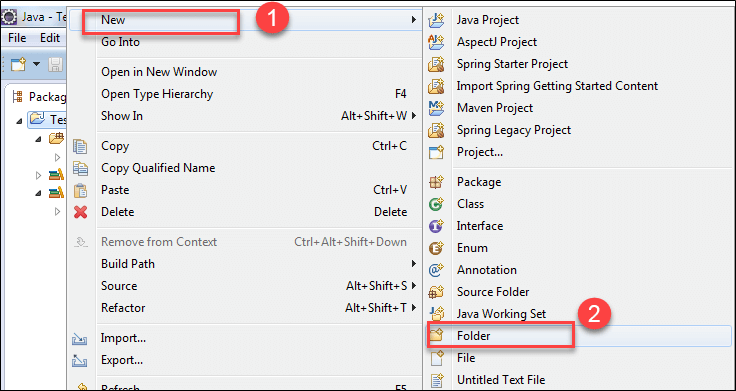
- Right-click on the project and select the Folder option to create a folder named lib.
- Paste the TestNG JAR and Selenium JAR (selenium-server-standalone<version>) into this folder. Download both JARs from the web, copy them, then right-click the lib folder in Eclipse and select Paste.
Step 10) In this step:
- Select the parent folder.
- Give the folder the name lib. (This folder is required only for command-line execution; it is not needed when running testng.xml from Eclipse.)
- Click Finish.

After creating the folder, the next step is to convert the programs DemoA and DemoB into a testng.xml file.
Convert and Execute Selenium Project to TestNG
Step 1) In this step:
- Select the two Java files in the package and right-click.
- Select the TestNG option.
- Click Convert to TestNG.

Step 2) A new window opens. Enter the following details:
- Location
- Suite Name
- Test Name
- Class Selection
- Parallel Mode
- Click Finish.

The testng.xml file is created under the Java project and will look like this:

(To run testng.xml from Eclipse: right-click the file in the Package Explorer and select Run As TestNG Suite.)
Step 3) The testng.xml suite file will look like this:

If you want to execute DemoA first, remove its line and add it before DemoB:


Step 4) After executing the testng.xml file, the result will be displayed as follows. (No console output appears because no System.out.println() statements were written.)

This is one way to execute tests through Eclipse. To run the same testng.xml suite from the command prompt, follow the steps below.
Execute TestNG via Command Line
To run a TestNG suite from the command line, you must first locate the project workspace path and construct the correct classpath command.
Step 1) Right-click on the Java project and select Properties. In the Properties window, select Resource.

Step 2) Click the Resource link in the left navigation pane to see the exact project storage location.
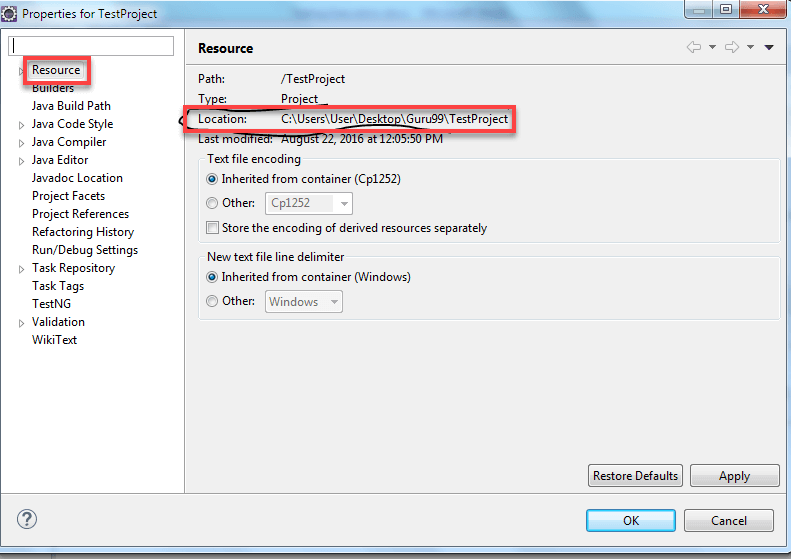
The project workspace is C:\Users\User\Desktop\Guru99\TestProject. Change the directory to that location in the command prompt.
Step 3) Type the following generic command:
java –cp "path_of_lib_folder\*; path_of_bin_folder; path_of_testng.jar" org.testng.TestNG testng.xml
For this project, use:
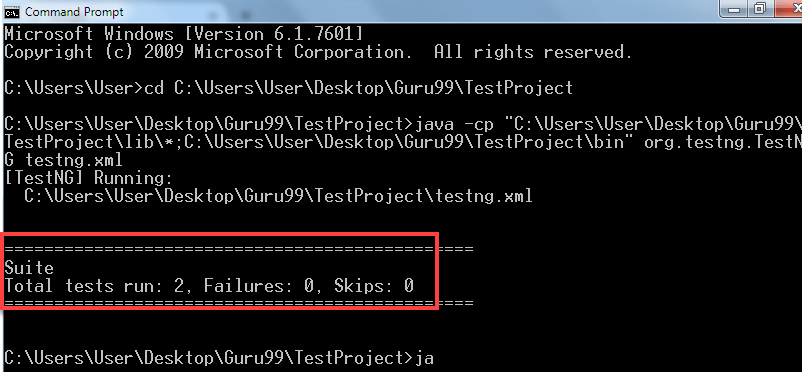
Java –cp "C:\Users\User\Desktop\Guru99\TestProject\lib\*;
  C:\Users\User\Desktop\Guru99\TestProject\bin" org.testng.TestNG testng.xml
Step 4) Press Enter. Both DemoA and DemoB will execute, and the result will be displayed in the command prompt.
How to Run Only Failed Test Cases
If you want to execute only the failed test cases through Eclipse, first refresh the project.
Step 1) Right-click on the Java project (DemoA and DemoB) and select Refresh, or select the project and press F5.
Step 2) You will now see the test-output folder. Inside it, there is a file named testng-failed.xml.

Step 3) Right-click on this file and select Run As → TestNG Suite.
Note: the test-output folder appears only when at least one test case has failed. If all test cases pass, the folder will not contain testng-failed.xml. Running this file re-executes only the failed test cases.

Running testng-failed.xml from the Command Line
Step 1) Open the command prompt and navigate to the project workspace.

The project workspace is C:\Users\User\Desktop\Guru99\TestProject. Change directory to that location.
Step 2) Type the following generic command:
java –cp "path_of_lib_folder\*; path_of_bin_folder; path_of_testng.jar" org.testng.TestNG test-output/testng-failed.xml
For this project:
Java –cp "C:\Users\User\Desktop\Guru99\TestProject\lib\*;
C:\Users\User\Desktop\Guru99\TestProject\bin" org.testng.TestNG test-output/testng-failed.xml
Step 3) Press Enter. TestNG will run only the failed classes and display results for those classes.
In DemoB, if you change the code to the following, the element will not be found and an exception will be thrown. Because the exception is unhandled, the class will fail:
driver.findElement(By.name("a")).sendKeys("Bye");
