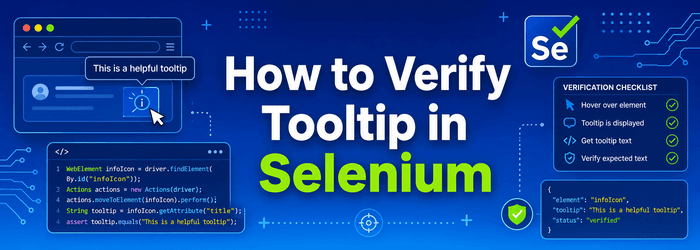
How to Verify Tooltip in Selenium
⚡ Smart Summary
Verify Tooltip in Selenium WebDriver covers two reliable patterns for asserting tooltip text: reading the HTML title attribute directly and using the Actions API to hover over elements that render dynamic JavaScript or jQuery tooltips.
Tooltip in Selenium
A Tooltip in Selenium is a short text that appears when a mouse hovers over an object on a web page. The object can be a link, an image, a button, or a text area. The tooltip text often gives more information about the element under the cursor.
Tooltips were traditionally implemented as a “title” attribute on an element. The value of this attribute was shown as a tooltip on mouse-hover. This is a static text giving information about the element with no styling.
Today, many plugins are available for tooltip implementation. Advanced tooltips with styling, rendering, images, and links are built using JavaScript or jQuery plugins, or with CSS-only tooltips.
- To access or verify static tooltips implemented through the HTML “title” attribute, use the
getAttribute("title")method on the WebElement. The returned value (the tooltip text) is compared with an expected value for verification. - For other tooltip implementations, use the “Advanced User Interactions API” provided by WebDriver to create the mouse-hover effect and then retrieve the tooltip for the element.
A Brief of the Advanced User Interactions API
The Advanced User Interactions API exposes user actions like drag and drop, hovering, multi-selecting, key press and release, and other keyboard or mouse actions on a webpage.
You can refer to this official Actions class reference for more details on the API.
Before jumping into scenarios, let us look at the classes and methods we need to move a slider element by an offset.
Step 1) To use the API, import the following packages and classes:

Step 2) Create an object of the “Actions” class and build the sequence of user actions. The Actions class builds chained actions such as moveToElement() and dragAndDrop(). The driver object is passed as a parameter to its constructor.
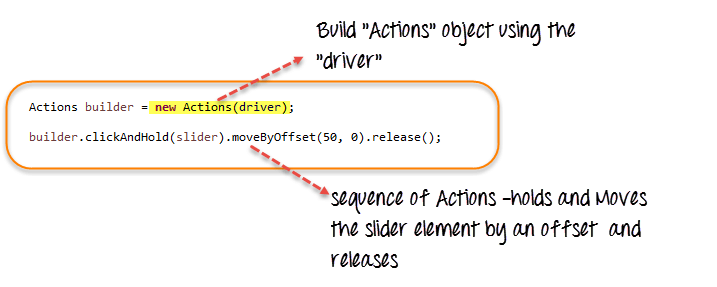
Step 3) Create an Action object using the build() method of the “Actions” class. Call the perform() method to execute every queued action on the builder.

We have seen how to use some of the user Action methods provided by the API: clickAndHold(element), moveByOffset(10, 0), and release(). The API exposes many more.
Tooltip Implementation vs Selenium Verification Approach
| Tooltip Type | How it Renders | Selenium Approach |
|---|---|---|
| HTML title attribute | Text stored on the element itself; browser shows on hover. | Read with getAttribute("title") or getDomAttribute("title"). No hover needed. |
| jQuery / JS plugin | Dedicated div is shown next to the element on mouseover. | Use Actions moveToElement(target).perform(), wait, then read the tooltip element with getText(). |
| CSS-only tooltip | Pseudo-element or sibling div toggled with :hover. |
Trigger hover with Actions and read the rendered text or computed style. |
How to Verify (Handle) Tooltip in Selenium
Let us walk through accessing and verifying tooltips with two common scenarios:
- Scenario 1: Tooltip is implemented using the “title” attribute.
- Scenario 2: Tooltip is implemented using a jQuery plugin.
Scenario 1: HTML “title” Attribute
For this case, we use the example site https://demo.guru99.com/test/social-icon.html and verify the tooltip of the “github” icon at the top right of the page.

We first locate the element, then read its “title” attribute and compare it with the expected tooltip text.
Because the tooltip is in the “title” attribute, we do not even automate the mouse-hover; we simply retrieve the attribute value with the getAttribute() method.

Here is the code:
import org.openqa.selenium.By;
import org.openqa.selenium.WebDriver;
import org.openqa.selenium.chrome.ChromeDriver;
import org.openqa.selenium.*;

public class ToolTip {
    public static void main(String[] args) {

        String baseUrl = "https://demo.guru99.com/test/social-icon.html";
        System.setProperty("webdriver.chrome.driver", "G:\\chromedriver.exe");
        WebDriver driver = new ChromeDriver();
        driver.get(baseUrl);
        String expectedTooltip = "Github";

        // Find the Github icon at the top right of the header
        WebElement github = driver.findElement(By.xpath(".//*[@class='soc-ico show-round']/a[4]"));

        // Read the "title" attribute value of the Github icon
        String actualTooltip = github.getAttribute("title");

        // Assert that the tooltip value matches the expected one
        System.out.println("Actual Title of Tool Tip " + actualTooltip);
        if (actualTooltip.equals(expectedTooltip)) {
            System.out.println("Test Case Passed");
        }
        driver.close();
    }
}
Explanation of code:
- Find the WebElement representing the “github” icon.
- Read its “title” attribute with the getAttribute() method.
- Assert the value against the expected tooltip text.
Selenium 4 tip: Prefer getDomAttribute("title") for the literal HTML attribute, and let Selenium Manager resolve the driver instead of hard-coding chromedriver.exe.
Scenario 2: jQuery Plugin
Many jQuery plugins implement tooltips, and each one renders slightly differently.
Some plugins keep the tooltip markup next to the trigger element at all times, while others create a “div” tag dynamically when the cursor enters the trigger.
For this demonstration, we use the “jQuery Tools Tooltip” style.
Open https://demo.guru99.com/test/tooltip.html; hovering over “Download now” reveals an advanced tooltip with an image, callout background, a small table, and a clickable link.

If you inspect the source, the div representing the tooltip already sits next to the “Download now” link. The script tag below controls when it appears.

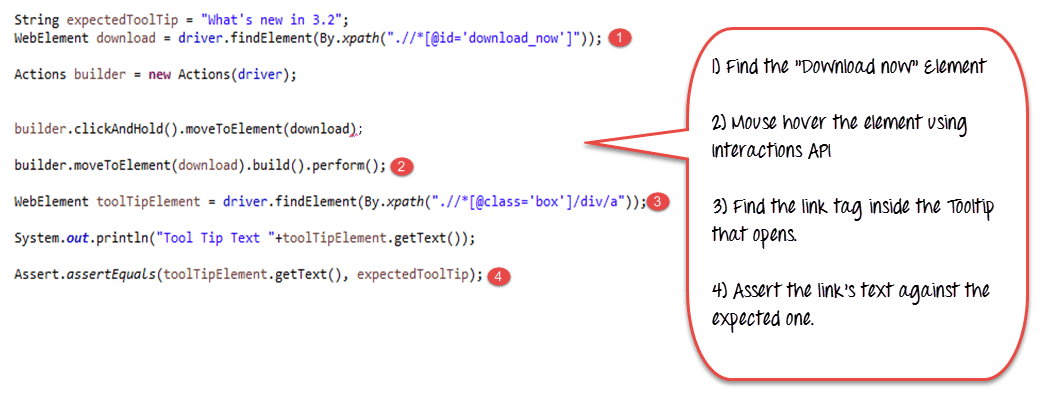
Now we verify the link text shown inside the tooltip.
First locate the WebElement for “Download now”. Use the Interactions API to move to the element (mouse-hover). Next, find the WebElement that maps to the link inside the displayed tooltip and verify its text against the expected value.
Here is the code:
import org.openqa.selenium.interactions.Actions;
import org.openqa.selenium.By;
import org.openqa.selenium.WebDriver;
import org.openqa.selenium.chrome.ChromeDriver;
import org.openqa.selenium.*;

public class JqueryToolTip {
    public static void main(String[] args) {

        String baseUrl = "https://demo.guru99.com/test/tooltip.html";
        System.setProperty("webdriver.chrome.driver", "G:\\chromedriver.exe");

        WebDriver driver = new ChromeDriver();
        String expectedTooltip = "What's new in 3.2";
        driver.get(baseUrl);

        WebElement download = driver.findElement(By.xpath(".//*[@id='download_now']"));
        Actions builder = new Actions(driver);

        // Hover over the "Download now" link to reveal the tooltip
        builder.moveToElement(download).build().perform();

        WebElement toolTipElement = driver.findElement(By.xpath(".//*[@class='box']/div/a"));
        String actualTooltip = toolTipElement.getText();

        System.out.println("Actual Title of Tool Tip " + actualTooltip);
        if (actualTooltip.equals(expectedTooltip)) {
            System.out.println("Test Case Passed");
        }
        driver.close();
    }
}
Code Explanation:
- Locate the WebElement that maps to the “Download now” element you will mouse-hover.
- Use the Interactions API to hover the cursor onto “Download now”.
- Once the tooltip is visible, locate the WebElement representing the link inside the tooltip (the “a” tag).
- Read the tooltip text with
getText()and compare it with the expected value stored inexpectedTooltip.