Assert & Verify in Selenium IDE
⚡ Smart Summary
Selenium IDE with Scripts and Commands lets testers record, edit, and replay browser actions using Selenese — the IDE’s lightweight command language. This article covers recording a script, writing Selenese manually, choosing between Assert and Verify, and debugging with breakpoints.
We will use the Mercury Tours website as our web application under test. It is an online flight reservation system that contains all the elements we need for this tutorial. Its base URL is https://demo.guru99.com/test/newtours/.
Let us now create our first test script in Selenium IDE using the most common method — by recording. Afterward, we shall execute the script using the playback feature.
Note: This tutorial uses the classic Firefox-only Selenium IDE 1.x with Firebug to introduce Selenese fundamentals. Firebug was retired in Firefox 57, and the modern Selenium IDE is now a Chrome / Firefox / Edge browser extension with a different UI. The Selenese concepts, command types, and debugging features below still apply directly to the new IDE.
Create a Script by Recording
Step 1)
- Launch Firefox and Selenium IDE.
- Type the value for our Base URL:
https://demo.guru99.com/test/newtours/. - Toggle the Record button on (if it is not toggled on by default).
.png)
Step 2) In Firefox, navigate to https://demo.guru99.com/test/newtours/. Firefox should land on a page similar to the one below.
.png)
Step 3)
- Right-click on any blank space within the page — for example, on the Mercury Tours logo in the upper-left corner. This brings up the Selenium IDE context menu. Do not click on any hyperlinked objects or images.
- Select the Show Available Commands option.
- Choose
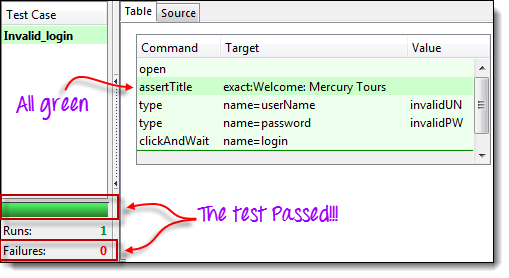
assertTitle exact: Welcome: Mercury Tours. This command checks that the page title is correct.
.png)

Step 4)
- In the User Name text box of Mercury Tours, type the invalid username
invalidUNN. - In the Password text box, type the invalid password
invalidPWD.


Step 5) Click the Sign-In button. Firefox should land on the page shown below.

Step 6) Toggle the Record button off to stop recording. Your script should now resemble the one below.

Step 7) Now save the recorded test script. In the File menu, choose Save Test Case, or press Ctrl+S.

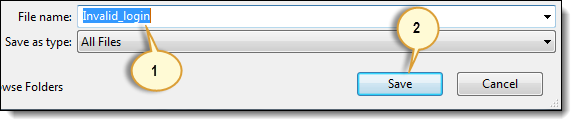
Step 8)
- Choose a destination folder, then name the test case Invalid_login.
- Click Save.
Step 9) Notice that the file is saved as HTML.

Step 10) Return to Selenium IDE and click the Playback button to execute the whole script. Selenium IDE replays every action faithfully.
Introduction to Selenium Commands – Selenese
Selenese is the script language that drives Selenium IDE. The rules are simple:
- Each Selenese command accepts up to two parameters — a target and a value.
- Parameters are not always required. The number depends on the command.
Types of Commands
Selenese groups commands into three categories. Each one has a different role in the script.
| Actions | Commands that directly interact with page elements. Example: click interacts with the element you click; type puts a value into a text box and the text box echoes it back, giving a two-way interaction. |
| Accessors | Commands that store a value into a variable. Example: storeTitle only reads the page title and saves it — it does not change anything on the page. |
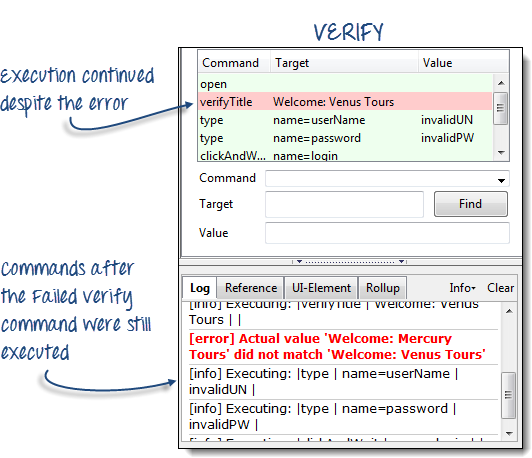
| Assertions | Commands that verify a condition. Selenese exposes three assertion flavours: Assert stops the test on failure, Verify logs the failure and continues, and WaitFor pauses until a condition becomes true (default timeout 30 seconds, configurable under Options > General). |
Assert vs. Verify in Selenium
The diagrams below contrast the runtime behaviour of an Assert versus a Verify command when the check fails mid-test.

Common Commands
| Command | Number of Parameters | Description |
|---|---|---|
| open | 0–2 | Opens a page using a URL. |
| click / clickAndWait | 1 | Clicks a specified element. |
| type / typeKeys | 2 | Types a sequence of characters. |
| verifyTitle / assertTitle | 1 | Compares the actual page title with an expected value. |
| verifyTextPresent | 1 | Checks if a given text is found within the page. |
| verifyElementPresent | 1 | Checks the presence of a specific element. |
| verifyTable | 2 | Compares the contents of a table with expected values. |
| waitForPageToLoad | 1 | Pauses execution until the page finishes loading. |
| waitForElementPresent | 1 | Pauses execution until the specified element appears. |
Create a Script Manually with Firebug
Let us now recreate the same test case manually by typing the commands. This walkthrough uses Firebug to inspect element locators. (In the modern Selenium IDE, use the browser’s built-in DevTools instead of Firebug.)
Step 1) Open Firefox and Selenium IDE. Type the base URL https://demo.guru99.com/test/newtours/. The Record button must be OFF.

Step 2) Click the topmost blank line in the Editor.

Type open in the Command text box and press Enter.

Step 3) Navigate Firefox to the base URL and activate Firebug. In the IDE Editor, select the line below the open command and type assertTitle. Use the autocomplete suggestions for accuracy.
.png)
Step 4) In Firebug, expand the <head> tag to reveal the <title>. Click the title value (Welcome: Mercury Tours) and paste it into the Target field in the Editor.

Step 5) Click the third blank line in the Editor and type type in the Command field. In Firebug, click the Inspect button.

Click on the User Name text box. Firebug shows the matching HTML element automatically.

Step 6) The User Name text box has no ID, but it has a NAME attribute. Copy the NAME value and paste it into the Target field of Selenium IDE.
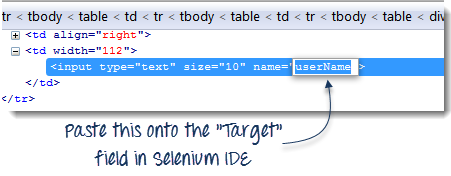
Still in the Target field, prefix userName with name= so Selenium IDE targets the element whose NAME attribute is userName.

Type invalidUN in the Value field. Your script now has its third command. Selenium IDE is case-sensitive, so type values and attribute names exactly as they appear in the application.

Step 7) Add a fourth command by typing type in the Command field. Use Firebug’s Inspect button on the Password text box.

Paste the NAME attribute (password) into the Target field, prefix with name=, and set the Value to invalidPW.

Step 8) Add the fifth command by typing clickAndWait in the Command field. Use Firebug’s Inspect on the Sign-In button.

Paste the NAME value (login) into the Target field with the name= prefix.

Step 9) Save the test case as before.
Using the Find Button
The Find button in Selenium IDE confirms that the value entered in the Target field actually matches a UI element on the page.
Open the Invalid_login test case from the previous section and click any command with a Target entry — for example, the third command.
.png)
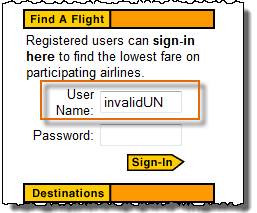
Click Find. The User Name text box on the Mercury Tours page becomes highlighted briefly.
.png)
The highlight confirms that Selenium IDE resolved the locator correctly. If the wrong element (or no element) is highlighted, the locator in the script needs to be corrected.
Execute Command
Execute Command runs a single line of the script without running the whole test case. Click the line you want to run and either choose Actions > Execute this command from the menu or press X on the keyboard.
Step 1) Make sure the browser is on the Mercury Tours homepage. Click the line you wish to run — for example, type | userName | invalidUN.
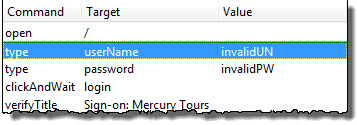
Step 2) Press X on the keyboard.
Step 3) The username text box on the page is populated with invalidUN.
Executing commands this way depends on the page that Firefox is currently displaying. Running the same command on Google’s homepage would fail because there is no field named userName there.
Start Point
A start point tells Selenium IDE which line to begin execution from. The shortcut key is S.

In the example above, playback starts on the third line (type | password | invalidPW). A test script can have only one start point. Like Execute Command, the start point depends on the currently displayed page and fails if the page is wrong.
Breakpoints
Breakpoints tell Selenium IDE to pause the test automatically at a given line. The shortcut key is B.

The yellow highlight shows the paused step. A test case can have multiple breakpoints.
Step
The Step command runs the next line after a paused test case. Use it together with breakpoints to walk through a script one command at a time.
|
|
Before clicking Step. The test case is paused on the line clickAndWait | login. |
|
|
After clicking Step. The clickAndWait | login command runs and execution pauses on the next command (verifyTitle | Sign-on: Mercury Tours). The next line pauses even without a breakpoint — that is the purpose of Step. |


Important Things to Note When Using Other Formats in Source View
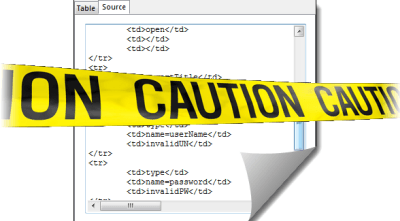
Selenium IDE 1.x works reliably only with the HTML format — other formats are still experimental. Creating or editing tests in non-HTML Source View is not recommended. The known issues as of version 1.9.1 are:
- You cannot use Playback or switch back to Table View without reverting to HTML.
- The safest way to add commands in Source View is by recording them.
- Manual edits in Source View are lost when you switch to another format.
- You can save a test case in Source View, but Selenium IDE may fail to reopen it.
The recommended way to convert Selenese tests to other languages is the File > Export Test Case As… menu, not the Source View.