CSS Selector in Selenium
⚡ Smart Summary
CSS Selector in Selenium is a powerful locator strategy that identifies elements using HTML tags, IDs, classes, attributes, and inner text patterns. This resource explains every CSS Selector type with step-by-step examples for Selenium IDE.

What is a CSS Selector in Selenium?
A CSS Selector in Selenium is a string pattern that identifies a web element through a combination of HTML tag, id, class, and attributes. CSS Selectors are slightly more advanced than locating by ID or Name, but they are the most popular strategy among experienced Selenium users because they can reach elements that have no ID or Name attribute at all.
CSS Selectors in Selenium come in many forms, but this guide focuses on the five most common patterns used in Selenium IDE:
- Tag and ID
- Tag and Class
- Tag and Attribute
- Tag, Class, and Attribute
- Inner Text
When using this strategy in Selenium IDE, always prefix the Target box with “css=” as demonstrated in every example below.
Why Use CSS Selectors in Selenium?
CSS Selectors are the preferred locator strategy for many Selenium automation engineers because they balance speed, flexibility, and readability. Modern web applications often use dynamically generated IDs or remove name attributes entirely, leaving CSS Selectors as the only reliable way to target a specific element on the page.
The main advantages of using CSS Selectors include:
- Performance: CSS Selectors are processed by the browser’s native engine, so they execute faster than equivalent XPath expressions, especially in older browsers such as Internet Explorer.
- Flexibility: They combine tag, class, attribute, and partial-match logic, allowing testers to target elements that lack a stable ID.
- Readability: The syntax mirrors the way developers already write CSS rules, which shortens the learning curve for both QA engineers and front-end teams.
- Cross-browser stability: CSS Selectors behave consistently across Chrome, Firefox, Edge, and Safari, reducing flaky test failures.
Tag and ID – CSS Selector
This example uses the Email text box on the Facebook login page. The element has an ID of “email“, and it was already accessed in the “Locating by ID” section. Now the same element is targeted using a Selenium CSS Selector with the ID attribute.
Syntax
css=tag#id
- tag = the HTML tag of the element being accessed
- # = the hash sign, which must always be present when using a Selenium CSS Selector with ID
- id = the ID of the element being accessed
Keep in mind that the ID is always preceded by a hash sign (#).
Step 1) Navigate to www.facebook.com. Using your browser’s DevTools (or a legacy tool such as Firebug), inspect the “Email or Phone” text box.
Notice that the HTML tag is “input” and its ID is “email“. The complete CSS Selector therefore becomes “css=input#email“.

Step 2) Enter “css=input#email” into the Target box of Selenium IDE and click the Find button. Selenium IDE highlights the matching element on the page.

Tag and Class – CSS Selector
A CSS Selector in Selenium that uses an HTML tag and a class name follows the same idea as tag and ID, but a dot (.) replaces the hash sign.
Syntax
css=tag.class
- tag = the HTML tag of the element being accessed
- . = the dot sign, which must always be present when using a CSS Selector with class
- class = the class of the element being accessed
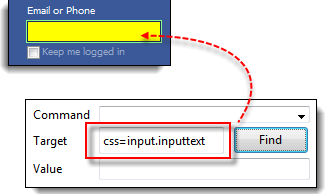
Step 1) Open the demo page https://demo.guru99.com/test/facebook.html and inspect the “Email or Phone” text box. Note that the HTML tag is “input” and its class is “inputtext“.

Step 2) In Selenium IDE, enter “css=input.inputtext” in the Target box and click Find. Selenium IDE recognizes the Email or Phone text box.
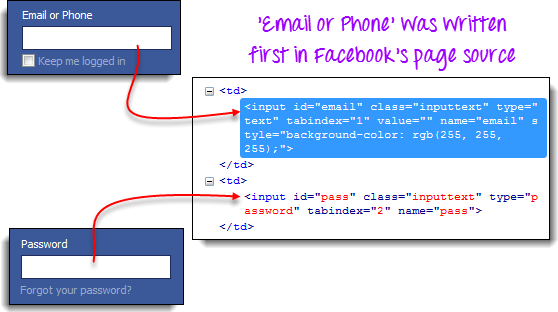
Take note that when multiple elements share the same HTML tag and class, only the first matching element in the source code is recognized. Inspect the Password text box on the same page and notice that it shares the same class as the Email or Phone text box.

Only the Email or Phone text box was highlighted in the previous illustration because it appears first in the page source.
Tag and Attribute – CSS Selector
This strategy combines an HTML tag with a specific attribute belonging to the element you want to access.
Syntax
css=tag[attribute=value]
- tag = the HTML tag of the element being accessed
- [ and ] = square brackets that wrap the attribute and its corresponding value
- attribute = the attribute to use. Choose one that is unique to the element, such as name or id.
- value = the corresponding value of the chosen attribute.
Step 1) Navigate to the Mercury Tours Registration page https://demo.guru99.com/test/newtours/register.php and inspect the “Last Name” text box. Note its HTML tag (“input”) and its name attribute (“lastName”).

Step 2) In Selenium IDE, enter “css=input[name=lastName]” in the Target box and click Find. Selenium IDE successfully locates the Last Name field.

When multiple elements share the same HTML tag and attribute, only the first one is recognized. The behavior is identical to locating elements with the same tag and class.
Tag, Class, and Attribute – CSS Selector
Syntax
css=tag.class[attribute=value]
- tag = the HTML tag of the element being accessed
- . = the dot sign, which must always be present when using a CSS Selector with class
- class = the class of the element being accessed
- [ and ] = square brackets that wrap a specific attribute and its corresponding value
- attribute = the attribute to use. Choose one that is unique to the element, such as name or id.
- value = the corresponding value of the chosen attribute.
Step 1) Open the demo page https://demo.guru99.com/test/facebook.html and inspect the “Email or Phone” and “Password” input boxes. Note their HTML tag, class, and attributes. This example uses the “tabindex” attribute.

Step 2) Access the “Email or Phone” text box first using a tabindex value of 1. Enter “css=input.inputtext[tabindex=1]” into Selenium IDE’s Target box and click Find. The Email or Phone field is highlighted.

Step 3) To target the Password input box, simply replace the tabindex value. Enter “css=input.inputtext[tabindex=2]” in the Target box and click Find. Selenium IDE successfully locates the Password text box.

Inner Text – CSS Selector
HTML labels are seldom given id, name, or class attributes. So how do you access them in Selenium? The answer is through their inner text. Inner texts are the actual string patterns that the HTML label displays on the page.
Syntax
css=tag:contains("inner text")
- tag = the HTML tag of the element being accessed
- inner text = the visible text content of the element
Step 1) Navigate to the Mercury Tours homepage https://demo.guru99.com/test/newtours/ and inspect the “Password” label. Note its HTML tag (“font” in this case) and observe that the element has no class, id, or name attributes.

Step 2) Type css=font:contains(“Password:”) into Selenium IDE’s Target box and click Find. Selenium IDE locates the Password label as shown below.

Step 3) This time, replace the inner text with “Boston” so the Target becomes “css=font:contains(“Boston”)“. Click Find. The “Boston to San Francisco” label is highlighted, demonstrating that Selenium IDE can locate a long label even when only the first word of its inner text is supplied.

CSS Selector vs XPath in Selenium
Both CSS Selectors and XPath are used to identify web elements in Selenium, yet they have different strengths. The table below compares the two locator strategies on key dimensions:
| Criteria | CSS Selector | XPath |
|---|---|---|
| Speed | Faster, runs on the browser’s native engine | Slower, especially in older browsers |
| Direction | Forward only (parent to child) | Forward and backward (child to parent) |
| Syntax | Shorter and similar to CSS rules | Longer, hierarchical path expressions |
| Text matching | Limited to :contains() pseudo-class | Strong text() and contains() functions |
| Best for | Static layouts and modern web apps | Complex DOM traversal and text-based locators |
Best Practices for Writing CSS Selectors in Selenium
Writing reliable CSS Selectors goes beyond knowing the syntax. The following practices help testers create stable, maintainable Selenium scripts that survive UI changes:
- Prefer unique attributes: Always pick id, data-test-id, or name attributes that are explicitly added for automation. These remain stable even when the visual layout changes.
- Avoid overly nested selectors: Long chains such as
div > div > ul > li > abreak easily when developers refactor the markup. Keep selectors as short as possible. - Use partial matches wisely: Patterns such as
[class*="btn-primary"]tolerate small class name changes, but they may also match unintended elements. - Avoid index-based locators: Selectors like
nth-child(3)are fragile because adding a sibling element shifts every position. - Validate selectors in DevTools: Before running a Selenium script, paste the selector into the Chrome DevTools Console using
document.querySelector()to confirm it returns exactly one element. - Combine attributes for uniqueness: When a class is shared by many elements, add an attribute filter such as
input.form-control[name="email"]to disambiguate the target. - Document and reuse: Centralize selectors inside a Page Object class so that a single update fixes every test that references the same element.
Following these guidelines reduces flakiness, improves test execution speed, and makes Selenium suites easier to maintain over time.
Summary: CSS Selector Syntax Quick Reference
The table below consolidates every Selenium CSS Selector pattern covered in this guide:
| Method | Target Syntax | Example |
|---|---|---|
| Tag and ID | css=tag#id | css=input#email |
| Tag and Class | css=tag.class | css=input.inputtext |
| Tag and Attribute | css=tag[attribute=value] | css=input[name=lastName] |
| Tag, Class, and Attribute | css=tag.class[attribute=value] | css=input.inputtext[tabindex=1] |
| Inner Text | css=tag:contains(“text”) | css=font:contains(“Password:”) |