Locators in Selenium
⚡ Smart Summary
Locators in Selenium are commands that direct the automation engine to identify GUI elements such as text boxes, buttons, and checkboxes. This reference explains ID, Name, Link Text, DOM, and XPath locator types with practical examples, syntax rules, and selection strategies for reliable web automation scripts.

What are Locators in Selenium?
A locator is a command that directs Selenium IDE or Selenium WebDriver to the correct GUI element, such as a text box, button, link, or checkbox, on which an action must be performed. Identifying the correct GUI element is a prerequisite for building any reliable automation script. However, accurate identification is more challenging than it sounds. Sometimes, you may end up interacting with the wrong element, or with no element at all. To address this, Selenium offers a variety of locator strategies that allow precise targeting of GUI elements.
While some commands, such as the “open” command, do not require a locator, the majority of Selenium commands depend on element locators. The choice of locator depends largely on your Application Under Test (AUT). In this tutorial, we will alternate between Facebook and the Mercury Tours demo site (newtours.demoaut), based on which locators each application supports. Likewise, in your own testing project, you will select an element locator in Selenium WebDriver based on the structure of your application.
Locating by ID
This is the most common method of locating elements because IDs are intended to be unique for each element on a page. Whenever an ID attribute exists, it should be your first choice for fast, stable, and readable test scripts.
Target Format: id=id of the element
For this example, we will use a Facebook demo page because Mercury Tours does not use ID attributes for its main form fields.
Step 1) Use this demo page https://demo.guru99.com/test/facebook.html for testing. Inspect the “Email or Phone” text box using your browser’s built-in Developer Tools (press F12 in Chrome, Edge, or Firefox) and note its ID. In this case, the ID is “email.”

Step 2) Launch Selenium IDE and enter “id=email” in the Target box. Click the Find button and notice that the “Email or Phone” text box is highlighted in yellow with a green border, indicating that Selenium IDE has located the element correctly.

Locating by Name
Locating elements by name is similar to locating by ID, except that we use the “name=” prefix instead. This approach is useful when elements lack an ID but have a defined name attribute.
Target Format: name=name of the element
For the following demonstration, we will use Mercury Tours because all significant form elements on the site carry a name attribute.
Step 1) Navigate to https://demo.guru99.com/test/newtours/ and use the browser Developer Tools to inspect the “User Name” text box. Note its name attribute.

Here, the element’s name is “userName”.
Step 2) In Selenium IDE, enter “name=userName” in the Target box and click the Find button. Selenium IDE should locate the User Name text box by highlighting it.

How To Locate Element By Name using Filters
Filters are useful when several elements share the same name attribute. Filters are additional attributes used to distinguish elements that share an identical name. Without filters, Selenium would default to the first matching element only.
Target Format: name=name_of_the_element filter=value_of_filter
Let us walk through an example.
Step 1) Log on to Mercury Tours.
Sign in to Mercury Tours using “tutorial” as both the username and password. The Flight Finder page should appear, as shown below.

Step 2) Use Developer Tools to inspect the VALUE attributes.
Notice that the Round Trip and One Way radio buttons share the same name “tripType”. However, they have different VALUE attributes, so we can use each value as a filter.

Step 3) Click on the first row in the editor.
- We will access the One Way radio button first. Click the first line in the Selenium IDE editor.
- In the Command box, enter the command “click”.
- In the Target box, enter “name=tripType value=oneway”. The “value=oneway” portion serves as our filter.

Step 4) Click the Find button.
Notice that Selenium IDE highlights the One Way radio button in green, confirming that the element has been accessed successfully through its VALUE attribute.

Step 5) Select the One Way radio button.
Press the “X” key on your keyboard to execute the click command. The One Way radio button is now selected.

You can perform the same action on the Round Trip radio button, this time using “name=tripType value=roundtrip” as your target.
Locating by Link Text
This locator strategy applies only to hyperlink texts. We access the link by prefixing the target with “link=” followed by the visible hyperlink text. This method is highly readable and works well for navigation testing.
Target Format: link=link_text
In the following example, we will access the “REGISTER” link found on the Mercury Tours homepage.
Step 1)
- First, ensure that you are logged out of Mercury Tours.
- Navigate to the Mercury Tours homepage.
Step 2)
- Use Developer Tools to inspect the “REGISTER” link. The link text appears between the opening and closing anchor tags.
- In this case, the link text is “REGISTER”. Copy the link text.
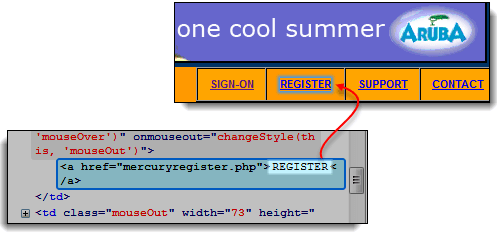
Step 3) Copy the link text and paste it into the Selenium IDE Target box. Prefix it with “link=”.

Step 4) Click the Find button. Selenium IDE will highlight the REGISTER link correctly.

Step 5) To verify further, enter “clickAndWait” in the Command box and execute it. Selenium IDE will click the REGISTER link successfully and take you to the Registration page shown below.

Locating by DOM (Document Object Model)
The Document Object Model (DOM), in simple terms, describes how HTML elements are structured as a tree of nodes. Selenium IDE can navigate this tree to access page elements. When using this method, the Target box always begins with “dom=document…”. The “dom=” prefix is typically omitted because Selenium IDE automatically interprets any value beginning with “document” as a DOM path.
There are four basic ways to locate an element through the DOM in Selenium:
- getElementById
- getElementsByName
- dom:name (applies only to elements within a named form)
- dom:index
Locating by DOM – getElementById
Let us first explore the getElementById method of the DOM in Selenium. This method returns a single element by matching its ID attribute.
Syntax
document.getElementById("id of the element")
- id of the element = the value of the ID attribute of the element to be accessed. This value must always be enclosed in a pair of quotation marks.
Step 1) Use this demo page https://demo.guru99.com/test/facebook.html. Navigate to it and use Developer Tools to inspect the “Keep me logged in” checkbox. Note its ID.

The ID we should use is “persist_box”.
Step 2) Open Selenium IDE and in the Target box enter document.getElementById(“persist_box”), then click Find. Selenium IDE will locate the “Keep me logged in” checkbox. Although it cannot highlight the interior of the checkbox, it surrounds the element with a bright green border, as shown below.

Locating by DOM – getElementsByName
The getElementById method accesses only one element at a time, namely the element with the specified ID. The getElementsByName method behaves differently. It returns an array of elements that share the specified name. Individual elements are accessed using a numeric index that starts at 0.
 |
getElementById It returns only one element. That element bears the ID specified inside the parentheses of getElementById(). |
 |
getElementsByName It returns a collection of elements whose names are identical. Each element is indexed by a number starting from 0, like an array. You select a specific element by placing its index inside the square brackets in the syntax below. |
Syntax
document.getElementsByName("name")[index]
- name = name of the element as defined by its ‘name’ attribute
- index = an integer that indicates which element within getElementsByName’s array will be used.
Step 1) Navigate to the Mercury Tours homepage and log in using “tutorial” as the username and password. The browser will load the Flight Finder screen.
Step 2) Use Developer Tools to inspect the three radio buttons at the bottom of the page (Economy class, Business class, and First class). Notice that they all share the same name, “servClass”.

Step 3) First, let us access the “Economy class” radio button. Of the three radio buttons, this element appears first, so its index is 0. In Selenium IDE, type document.getElementsByName(“servClass”)[0] and click the Find button. Selenium IDE will identify the Economy class radio button correctly.

Step 4) Change the index number to 1, so your Target becomes document.getElementsByName(“servClass”)[1]. Click the Find button, and Selenium IDE will highlight the “Business class” radio button as shown below.

Locating by DOM – dom:name
As mentioned earlier, this method only applies if the element you are accessing is contained within a named form. The locator path begins at the form, then drills down to the target element by name.
Syntax
document.forms["name of the form"].elements["name of the element"]
- name of the form = the value of the name attribute of the form tag that contains the element you wish to access
- name of the element = the value of the name attribute of the element you wish to access
Step 1) Navigate to Mercury Tours homepage https://demo.guru99.com/test/newtours/ and use Developer Tools to inspect the User Name text box. Notice that it is contained in a form named “home”.

Step 2) In Selenium IDE, type document.forms[“home”].elements[“userName”] and click the Find button. Selenium IDE will access the element successfully.

Locating by DOM – dom:index
This method applies even when the element is not within a named form because it uses the form’s index instead of its name. This is useful for legacy pages or auto-generated forms where naming is unavailable.
Syntax
document.forms[index of the form].elements[index of the element]
- index of the form = the index number (starting at 0) of the form with respect to the entire page
- index of the element = the index number (starting at 0) of the element with respect to the form that contains it
We will access the “Phone” text box on the Mercury Tours Registration page. The form on this page has neither a name nor an ID attribute, so it makes a good example.
Step 1) Navigate to the Mercury Tours Registration page and inspect the Phone text box. Notice that the surrounding form has neither ID nor name attributes.

Step 2) Enter document.forms[0].elements[3] in the Selenium IDE Target box and click the Find button. Selenium IDE will access the Phone text box correctly.

Step 3) Alternatively, you can use the element’s name in place of its index for the same outcome. Enter document.forms[0].elements[“phone”] in the Target box. The Phone text box will still be highlighted.

Locating by XPath
XPath is the query language used to navigate XML (Extensible Markup Language) nodes. Because HTML can be considered an implementation of XML, XPath can also locate HTML elements. It is one of the most powerful locator strategies in Selenium.
- Advantage: It can access almost any element, including those without class, name, or ID attributes.
- Disadvantage: It is the most complex locator strategy due to its many rules and syntax variations.
Modern browser Developer Tools can automatically generate XPath expressions. In Chrome, Edge, or Firefox, right-click an element in the Elements panel and choose Copy > Copy XPath. In the following example, we will access an image that cannot be located using the methods discussed earlier.
Step 1) Navigate to the Mercury Tours homepage and use Developer Tools to inspect the orange rectangle to the right of the yellow “Links” box, as shown below.

Step 2) Right-click the element’s HTML code, then select the “Copy XPath” option.

Step 3) In Selenium IDE, type a single forward slash “/” in the Target box, then paste the XPath copied in the previous step. The entry in the Target box should now begin with two forward slashes “//”.

Step 4) Click the Find button. Selenium IDE will highlight the orange box, as shown below.

Why Choosing the Right Locator Matters
Selecting the correct locator strategy is one of the most influential decisions in Selenium automation because it directly impacts script stability, execution speed, and long-term maintenance cost. A poorly chosen locator can cause flaky tests, false failures, and frequent rework whenever the application’s UI changes. The order of preference recommended by experienced automation engineers is ID first, then Name, followed by CSS Selector, Link Text, and finally XPath.
ID-based locators are the fastest because the browser’s lookup is optimized for unique identifiers. Name-based locators are nearly as efficient when names are unique. CSS Selectors and XPath provide flexibility but tend to be slower and more brittle when developers refactor the DOM. Link Text is excellent for navigation links but offers limited reuse.
Stable automation also depends on collaboration with developers. When testers request consistent and meaningful ID or data-* attributes during code reviews, locator durability improves significantly. Avoid relying on auto-generated IDs (such as those produced by frameworks) because they may change between builds. By prioritizing readable, intent-driven locators, teams can keep test suites maintainable and reduce technical debt as the application evolves.
Best Practices for Writing Reliable Locators
Reliable locators are the foundation of a maintainable Selenium test suite. The following practices help reduce script failures, improve readability, and make tests resilient against UI changes.
- Prefer unique IDs: Always check for an ID attribute first. IDs are intended to be unique within a page and are the most performant choice.
- Use semantic Name and data-* attributes: Encourage developers to add stable test attributes such as data-testid or data-qa. These remain consistent even when CSS classes change.
- Avoid absolute XPath: Absolute paths like /html/body/div[2]/div[3]/span break easily. Use relative XPath expressions with attributes such as //input[@name=’userName’].
- Combine attributes for precision: When a single attribute is not unique, combine multiple attributes (for example, //button[@type=’submit’ and @name=’login’]) to target the correct element.
- Use text wisely: Locators that depend on visible text may break across language localizations. Use text-based locators only when content is stable and unilingual.
- Centralize locators: Store locators in a Page Object Model (POM) class so updates can be made in one place rather than across many test scripts.
- Validate in Developer Tools: Before adding a locator to a script, test it in the browser console using $x(“//xpath”) for XPath or document.querySelector for CSS to confirm it returns exactly one element.
- Avoid index-based locators when possible: Index positions like [3] depend on element order. Even minor layout changes can shift the index and break the script.
By applying these practices consistently, automation engineers create test suites that scale across teams and survive frequent UI updates with minimal maintenance.