Selenium with Cucumber (BDD Framework Tutorial)
⚡ Smart Summary
Selenium with Cucumber forms a powerful Behavior Driven Development (BDD) framework that combines plain-English Gherkin syntax with Selenium WebDriver automation. This tutorial explains the prerequisites, walks through three hands-on scenarios, and shows how feature files, step definitions, and a TestRunner class integrate to execute browser tests.

In this tutorial, you will learn how to integrate Cucumber with Selenium WebDriver to build a Behavior Driven Development (BDD) framework that is readable, maintainable, and data-driven.
What is Cucumber?
Cucumber is a testing tool that supports Behavior Driven Development (BDD). It describes the behavior of an application in simple English text using the Gherkin language, which lets non-developers contribute to test specifications without learning a programming language. Learn more in our Cucumber tutorial.
What is Selenium?
Selenium is an automation tool used for Functional Testing of web-based applications. Selenium supports multiple programming languages including Java, Ruby, Python, and C#, which makes it a natural fit for teams with mixed technical backgrounds. Learn more in our Selenium tutorial.
Why Use Cucumber with Selenium?
Cucumber and Selenium are two of the most widely adopted testing technologies. Most organizations already use Selenium for functional testing and want to layer Cucumber on top because Cucumber makes it easy to read and understand the application flow.
Cucumber is based on the Behavior Driven Development framework that acts as a bridge between the following roles:
- Software Engineer and Business Analyst.
- Manual Tester and Automation Tester.
- Manual Tester and Developers.
The Cucumber BDD framework also helps clients understand the application code because it uses the Gherkin language, which is in plain text. Anyone in the organization can follow the behavior of the software. The Gherkin syntax is in simple readable English, which keeps the specification accessible to non-technical readers.

Prerequisites for Using Cucumber with Selenium
Before we start the Cucumber-Selenium integration, you need the following items:
Selenium jar files:
- Selenium-server-standalone
You can download them at https://www.selenium.dev/downloads/.

Jar files for Cucumber:
- Cucumber-core
- Cucumber-html
- Cobertura code coverage
- Cucumber-java
- Cucumber-junit
- Cucumber-jvm-deps
- Cucumber-reporting
- Hamcrest-core
- Gherkin
- JUnit
You can download them at https://mvnrepository.com/search?q=Cucumber. You will need to search for each jar and download them one by one.
For example, here is how to download one of the jar files, the “Cucumber-core” library.
Click the download link above. It redirects to the Maven Repository site. Now search for the specific jar (in this case “Cucumber Core”) as shown in the screenshot below:

On the next page, click version 1.2.2:

On the next screen, click Download to grab the Cucumber Core jar file:

Note: For convenience, we have bundled the Maven jar files required here. These jars may become outdated and incompatible over time, so we recommend downloading them yourself using the method described above.
Automation Testing Using Cucumber with Selenium
Let us walk through how to use Cucumber with Selenium step by step. Here we will cover three scenarios:
- Scenario 1: Print text in the console.
- Scenario 2: Enter login credentials and reset the value.
- Scenario 3: Enter login credentials on Guru99 and reset the value — repeated for 3 sets of data.
Scenario 1: Print Text in the Console
In this scenario, we simply print text in the console using Cucumber.
Step 1) Create a project in Eclipse.
Create a Java project with the name “CucumberWithSelenium” as shown in the screenshot below.


Step 2) Add the jar files to the project.
Right-click the project > Properties > Java Build Path. Add all the libraries you downloaded earlier.

Step 3) Create a feature file.
To create a feature file, first create a Features folder as shown in the screenshot below.

Enter the folder name “Features” and click Finish.


Now create a feature file inside the Features folder named MyTest.feature. The process is similar to creating a folder.

Note: You may need to install the Cucumber Eclipse Plugin first. Go to Help → Install New Software, paste the link http://cucumber.github.io/cucumber-eclipse/update-site/, and install it.
Step 4) Write the scenarios.
The lines below are written in MyTest.feature using the Gherkin language:
Feature: Reset functionality on login page of Application

Scenario: Verification of Reset button

Given Open the Firefox and launch the application

When Enter the Username and Password

Then Reset the credential
Code Explanation
Line 1) Defines the business functionality.
Line 2) Defines a scenario to test.
Line 3) Defines the precondition (Given).
Line 4) Defines the action to perform (When).
Line 5) Defines the expected outcome or result (Then).
Step 5) Write the Selenium TestRunner script for the Cucumber framework design.
Create a TestRunner package and then a Runner.java class file under it.
package TestRunner;

import org.junit.runner.RunWith;
import cucumber.api.CucumberOptions;
import cucumber.api.junit.Cucumber;

@RunWith(Cucumber.class)
@CucumberOptions(features = "Features", glue = {"StepDefinition"})
public class Runner
{

}
In the above Cucumber Java example, we run the cucumber test using the following annotations:
@RunWith() tells JUnit about the test runner class that starts executing our tests.
@CucumberOptions() sets test properties such as the feature file path and step-definition glue package.
Screenshot of the TestRunner file:

Step 6) Create the Step Definition script.
Now create a StepDefinition package and then a Steps.java script file under it. Inside Steps.java we write the Selenium logic that maps to each Gherkin step.
package StepDefinition;

import cucumber.api.java.en.Given;
import cucumber.api.java.en.Then;
import cucumber.api.java.en.When;

public class Steps {

    @Given("^Open the Firefox and launch the application$")
    public void open_the_Firefox_and_launch_the_application() throws Throwable
    {
        System.out.println("This Step open the Firefox and launch the application.");
    }

    @When("^Enter the Username and Password$")
    public void enter_the_Username_and_Password() throws Throwable
    {
        System.out.println("This step enter the Username and Password on the login page.");
    }

    @Then("^Reset the credential$")
    public void Reset_the_credential() throws Throwable
    {
        System.out.println("This step click on the Reset button.");
    }
}
The class is named Steps, and Cucumber annotations map each method to a feature-file step:
@Given defines the method to open Firefox and launch the application.
@When defines the method to enter the username and password.
@Then defines the method to reset the credentials.
Each method simply prints a message to the console.
The screenshot below shows the Steps.java script and the project tree:
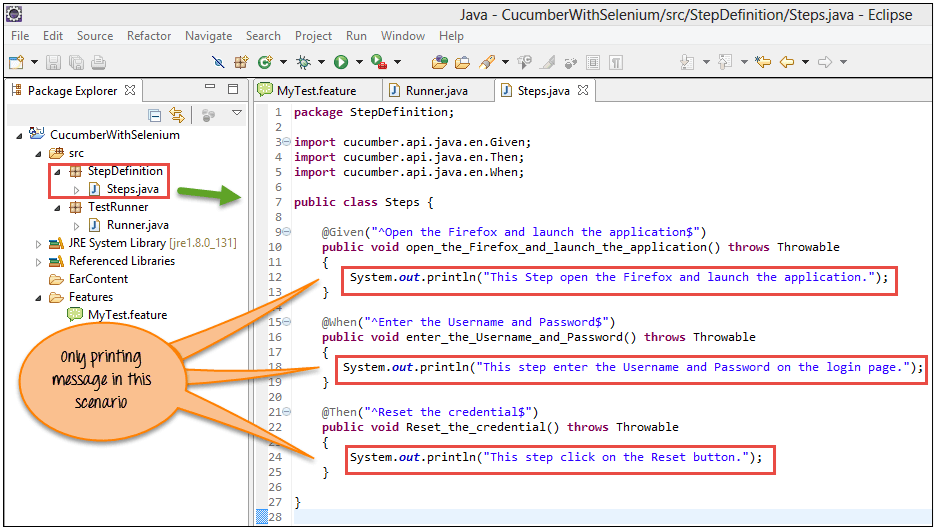
Note: A step definition is the code you want Cucumber to execute when it matches a feature-file step.
Step 7) Execute the script.
Run this script from the TestRunner file (Runner.java) as shown below.
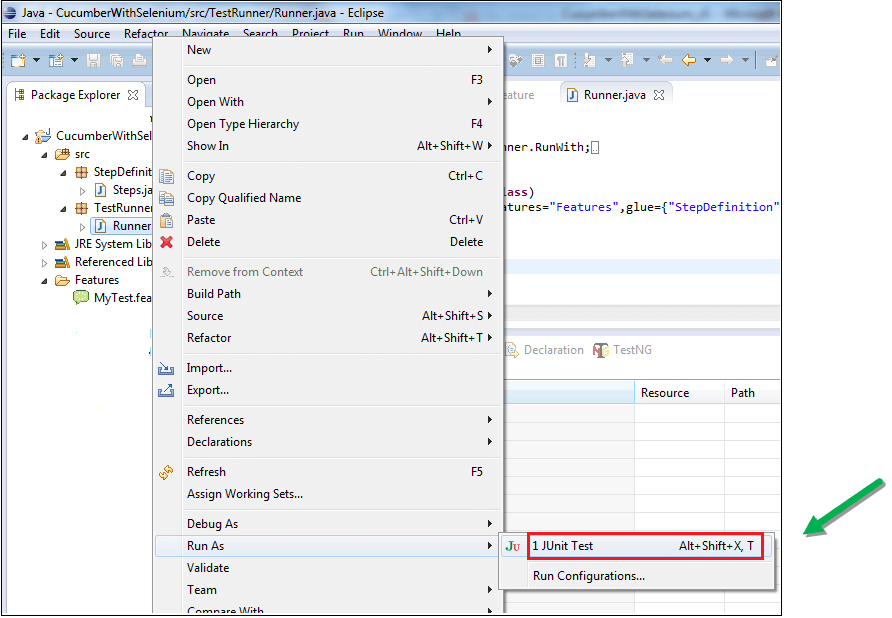
Step 8) Analyze the output.
On executing Runner.java, Cucumber prints the same text defined in Steps.java to the console.

Scenario 2: Enter Login Credentials and Reset the Value
Here we enter credentials on the Guru99 demo login page and reset the value.
For Scenario 2 we only need to update Steps.java. Here we add the real Selenium code. First, make sure the Selenium jar file is added to the project.

Step 1) Update the Steps.java script as shown below.
package StepDefinition;

import org.openqa.selenium.By;
import org.openqa.selenium.WebDriver;
import org.openqa.selenium.firefox.FirefoxDriver;

import cucumber.api.java.en.Given;
import cucumber.api.java.en.Then;
import cucumber.api.java.en.When;

public class Steps {

    WebDriver driver;

    @Given("^Open the Firefox and launch the application$")
    public void open_the_Firefox_and_launch_the_application() throws Throwable
    {
        System.setProperty("webdriver.gecko.driver", "E://Selenium//Selenium_Jars//geckodriver.exe");
        driver = new FirefoxDriver();
        driver.manage().window().maximize();
        driver.get("http://demo.guru99.com/v4");
    }

    @When("^Enter the Username and Password$")
    public void enter_the_Username_and_Password() throws Throwable
    {
        driver.findElement(By.name("uid")).sendKeys("username12");
        driver.findElement(By.name("password")).sendKeys("password12");
    }

    @Then("^Reset the credential$")
    public void Reset_the_credential() throws Throwable
    {
        driver.findElement(By.name("btnReset")).click();
    }
}
Screenshot of the above Selenium script:

Step 2) Execute the script.
After updating Steps.java, run Runner.java.
Step 3) Analyze the output. In the output you will see the following:
- Browser launched.
- Guru99 bank demo site opens.
- Username and password are entered on the login page.
- The Reset button clears the values.

Scenario 3: Run the Login and Reset Flow with 3 Sets of Data
Here we need to update both Steps.java and the feature file to drive the same flow with three sets of credentials.
Step 1) Update the feature file as shown below.
We use the Scenario Outline and Examples syntax so Cucumber loops the same scenario across each data row.
Feature: Reset functionality on login page of Application

Scenario Outline: Verification of reset button with multiple credentials

Given Open the Firefox and launch the application

When Enter the Username <username> and Password <password>

Then Reset the credential

Examples:
    | username | password  |
    | User1    | password1 |
    | User2    | password2 |
    | User3    | password3 |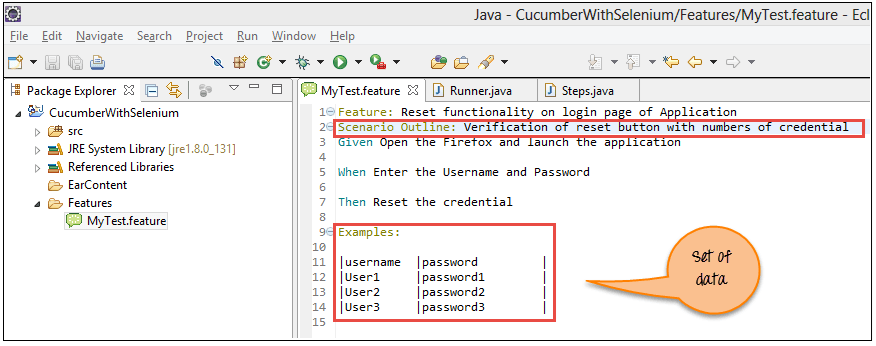
Step 2) Update the Steps.java script.
Here we update the method signatures so they accept parameters from the Examples table.
package StepDefinition;

import org.openqa.selenium.By;
import org.openqa.selenium.WebDriver;
import org.openqa.selenium.firefox.FirefoxDriver;

import cucumber.api.java.en.Given;
import cucumber.api.java.en.Then;
import cucumber.api.java.en.When;

public class Steps {

    WebDriver driver;

    @Given("^Open the Firefox and launch the application$")
    public void open_the_Firefox_and_launch_the_application() throws Throwable
    {
        System.setProperty("webdriver.gecko.driver", "E://Selenium//Selenium_Jars//geckodriver.exe");
        driver = new FirefoxDriver();
        driver.manage().window().maximize();
        driver.get("http://demo.guru99.com/v4");
    }

    @When("^Enter the Username \"(.*)\" and Password \"(.*)\"$")
    public void enter_the_Username_and_Password(String username, String password) throws Throwable
    {
        driver.findElement(By.name("uid")).sendKeys(username);
        driver.findElement(By.name("password")).sendKeys(password);
    }

    @Then("^Reset the credential$")
    public void Reset_the_credential() throws Throwable
    {
        driver.findElement(By.name("btnReset")).click();
    }
}
Step 3) Execute the updated script.
The screen below shows a successful execution and the time taken by each data set.

Step 4) Analyze the output. The following steps repeat for each of the 3 sets of data:
- Browser launched.
- Guru99 bank demo site opens.
- Username and password are entered on the login page.
- The Reset button clears the values.
