
TestNG Reports Generation in Selenium: How to Generate?
 Krishna Rungta
⚡ Smart Summary
TestNG Reports are the default HTML result files that TestNG writes into the test-output folder after every run, showing which test cases passed, failed or were skipped, plus any Reporter logs.
What are TestNG Reports?
TestNG Reports are the default HTML reports which are generated once the test cases are executed using TestNG. These reports help you to identify the information about test cases and the status of a project. TestNG reports in Selenium record three outcomes for every test method — pass, fail and skip — so you can check the data about test cases at a glance.
Report generation is very important when you are doing the Automation Testing as well as for Manual Testing.
- By looking at the result, you can easily identify how many test cases are passed, failed and skipped.
- By looking at the report, you will come to know what the status of the project is.
Selenium WebDriver is used for automating the web application, but it does not generate any reports on its own.
- The TestNG will generate the default report.
- When you execute the testng.xml file and refresh the project, you will get a test-output folder, and that folder holds the reporting output from TestNG.
- Right click on the emailable-report.html and select the option Open with the web browser.
Note: the behaviour described here is unchanged in TestNG 7.x. Releases from TestNG 7.6 onward require JDK 11 or higher, so an older project may need its JDK level raised before the reports are produced.
Types of TestNG Reports in the test-output Folder
Before opening any single file, it helps to know what the test-output folder actually contains. TestNG writes several artefacts on every run, and each one answers a different question.
| File or folder | What it holds | When it is useful |
| index.html | The landing report that links to the results, groups, times and reporter output views. | Digging into one run in detail. |
| emailable-report.html | A single self-contained page summarising passed, failed and skipped methods per class. | Sharing a result with people who are not opening the project. |
| testng-results.xml | The machine-readable XML written by the built-in XML reporter, with per-method status and duration. | Feeding a dashboard or a custom parser. |
| junitreports | JUnit-format XML files, one per test class. | Any CI plug-in that reads the JUnit result format. |
| testng-failed.xml | A generated suite file that lists only the methods that failed. | Re-running just the failures instead of the whole suite. |
The two HTML files are the ones this tutorial opens next, so the walkthrough below starts with emailable-report.html.
How to generate reports in Selenium
Method-1: emailable-report.html
- Click on option “emailable-report.html”
- Click on option web browser
The screenshot below shows the emailable-report.html file being opened from the test-output folder.

The output reports in TestNG reporting will look like below if both the classes are passed:

Consider the scenario in where you are intentionally failing the test case i.e. DemoB class. Then convert both the classes into testng.xml suite file and run it. Then the result will look like this. It will show the failed test cases.
This is result for DemoB class:

Similarly, result for the Class DemoA will look like this:

Method-2: index.html
- Right click on the index.html from the project directory.
- Select option open with web browser option. It will display the result in the following order.
The screenshot below shows index.html being opened from the project directory.

The result will look like this:

Method-3: Reporter Class
Along with these TestNG report generated methods, you can use object.properties file to store the system generated logs as well as user generated logs. But one of the simplest ways to store log information in testing is using Reporter Class.
Reporter.log in Selenium is a class present in TestNG for Selenium reporting. It provides 4 different methods to store log information they are:
- Reporter.log(String s);
- Reporter.log(String s, Boolean logToStandardOut);
- Reporter.log(String s, int level);
- Reporter.log(String s, int level, Boolean logToStandardOut);
The second argument decides whether the message is echoed to the console as well as the report, and the level argument controls the verbosity at which the message is kept.
Example:
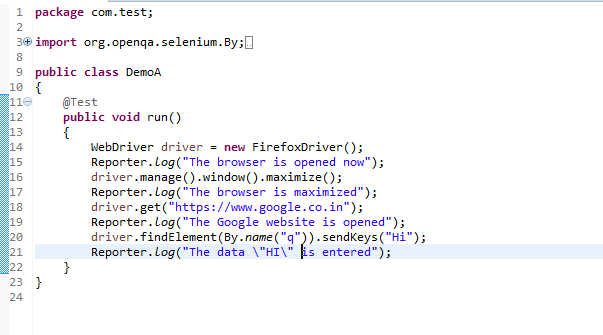
Create Two classes such as DemoA and DemoB and write the following code inside the classes.
For Class DemoA;
- The Code for DemoA is already explained above. Here you are using log method of Reporter class. (For implementing a reporting class of your own, the class has to implement the org.testng.IReporter interface.)
- The log method is a static method of Reporter class. So you are accessing that method through the Reporter class.
- The log method is used to store log information that is written inside the program. By looking at the log information, you will easily come to know where exactly the execution of the program is stopped.
The screenshot below shows the Reporter.log calls placed inside the DemoA class.
For Class DemoB:

- Now, Create testng.xml file by selecting these two classes and
- Select run as and
- Click on the convert to testng.
- Then run this testng.xml file by selecting run as and select testng suite.
- Then refresh the project open the test-output folder.
- In the test-output folder, open the emailable-report.html. It will look like:

Similarly, you will have an Output for Demo B project as well.
- In the test-output folder, open the index.html. It will look like:


Click on reporter output. It will open logging info whatever written in the test methods.

Click on the Times. It will going to show how much time it took to run the test method present in class using TestNG reporting tools.

How to Customize TestNG Reports with ITestListener and IReporter
The three methods above use whatever TestNG produces by default. When a team needs a different layout, extra fields or a live progress view, TestNG exposes two extension points rather than asking you to patch the default report.
- ITestListener is notified in real time, as each test starts, passes, fails or is skipped. Use it when the information has to be captured at the moment the event happens — a screenshot on failure, for example.
- IReporter is notified once, after every suite has finished, and receives objects describing the whole run. Use it when the output is a finished document, such as a PDF or a custom HTML page.
A listener that pushes each outcome into the report through the Reporter class looks like this.
import org.testng.ITestListener;
import org.testng.ITestResult;
import org.testng.Reporter;

public class ReportListener implements ITestListener {

    @Override
    public void onTestSuccess(ITestResult result) {
        Reporter.log("PASSED: " + result.getName(), true);
    }

    @Override
    public void onTestFailure(ITestResult result) {
        Reporter.log("FAILED: " + result.getName(), true);
    }

    @Override
    public void onTestSkipped(ITestResult result) {
        Reporter.log("SKIPPED: " + result.getName(), true);
    }
}
Registering the listener is done in the same testng.xml suite file that you already created for DemoA and DemoB.
<suite name="Demo Suite">
  <listeners>
    <listener class-name="ReportListener" />
  </listeners>
  <test name="Demo Test">
    <classes>
      <class name="DemoA" />
      <class name="DemoB" />
    </classes>
  </test>
</suite>
Two command-line switches are worth knowing while you experiment. The -d option changes the directory the reports are written to, and -usedefaultlisteners false switches the built-in reporters off so that only your own listener runs. Both are described in the official TestNG logging and results documentation, which also documents the properties accepted by the built-in XML reporter.
A listener is registered once and then applies to every class in the suite, which is why teams that run large automation testing suites usually prefer it over adding log lines to each test method by hand.
TestNG Default Reports vs ExtentReports vs Allure
The default reports are enough for a small suite, but they carry no history and no charts. Two open-source libraries are commonly bolted on when a suite grows, and both work with TestNG.
| Capability | TestNG default | ExtentReports | Allure Report |
| Setup effort | None — produced automatically | Add the library and write the reporter code | Add the adapter, then generate the report from results |
| Charts and dashboards | No | Yes | Yes |
| Screenshots | Only through Reporter.log markup | Built-in attachment API | Built-in attachment API |
| Run history and trends | No | Through the optional server component | Yes, from stored previous results |
| Framework coverage | TestNG only | Java and .NET | Framework agnostic |
Start with the default reports while the suite is small. Move to ExtentReports when stakeholders ask for readable dashboards, and to Allure Report when flaky-test history across builds becomes the question that matters. Whichever you pick, the report is normally published by the build job, which is covered in the Jenkins continuous integration tutorial.
