Customize, PDF & Email TestNG Reports in Selenium WebDriver
Before we look into anything else, let’s first understand –
Why do we need reporting?
When we are using Selenium or any other automation tool, we are performing operations on the web application. But our purpose of automation is not just to exercise the Application Under Test. We, as an automation tester are supposed to test the application, find bugs and report it to the development team or higher management. Here the reporting gets importance for software Testing process
TestNG Reporting
TestNG library provides a very handy reporting feature. After execution, Testng will generate a test-output folder at the root of the project. This folder contains two type of Reports-
Index.html: This is the complete report of current execution which contains information like an error, groups, time, reporter logs, testng XML files.

emailable-report.html: This is the summarize report of the current test execution which contains Test Case message in green (for pass test cases) and red(for failed test cases) highlight.

How to customize TestNG Report
TestNG reporting is quite handy but still, sometimes we need some less data in reports or want to display reports in some other format like pdf, excel, etc. or want to change report’s layout.
There can be two ways we can customize TestNG report
- Using ITestListener Interface:
- Using IReporter Interface:

ITestListener Interface
We use this interface when we need to customize real time report. In other words, if we are executing the bunch of test cases in a TetNG suite and we want to get the report of each test case, then after each test case we need to implement ITestListener interface. This interface will override onTestFailure, onTestStart, onTestSkipped method to send the correct status of the current test case.

Here are the steps we will follow
- Create a class say RealGuru99Report and implement iTestListener in it.
- Implement methods of iTestListener
- Create test method and add RealGuru99Report class as a listener in Test Method class.

Code Example
RealGuru99TimeReport.java is the real time reporting class. It will implement ITestListener interface for reporting
package testNGReport.realTimeReport;

import org.testng.ITestContext;

import org.testng.ITestListener;

import org.testng.ITestResult;

public class RealGuru99TimeReport implements ITestListener{

    @Override

    public void onStart(ITestContext arg0) {

         System.out.println("Start Of Execution(TEST)->"+arg0.getName());

    }

    @Override

    public void onTestStart(ITestResult arg0) {

        System.out.println("Test Started->"+arg0.getName());

    }

    @Override

    public void onTestSuccess(ITestResult arg0) {

        System.out.println("Test Pass->"+arg0.getName());

    }

    @Override

    public void onTestFailure(ITestResult arg0) {

        System.out.println("Test Failed->"+arg0.getName());

    }

    @Override

    public void onTestSkipped(ITestResult arg0) {

        System.out.println("Test Skipped->"+arg0.getName());

    }

    @Override

    public void onFinish(ITestContext arg0) {

System.out.println("END Of Execution(TEST)->"+arg0.getName());

    }

    @Override

    public void onTestFailedButWithinSuccessPercentage(ITestResult arg0) {

        // TODO Auto-generated method stub


    }


}
TestGuru99RealReport.java is the test case for real report
package testNGReport.realTimeReport;

import org.testng.Assert;

import org.testng.annotations.Listeners;

import org.testng.annotations.Test;

@Listeners(RealGuru99TimeReport.class)

public class TestGuru99RealReport {

    @Test

    public void testRealReportOne(){

        Assert.assertTrue(true);

    }


    @Test

    public void testRealReportTwo(){

        Assert.assertTrue(false);

    }

    //Test case depends on failed testcase= testRealReportTwo

    @Test(dependsOnMethods="testRealReportTwo")

    public void testRealReportThree(){


    }

}
The output will look like-

IReporter Interface
If we want to customize final test report generated by TestNG, we need to implement IReporter interface. This interface has only one method to implement generateReport. This method has all the information of a complete test execution in the List<ISuite>, and we can generate the report using it.
Code Example
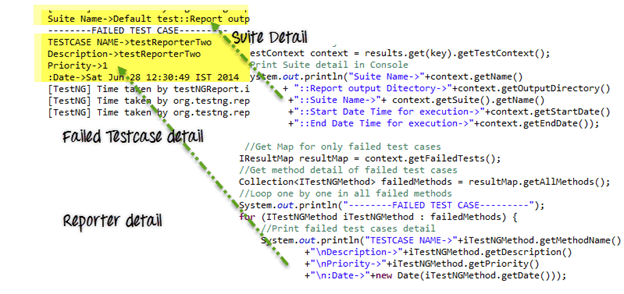
Guru99Reporter.java is the file used to customize report
package testNGReport.iReporterReport;

import java.util.Collection;

import java.util.Date;

import java.util.List;

import java.util.Map;

import java.util.Set;

import org.testng.IReporter;

import org.testng.IResultMap;

import org.testng.ISuite;

import org.testng.ISuiteResult;

import org.testng.ITestContext;

import org.testng.ITestNGMethod;

import org.testng.xml.XmlSuite;

public class Guru99Reporter implements IReporter{

    @Override

    public void generateReport(List<XmlSuite> arg0, List<ISuite> arg1,

            String outputDirectory) {

        // Second parameter of this method ISuite will contain all the suite executed.

        for (ISuite iSuite : arg1) {

         //Get a map of result of a single suite at a time

            Map<String,ISuiteResult> results =    iSuite.getResults();

         //Get the key of the result map

            Set<String> keys = results.keySet();

        //Go to each map value one by one

            for (String key : keys) {

             //The Context object of current result

            ITestContext context = results.get(key).getTestContext();

            //Print Suite detail in Console

             System.out.println("Suite Name->"+context.getName()

                    + "::Report output Ditectory->"+context.getOutputDirectory()

                     +"::Suite Name->"+ context.getSuite().getName()

                     +"::Start Date Time for execution->"+context.getStartDate()

                     +"::End Date Time for execution->"+context.getEndDate());


             //Get Map for only failed test cases

            IResultMap resultMap = context.getFailedTests();

            //Get method detail of failed test cases

            Collection<ITestNGMethod> failedMethods = resultMap.getAllMethods();

            //Loop one by one in all failed methods

            System.out.println("--------FAILED TEST CASE---------");

            for (ITestNGMethod iTestNGMethod : failedMethods) {

                //Print failed test cases detail

                System.out.println("TESTCASE NAME->"+iTestNGMethod.getMethodName()

                        +"\nDescription->"+iTestNGMethod.getDescription()

                        +"\nPriority->"+iTestNGMethod.getPriority()

                        +"\n:Date->"+new Date(iTestNGMethod.getDate()));


            }

        }

        }


    }

}
TestGuru99ForReporter.java is a demo for Custom reporting
package testNGReport.iReporterReport;

import org.testng.Assert;

import org.testng.annotations.Listeners;

import org.testng.annotations.Test;

//Add listener to listen report and write it when testcas finished

@Listeners(value=Guru99Reporter.class)

public class TestGuru99ForReporter {

    @Test(priority=0,description="testReporterOne")

    public void testReporterOne(){

        //Pass test case

        Assert.assertTrue(true);

    }


    @Test(priority=1,description="testReporterTwo")

    public void testReporterTwo(){

        //Fail test case

        Assert.assertTrue(false);

    }

}
Output will be like-
PDF and Email of Reports
The above report implementation is quite simple and clear to get you started with report customization.
But in corporate environment, you will need to create highly customized reports. Here is the scenario we will be dealing with
- Create Custom Report in PDF form
- Take Screenshots ONLY on Errors. Link to screenshots in PDF
- Send Email of the PDF
The PDF report looks like this

To create pdf report we need a Java API IText. Download it here . There is another custom listener class which is actually implementing this IText jar and creating a pdf report for us. Download it here
Above figure shows the default format of the PDF report generated. You can customize it
Here is how we will approach this
Step 1) Create a Base Class
Step 2) Customize JypersionListerner.Java (PDF creation code)
Step 3) Create a TestGuru99PDFEmail.java which will execute test cases , create PDF
Step 4) Append code to TestGuru99PDFEmail.java to send PDF report via email
Let’s look into these steps
Step 1) Create Base Class
This base class has functions to create WebDriver and Take Screenshot
package PDFEmail;

import java.io.File;

import org.apache.commons.io.FileUtils;

import org.openqa.selenium.OutputType;

import org.openqa.selenium.TakesScreenshot;

import org.openqa.selenium.WebDriver;

import org.openqa.selenium.firefox.FirefoxDriver;

public class BaseClass {

    static WebDriver driver;

    public static WebDriver getDriver(){

        if(driver==null){


        WebDriver driver ;
    	System.setProperty("webdriver.gecko.driver","C:\\geckodriver.exe");
    	driver = new FirefoxDriver();


        }

        return driver;

    }


    /**

     * This function will take screenshot

     * @param webdriver

     * @param fileWithPath

     * @throws Exception

     */

    public static void takeSnapShot(WebDriver webdriver,String fileWithPath) throws Exception{

        //Convert web driver object to TakeScreenshot

        TakesScreenshot scrShot =((TakesScreenshot)webdriver);

        //Call getScreenshotAs method to create image file

                File SrcFile=scrShot.getScreenshotAs(OutputType.FILE);

            //Move image file to new destination

                File DestFile=new File(fileWithPath);

                //Copy file at destination

                FileUtils.copyFile(SrcFile, DestFile);


    }

}
Step 2) Customize JypersionListener.java
We will stick with the default report format. But we will make 2 customizations
- Adding code to instruct JypersionListener to take screenshot on Error
- Attaching the link of the screenshot take in the PDF report

Add code to attach the screenshot to the PDF report

Step 3) Create a TestGuru99PDFEmail.java which will execute test cases , create PDF
- Here we will add JyperionListener.class as listener
- We will Execute 3 test cases.
- Using Assert.assertTrue we will fail 2 test cases while passing just one.
- Screenshot will be taken for the failed test cases only as per our customizations
package PDFEmail;

import java.util.Properties;

import javax.activation.DataHandler;

import javax.activation.DataSource;

import javax.activation.FileDataSource;

import javax.mail.BodyPart;

import javax.mail.Message;

import javax.mail.MessagingException;

import javax.mail.Multipart;

import javax.mail.Session;

import javax.mail.Transport;

import javax.mail.internet.AddressException;

import javax.mail.internet.InternetAddress;

import javax.mail.internet.MimeBodyPart;

import javax.mail.internet.MimeMessage;

import javax.mail.internet.MimeMultipart;

import org.openqa.selenium.WebDriver;

import org.testng.Assert;

import org.testng.annotations.AfterSuite;

import org.testng.annotations.Listeners;

import org.testng.annotations.Test;

import reporter.JyperionListener;

//Add listener for pdf report generation

@Listeners(JyperionListener.class)

public class TestGuru99PDFReport extends BaseClass {

    WebDriver driver;

    //Testcase failed so screen shot generate

    @Test

    public void testPDFReportOne(){

        driver = BaseClass.getDriver();

        driver.get("http://google.com");

        Assert.assertTrue(false);

    }


    //Testcase failed so screen shot generate

    @Test

    public void testPDFReporTwo(){

        driver = BaseClass.getDriver();

        driver.get("http:/guru99.com");

        Assert.assertTrue(false);

    }


    //Test test case will be pass, so no screen shot on it

    @Test

    public void testPDFReportThree(){

        driver = BaseClass.getDriver();

        driver.get("https://demo.guru99.com");

        Assert.assertTrue(true);

    }
Step 4) Append code to TestGuru99PDFEmail.java to send PDF report via email
- We will use the annotation @AfterSuite to send email of the PDF report
- We will be sending email using Gmail
- To enable Email, need to import many library files like mail.jar, pop3.jar, smptp.jar, etc
- Before you execute this, do enter the from, to email address and password
 //After complete execution send pdf report by email

    @AfterSuite

    public void tearDown(){

        sendPDFReportByGMail("FROM@gmail.com", "password", "TO@gmail.com", "PDF Report", "");

        }


    /**

     * Send email using java

     * @param from

     * @param pass

     * @param to

     * @param subject

     * @param body

     */

    private static void sendPDFReportByGMail(String from, String pass, String to, String subject, String body) {

Properties props = System.getProperties();

String host = "smtp.gmail.com";

props.put("mail.smtp.starttls.enable", "true");

props.put("mail.smtp.host", host);

props.put("mail.smtp.user", from);

props.put("mail.smtp.password", pass);

props.put("mail.smtp.port", "587");

props.put("mail.smtp.auth", "true");

Session session = Session.getDefaultInstance(props);

MimeMessage message = new MimeMessage(session);

try {

    //Set from address

message.setFrom(new InternetAddress(from));

message.addRecipient(Message.RecipientType.TO, new InternetAddress(to));

//Set subject

message.setSubject(subject);

message.setText(body);

BodyPart objMessageBodyPart = new MimeBodyPart();

objMessageBodyPart.setText("Please Find The Attached Report File!");

Multipart multipart = new MimeMultipart();

multipart.addBodyPart(objMessageBodyPart);

objMessageBodyPart = new MimeBodyPart();

//Set path to the pdf report file

String filename = System.getProperty("user.dir")+"\\Default test.pdf";

//Create data source to attach the file in mail

DataSource source = new FileDataSource(filename);

objMessageBodyPart.setDataHandler(new DataHandler(source));

objMessageBodyPart.setFileName(filename);

multipart.addBodyPart(objMessageBodyPart);

message.setContent(multipart);

Transport transport = session.getTransport("smtp");

transport.connect(host, from, pass);

transport.sendMessage(message, message.getAllRecipients());

transport.close();

}

catch (AddressException ae) {

ae.printStackTrace();

}

catch (MessagingException me) {

me.printStackTrace();

}

}

}
Download the complete project here
Note: When we click on the screen shot link in pdf, it shows security dialog. We have to allow this dialog to open pdf.

The email so generated will look like this

Summary
- TestNG has an inbuilt reporting ability in it.
- After a complete execution of test cases, TestNG generates a test-output folder in the root of the project.
- In the test-output folder, there are two main reports, index.html, and emailable-report.html.
- To customize TestNG report we need to implement two interfaces, ITestListener and IReporter.
- If we need to get a report in between execution, we need ITestListener.
- For creating a final report after complete execution, we need to implement IReporter.
- Taking the screenshot, in Selenium WebDriver, we need to type cast WebDriver to TakesScreenShot interface.
- To generate pdf reports we need to add IText jar in the project.
Download the Selenium Project Files for the Demo in this Tutorial