Apache ANT with Selenium: Complete Tutorial
What is Apache Ant?
While creating a complete software product, one needs to take care of different third party API, their classpath, cleaning previous executable binary files, compiling our source code, execution of source code, creation of reports and deployment code base etc. If these tasks are done one by one manually, it will take an enormous time, and the process will be prone to errors.
Here comes the importance of a build tool like Ant. It stores, executes and automates all process in a sequential order mentioned in Ant’s configuration file (usually build.xml).

Benefit of Ant build
- Ant creates the application life cycle i.e. clean, compile, set dependency, execute, report, etc.
- Third party API dependency can be set by Ant i.e. other Jar file’s class path is set by Ant build file.
- A complete application is created for End to End delivery and deployment.
- It is a simple build tool where all configurations can be done using XML file and which can be executed from the command line.
- It makes your code clean as configuration is separate from actual application logic.
How to install Ant
Steps to install Ant in Windows is as follows
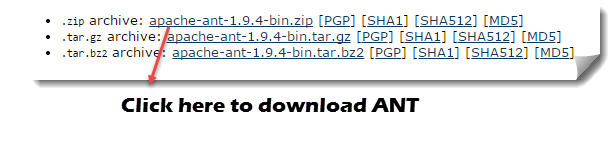
Step 1) Go to https://ant.apache.org/bindownload.cgi Or Download .zip file from apache-ant-1.9.4-bin.zip
Step 2) Unzip the folder and go to and copy path to the root of unzipped folder

Step 3) Go to Start -> Computer -> right click here and select ‘Properties’ then click on Advanced System Settings

Step 4) A new window opens. Click on ‘Environment Variable…’ button.

Step 5) Click ‘New…’ button and set variable name as ‘ANT_HOME’ and variable value as the root path to unzipped folder and click OK.

Step 6) now select ‘Path’ variable from the list and click ‘Edit’ and append; %ANT_HOME%\bin.

Restart system one time and you are ready to use Ant build tool now.
Step 7) To check the version of your Ant using command line:
Ant –version

Understanding Build.xml
Build.xml is the most important component of Ant build tool. For a Java project, all cleaning, setup, compilation and deployment related task are mentioned in this file in XML format. When we execute this XML file using command line or any IDE plugin, all instructions written into this file will get executed in sequential manner.
Let’s understand the code within a sample build.XML
-
Project tag is used to mention a project name and basedir attribute. The basedir is the root directory of an application
<project name="YTMonetize" basedir=".">
- Property tags are used as variables in build.XML file to be used in further steps
<property name="build.dir" value="${basedir}/build"/>
		<property name="external.jars" value=".\resources"/>
	<property name="ytoperation.dir" value="${external.jars}/YTOperation"/>
<property name="src.dir"value="${basedir}/src"/>
- Target tags used as steps that will execute in sequential order. Name attribute is the name of the target. You can have multiple targets in a single build.xml
<target name="setClassPath">
- path tag is used to bundle all files logically which are in the common location
<path id="classpath_jars">
- pathelement tag will set the path to the root of common location where all files are stored
<pathelement path="${basedir}/"/> - pathconvert tag used to convert paths of all common file inside path tag to system’s classpath format
<pathconvert pathsep=";" property="test.classpath" refid="classpath_jars"/>
- fileset tag used to set classpath for different third party jar in our project
<fileset dir="${ytoperation.dir}" includes="*.jar"/> - Echo tag is used to print text on the console
<echo message="deleting existing build directory"/>
- Delete tag will clean data from given folder
<delete dir="${build.dir}"/>
- mkdir tag will create a new directory
<mkdir dir="${build.dir}"/>
- javac tag used to compile java source code and move .class files to a new folder
        <javac destdir="${build.dir}" srcdir="${src.dir}">
	<classpath refid="classpath_jars"/>
</javac>
- jar tag will create jar file from .class files
<jar destfile="${ytoperation.dir}/YTOperation.jar" basedir="${build.dir}">
- manifest tag will set your main class for execution
<manifest>
		<attribute name="Main-Class" value="test.Main"/>
</manifest>
- ‘depends’ attribute used to make one target to depend on another target
<target name="run" depends="compile">
- java tag will execute main function from the jar created in compile target section
<java jar="${ytoperation.dir}/YTOperation.jar" fork="true"/>
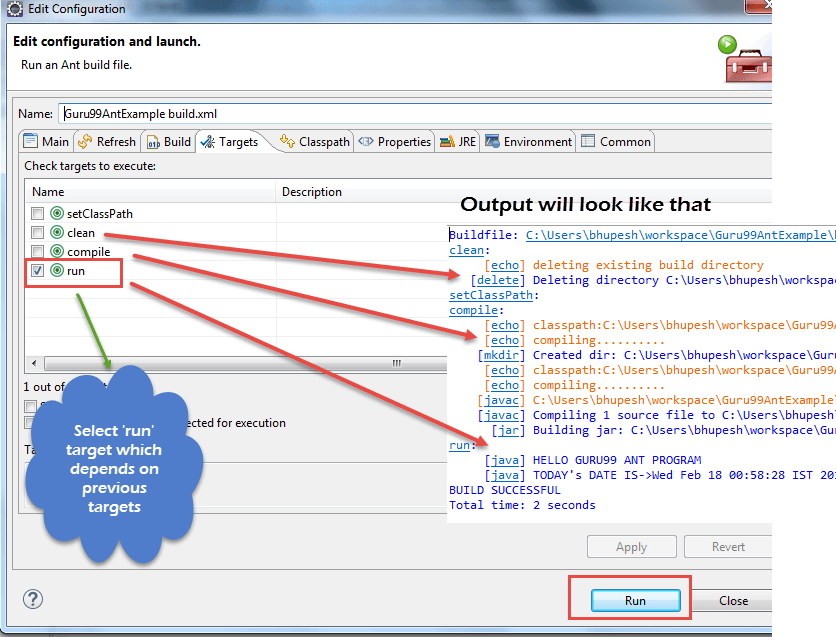
Run Ant using Eclipse plugin
To run Ant from eclipse go to build.xml file -> right click on file -> Run as… -> click Build file

Example
We will take a small sample program that will explain Ant functionality very clearly. Our project structure will look like –

Here in this example we have 4 targets
- Set class path for external jars,
- Clean previously complied code
- Compile existing java code
- Run the code
Guru99AntClass.class
package testAnt;
import java.util.Date;

public class Guru99AntClass {
   public static void main(String...s){
		System.out.println("HELLO GURU99 ANT PROGRAM");
		System.out.println("TODAY's DATE IS->"+ currentDate() );
}
public static String currentDate(){
	return new Date().toString();
	}
}
Build.xml
<?xml version="1.0" encoding="UTF-8"	standalone="no"?>
<!--Project tag used to mention the project name, and basedir attribute will be the root directory of the application-->

<project name="YTMonetize" basedir=".">
     <!--Property tags will be used as variables in build.xml file to use in further steps-->

	<property name="build.dir" value="${basedir}/build"/>
    <property name="external.jars" value=".\resources"/>
		<property name="ytoperation.dir" value="${external.jars}/YTOperation"/>
<property name="src.dir"value="${basedir}/src"/>
<!--Target tags used as steps that will execute in sequential order. name attribute will be the name  of the target and < a name=OLE_LINK1 >'depends' attribute used to make one target to depend on another target -->
	       <target name="setClassPath">
			<path id="classpath_jars">
				<pathelement	path="${basedir}/"/>
			</path>
<pathconvert	pathsep=";"property="test.classpath" refid="classpath_jars"/>
</target>
	<target name="clean">
		<!--echo tag will use to print text on console-->
		<echo message="deleting existing build directory"/>
		<!--delete tag will clean data from given folder-->
		<delete dir="${build.dir}"/>
	</target>
<target name="compile" depends="clean,setClassPath">
	<echo message="classpath:${test.classpath}"/>
			<echo message="compiling.........."/>
	<!--mkdir tag will create new director-->
	<mkdir dir="${build.dir}"/>
		<echo message="classpath:${test.classpath}"/>
		<echo message="compiling.........."/>
	<!--javac tag used to compile java source code and move .class files to a new folder-->
	<javac destdir="${build.dir}" srcdir="${src.dir}">
			<classpath refid="classpath_jars"/>
	</javac>
	<!--jar tag will create jar file from .class files-->
	<jar	destfile="${ytoperation.dir}/YTOperation.jar"basedir="${build.dir}">
	            <!--manifest tag will set your main class for execution-->
						<manifest>
							<attribute name="Main-Class" value="testAnt.Guru99AntClass"/>
</manifest>
</jar>
    </target>
	<target name="run" depends="compile">
		<!--java tag will execute main function from the jar created in compile target section-->
<java jar="${ytoperation.dir}/YTOperation.jar"fork="true"/>
</target>
	</project>
How to Execute TestNG code using Ant

Here we will create a class with Testng methods and set class path for Testing in build.xml.
Now to execute testng method we will create another testng.xml file and call this file from build.xml file.
Step 1) We create a “Guru99AntClass.class” in package testAnt
Guru99AntClass.class
package testAnt;
import java.util.Date;
import org.testng.annotations.Test;
public class Guru99AntClass {
    @Test
	public void Guru99AntTestNGMethod(){
		System.out.println("HELLO GURU99 ANT PROGRAM");
		System.out.println("TODAY's DATE IS->"+ currentDate() );
	}
	public static String currentDate(){
		return new Date().toString();
	}
}
Step 2) Create a target to load this class in Build.xml
<!-- Load testNG and add to the class path of application -->
	<target name="loadTestNG" depends="setClassPath">
<!—using taskdef  tag we can add a task to run on the current project. In below line, we are adding testing task in this project. Using testing task here now we can run testing code using the ant script -->
		<taskdef resource="testngtasks" classpath="${test.classpath}"/>
</target>
Step 3) Create testng.xml
testng.xml
<?xml version="1.0"encoding="UTF-8"?>
<!DOCTYPE suite SYSTEM "http://testng.org/testng-1.0.dtd">
<suite name="YT"thread-count="1">
			<test name="GURU99TestNGAnt">
			<classes>
			   <class name="testAnt.Guru99AntClass">
	</class>
</classes>
</test>
</suite>
Step 4) Create Target in Build.xml to run this TestNG code
<target name="runGuru99TestNGAnt" depends="compile">
<!-- testng tag will be used to execute testng code using corresponding testng.xml file. Here classpath attribute is setting classpath for testng's jar to the project-->
	<testng classpath="${test.classpath};${build.dir}">
<!—xmlfileset tag is used here to run testng's code using testing.xml file. Using includes tag we are mentioning path to testing.xml file-->
	 <xmlfileset dir="${basedir}" includes="testng.xml"/>
</testng>
Step 5) The complete Build.xml
<?xml version="1.0"encoding="UTF-8"standalone="no"?>
<!--Project tag used to mention the project name, and basedir attribute will be the root directory of the application-->
			<project name="YTMonetize" basedir=".">
		       <!--Property tags will be used as variables in build.xml file to use in further steps-->
			<property name="build.dir"value="${basedir}/build"/>
<!-- put  testng related jar in the resource  folder -->
	      <property name="external.jars" value=".\resource"/>
				<property name="src.dir" value="${basedir}/src"/>
<!--Target tags used as steps that will execute in  sequential order. name attribute will be the name
    of the target and 'depends' attribute used to make one target to depend on another target-->
<!-- Load testNG and add to the class path of application -->
         <target name="loadTestNG"depends="setClassPath">
				<taskdef resource="testngtasks"classpath="${test.classpath}"/>
		</target>
		<target name="setClassPath">
		       <path id="classpath_jars">
					<pathelement path="${basedir}/"/>
					<fileset dir="${external.jars}" includes="*.jar"/>
         </path>
        <pathconvert pathsep=";"property="test.classpath"refid="classpath_jars"/>
	</target>
	<target name="clean">
              <!--echo tag will use to print text on console-->
	               <echo message="deleting existing build directory"/>
               <!--delete tag will clean data from given folder-->
	               <delete				dir="${build.dir}"/>
			</target>
<target name="compile"depends="clean,setClassPath,loadTestNG">
	         <echo message="classpath:${test.classpath}"/>
	               <echo	message="compiling.........."/>
		       <!--mkdir tag will create new director-->
		        <mkdir dir="${build.dir}"/>
					<echo message="classpath:${test.classpath}"/>
			<echo message="compiling.........."/>
	<!--javac tag used to compile java source code and move .class files to a new folder-->
	        <javac destdir="${build.dir}"srcdir="${src.dir}">
	             <classpath refid="classpath_jars"/>
		</javac>
  </target>
<target name="runGuru99TestNGAnt"depends="compile">
		<!-- testng tag will be used to execute testng code using corresponding testng.xml file -->
			<testng classpath="${test.classpath};${build.dir}">
               <xmlfileset dir="${basedir}"includes="testng.xml"/>
	</testng>
</target>
</project>
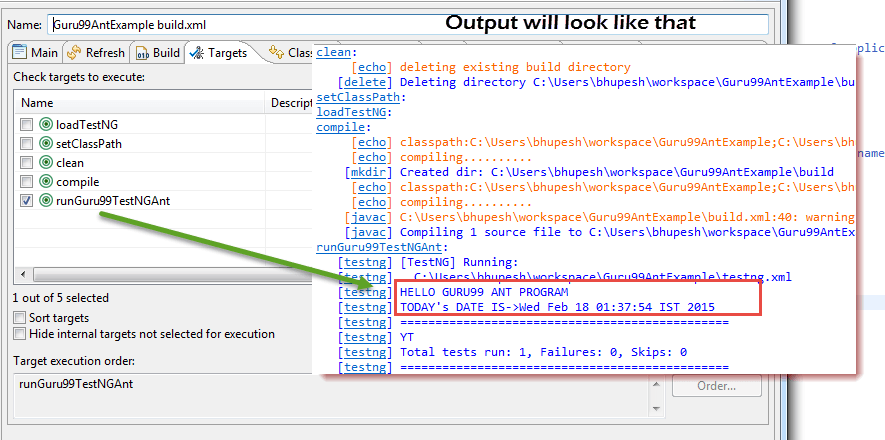
Step 6) Output
Ant with Selenium Webdriver
So far, we have learned that using ANT we can put all third party jars in a particular location in the system and set their path for our project. Using this method we are setting all dependencies of our project in a single place and making it more reliable for compilation, execution, and deployment.
Similarly, for our testing projects using selenium, we can easily mention selenium dependency in build.xml and we don’t need to add a class path of it manually in our application.
So now you can ignore below-mentioned traditional way to set classpaths for project.

Example:
We are going to modify the previous example
Step 1) Set the property selenium.jars to selenium related jar in the resource folder
<property name="selenium.jars" value=".\selenium"/>
Step 2) In the target setClassPath, add the selenium files
<target name="setClassPath">
	        <path id="classpath_jars">
				<pathelement path="${basedir}/"/>
				<fileset dir="${external.jars}" includes="*.jar"/>
	            <!-- selenium jar added here -->
  		            <fileset dir="${selenium.jars}" includes="*.jar"/>
         </path>
Step 3) Complete Build.xml:
<?xml version="1.0" encoding="UTF-8" standalone="no"?>

<!--Project tag used to mention the project name, and basedir attribute will be the root directory of the application-->
			<project name="YTMonetize" basedir=".">
                  <!--Property tags will be used as variables in build.xml file to use in further steps-->
				<property name="build.dir" value="${basedir}/build"/>
      <!-- put  testng related jar in the resource  folder -->
	       <property name="external.jars" value=".\resource"/>
<!-- put  selenium related jar in resource  folder -->
     <property name="selenium.jars" value=".\selenium"/>
			<property name="src.dir" value="${basedir}/src"/>
				<!--Target tags used as steps that will execute in  sequential order. name attribute will be the name
of the target and 'depends' attribute used to make one target to depend on another target-->
      <!-- Load testNG and add to the class path of application -->
       <target name="loadTestNG" depends="setClassPath">
				<taskdef resource="testngtasks" classpath="${test.classpath}"/>
		</target>
<target name="setClassPath">
	        <path id="classpath_jars">
				<pathelement path="${basedir}/"/>
					<fileset dir="${external.jars}" includes="*.jar"/>
			<!-- selenium jar added here -->
	            <fileset dir="${selenium.jars}"includes="*.jar"/>
        </path>
   <pathconvert pathsep=";" property="test.classpath" refid="classpath_jars"/>
</target>
<target name="clean">
<!--echo tag will use to print text on console-->
               <echo message="deleting existing build directory"/>
	                <!--delete tag will clean data from given folder-->
		               <delete dir="${build.dir}"/>
				</target>
<target name="compile" depends="clean,setClassPath,loadTestNG">
         <echo message="classpath:${test.classpath}"/>
                <echo message="compiling.........."/>
        <!--mkdir tag will create new director-->
	        <mkdir dir="${build.dir}"/>
          			<echo message="classpath:${test.classpath}"/>
			<echo message="compiling.........."/>
	<!--javac tag used to compile java source code and move .class files to new folder-->
     <javac destdir="${build.dir}"srcdir="${src.dir}">
             <classpath refid="classpath_jars"/>
	</javac>
</target>
<target name="runGuru99TestNGAnt" depends="compile">
		<!-- testng tag will be used to execute testng code using corresponding testng.xml file -->
			<testng classpath="${test.classpath};${build.dir}">
               <xmlfileset dir="${basedir}" includes="testng.xml"/>
		</testng>
	</target>
</project>
Step 4) Now change previously created class Guru99AntClass.java with new code.
Here in this example our steps using Selenium are:
- Go to https://demo.guru99.com/test/guru99home/
- Read all courses links one by one
- Print all courses hyperlink on console.
Guru99AntClass.java:
package testAnt;
import java.util.List;
import org.openqa.selenium.By;
import org.openqa.selenium.WebDriver;
import org.openqa.selenium.WebElement;
import org.openqa.selenium.firefox.FirefoxDriver;
import org.testng.annotations.Test;

public class Guru99AntClass {

	@Test
		public void Guru99AntTestNGMethod(){
	      WebDriver driver = new FirefoxDriver();
		  driver.get("https://demo.guru99.com/test/guru99home/");
		  List<WebElement> listAllCourseLinks = driver.findElements(By.xpath("//div[@class='canvas-middle']//a"));
          for(WebElement webElement : listAllCourseLinks) {
			System.out.println(webElement.getAttribute("href"));
      	  }
		}
}
Step 5) After successful execution output will look like:

Download the Above Example File
Summary
Ant is a build tool for Java.
Ant used for code compilation, deployment, execution process.
Ant can be downloaded from Apache website.
Build.xml file used to configure execution targets using Ant.
Ant can be run from the command line or suitable IDE plugin like eclipse.