How to Handle Cookies in Selenium WebDriver
A HTTP cookie is comprised of information about the user and their preferences. It stores information using a key-value pair. It is a small piece of data sent from Web Application and stored in Web Browser, while the user is browsing that website.
Click here to learn about cookie testing.
Selenium Query Commands for cookies
In Selenium Webdriver, we can query and interact with cookies with below built-in method:
| Selenium Query Commands | Output |
|---|---|
driver.manage().getCookies(); |
Return The List of all Cookies |
driver.manage().getCookieNamed(arg0); |
Return specific cookie according to name |
driver.manage().addCookie(arg0); |
Create and add the cookie |
driver.manage().deleteCookie(arg0); |
Delete specific cookie |
driver.manage().deleteCookieNamed(arg0); |
Delete specific cookie according Name |
driver.manage().deleteAllCookies(); |
Delete all cookies |
Why Handle (Accept) Cookies in Selenium?
Each cookie is associated with a name, value, domain, path, expiry, and the status of whether it is secure or not. In order to validate a client, a server parses all of these values in a cookie.
When Testing a web application using selenium web driver, you may need to create, update or delete a cookie.
For example, when automating Online Shopping Application, you many need to automate test scenarios like place order, View Cart, Payment Information, order confirmation, etc.
If cookies are not stored, you will need to perform login action every time before you execute above listed test scenarios. This will increase your coding effort and execution time.
The solution is to store cookies in a File. Later, retrieve the values of cookie from this file and add to it your current browser session. As a result, you can skip the login steps in every Test Case because your driver session has this information in it.
The application server now treats your browser session as authenticated and directly takes you to your requested URL.
How to Handle Cookies in Selenium
We will use https://demo.guru99.com/test/cookie/selenium_aut.php for our demo purpose.
This will be a 2 step process.
Step 1) Login into application and store the authentication cookie generated.

Step 2) Used the stored cookie, to again login into application without using userid and password.
Step 1) Storing cookie information
package CookieExample;

import java.io.BufferedWriter;
import java.io.File;
import java.io.FileWriter;
import java.util.Set;
import org.openqa.selenium.By;
import org.openqa.selenium.WebDriver;
import org.openqa.selenium.chrome.ChromeDriver;
import org.openqa.selenium.Cookie;

public class cookieRead{
        public static void main(String[] args)
    {
    	WebDriver driver;
        System.setProperty("webdriver.chrome.driver","G:///chromedriver.exe");
		driver=new ChromeDriver();
		driver.get("https://demo.guru99.com/test/cookie/selenium_aut.php");


        // Input Email id and Password If you are already Register
        driver.findElement(By.name("username")).sendKeys("abc123");
        driver.findElement(By.name("password")).sendKeys("123xyz");
        driver.findElement(By.name("submit")).click();

        // create file named Cookies to store Login Information
        File file = new File("Cookies.data");
        try
        {
            // Delete old file if exists
			file.delete();
            file.createNewFile();
            FileWriter fileWrite = new FileWriter(file);
            BufferedWriter Bwrite = new BufferedWriter(fileWrite);
            // loop for getting the cookie information

            // loop for getting the cookie information
            for(Cookie ck : driver.manage().getCookies())
            {
                Bwrite.write((ck.getName()+";"+ck.getValue()+";"+ck.getDomain()+";"+ck.getPath()+";"+ck.getExpiry()+";"+ck.isSecure()));
                Bwrite.newLine();
            }
            Bwrite.close();
            fileWrite.close();

        }
        catch(Exception ex)
        {
            ex.printStackTrace();
        }
    }
}
Code Explanation:
- Create WebDriver instance
- We visit the website using the driver.get(“https://demo.guru99.com/test/cookie/selenium_aut.php”)
- Login into the Application
- Read the cookie information using
driver.manage().getCookies();
- Store the cookie information using FileWriter Class to write streams of characters and BufferedWriter to write the text into a file to create into a file Cookies.data
- “Cookies.data” file stores all cookies information along with “Name, Value, Domain, Path”. We can retrieve this information and login into the application without entering the login credentials.
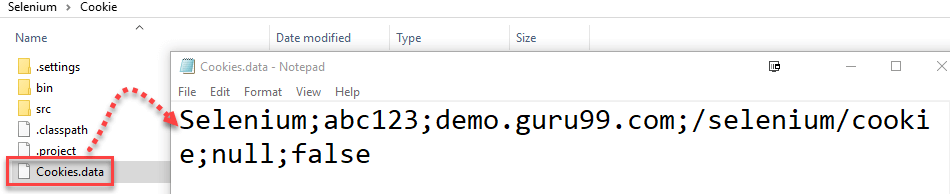
- Once you run above code the Cookie.data file is created into the project folder structure as shown in below screen. Open the Cookie.data file, you can see login credential of the AUT is saved in the format of Cookie, see below-highlighted screen

Step 2) Using stored cookie to login into the application
Now, we will access the cookie generated in step 1 and use the cookie generated to authenticate our session in the application
package CookieExample;

import java.io.BufferedReader;
import java.io.File;
import java.io.FileReader;
import java.util.Date;
import java.util.StringTokenizer;
import org.openqa.selenium.Cookie;
import org.openqa.selenium.WebDriver;
import org.openqa.selenium.chrome.ChromeDriver;

public class CookieWrite
{

	public static void main(String[] args){
    	WebDriver driver;
       	System.setProperty("webdriver.chrome.driver","G://chromedriver.exe");
        driver=new ChromeDriver();
    try{

        File file = new File("Cookies.data");
        FileReader fileReader = new FileReader(file);
        BufferedReader Buffreader = new BufferedReader(fileReader);
        String strline;
        while((strline=Buffreader.readLine())!=null){
        StringTokenizer token = new StringTokenizer(strline,";");
        while(token.hasMoreTokens()){
        String name = token.nextToken();
        String value = token.nextToken();
        String domain = token.nextToken();
        String path = token.nextToken();
        Date expiry = null;

        String val;
        if(!(val=token.nextToken()).equals("null"))
		{
        	expiry = new Date(val);
        }
        Boolean isSecure = new Boolean(token.nextToken()).
        booleanValue();
        Cookie ck = new Cookie(name,value,domain,path,expiry,isSecure);
        System.out.println(ck);
        driver.manage().addCookie(ck); // This will add the stored cookie to your current session
        }
        }
        }catch(Exception ex){
        ex.printStackTrace();
        }
        driver.get("https://demo.guru99.com/test/cookie/selenium_aut.php");
}
	}
Output: You are taken directly to the login success screen without entering the input user id and password
NOTE: Use hard refresh in case you see the login page after executing the above script.
Conclusion
Thus, you can avoid entering the username and password on the server validating them again and again for each test with the help of Selenium Webdriver, and thereby saves a lot of time.