Object Repository in Selenium
⚡ Smart Summary
Object Repository in Selenium centralizes element locators in a single external file, separating them from test scripts. This approach improves maintenance and lets testers update locators in one place rather than editing many test cases.

What is an Object Repository?
An object repository is a common storage location for all objects. In Selenium WebDriver context, objects would typically be the locators used to uniquely identify web elements.
The major advantage of using an object repository is the segregation of objects from test cases. If the locator value of one web element changes, only the object repository needs to be changed rather than making changes in all test cases in which the locator has been used. Maintaining an object repository increases the modularity of framework implementation.
Types of Object Repositories in Selenium Web Driver
Selenium WebDriver does not offer an in-built object repository by default. However, object repositories can be built using the key-value pair approach, wherein the key refers to the name given to the object and the value refers to the properties used to uniquely identify an object within the web page.
The following are the types of object repositories that can be created in Selenium WebDriver.
- Object Repository using Properties file
- Object Repository using XML file
Selenium Web Driver Object repository using Properties file
In this approach, a properties file is a text file wherein data is stored in the form of key-value pairs. The below tutorial will address the following topics.
Step 1) Creating a properties file in eclipse
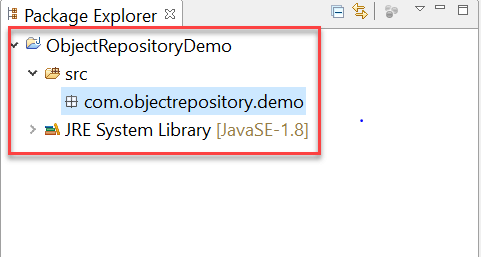
- To start with, the below java project structure needs to be created in eclipse. The project name and package name can be any valid names.
- Right-click on the main project folder and select New-> Other

- In the next window, select General -> File and click on the ‘Next’ button

- Provide a valid file name with the extension ‘.properties’ on the new file resource window and click on the ‘Finish’ button

- A file named ‘application.properties’ must be displayed on the Project Structure

Step 2) Storing data onto properties file
- Data is stored in a properties file in the form of key-value pairs, with the key being unique across the file.
- We will try to use the properties file to identify web elements using locator values.
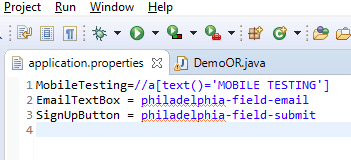
- Open the application.properties file in Eclipse and store the following data
MobileTesting=//a[text()='MOBILE TESTING']
EmailTextBox = philadelphia-field-email
SignUpButton = philadelphia-field-submit
4) For this tutorial, the following demo website is being used:
https://demo.guru99.com/test/guru99home/. Here is the test scenario:
- Click on the Mobile Testing link using XPATH
- Navigate back
- Enter data onto the email textbox using ID
- Click on the Sign Up button using ID
Step 3) Reading data from properties file
- Reading data from a properties file can be done using the built-in Properties class provided in the java.util package.
- Initially, an object of the Properties class needs to be created as below
Properties obj = new Properties();
- We need to create an object of the FileInputStream class with the path to the properties file
FileInputStream objfile = new FileInputStream(System.getProperty("user.dir")+"\\application.properties");
- Reading data from a properties file can be done using the load method offered by the Properties class in java. The below code demonstrates the usage of the load method.
Properties obj = new Properties();
FileInputStream objfile = new FileInputStream(System.getProperty("user.dir")+"\\application.properties");
obj.load(objfile);
String mobileTesting = obj.getProperty("MobileTesting");
The string ‘mobileTesting’ will contain the XPATH to identify the Mobile Testing link within the webpage.
Step 4) Using properties file in test scripts
A properties file can be used in test scripts by reading data from the properties file and passing the data as a parameter to the findElement method. The below code demonstrates the usage of data read from a properties file in test scripts.
driver.findElement(By.xpath(obj.getProperty("MobileTesting"))).click();
driver.findElement(By.id(obj.getProperty("EmailTextBox"))).sendKeys("testguru99@gmail.com");
driver.findElement(By.id(obj.getProperty("SignUpButton"))).click();
The below is the complete code used for the above test scenario.
package com.objectrepository.demo;

import java.io.FileInputStream;
import java.io.FileNotFoundException;
import java.io.IOException;
import java.util.Properties;

import org.openqa.selenium.By;
import org.openqa.selenium.WebDriver;
import org.openqa.selenium.chrome.ChromeDriver;

public class DemoOR {

    public static void main(String[] args) throws IOException {

        // Create WebDriver Instance
        WebDriver driver;
        System.setProperty("webdriver.chrome.driver", "G:\\chromedriver.exe");
        driver = new ChromeDriver();
        driver.get("https://demo.guru99.com/test/guru99home/");
        driver.manage().window().maximize();
        // Load the properties File
        Properties obj = new Properties();
        FileInputStream objfile = new FileInputStream(System.getProperty("user.dir")+"\\application.properties");
        obj.load(objfile);
        // Navigate to link Mobile Testing and Back
        driver.findElement(By.xpath(obj.getProperty("MobileTesting"))).click();
        driver.navigate().back();
        // Enter Data into Form
        driver.findElement(By.id(obj.getProperty("EmailTextBox"))).sendKeys("testguru99@gmail.com");
        driver.findElement(By.id(obj.getProperty("SignUpButton"))).click();
    }

}
Selenium WebDriver Object Repository Using XML File
XML stands for Extensible Markup Language. An XML File uses the Document Object Model (DOM) as the basic structure. The XML File format will replicate the HTML format upon which the webpage is constructed. Below is the list of topics that will be covered.
- Creating an XML file in eclipse
- Storing data onto XML file
- Reading data from XML file
- Using XML file in test scripts
Step 1) Creating an XML file in eclipse
- The below java project structure needs to be created in Eclipse.

- Right-click on the project folder, select New -> Other

- Select the XML File within the XML folder and click on the ‘Next’ button

- Enter a valid XML File name and click on the ‘Finish’ button

- An XML file will be added to the project folder as shown below

Step 2) Storing data onto XML file
Data can be stored in an XML file in the form of the Document Object Model (DOM). For simplicity’s sake, we can use the below test scenario as an example.
- Click on the Mobile Testing link using XPATH
- Navigate Back to the Home page
- Enter data onto the email textbox using ID
- Click on the Sign Up button using ID
The below is the format of the XML File to be used.
<menu>
      <mobiletesting>//a[text()='MOBILE TESTING']</mobiletesting>
      <email> philadelphia-field-email</email>
      <signup> philadelphia-field-submit </signup>
 </menu>
Store the above XML code in properties.xml

In the design tab you will see

Step 3) Reading data from XML file
1. Reading data from an XML file can be accomplished using the built-in ‘dom4j’ class in java. Please note that you need to add the below JAR files into the build path of your project before proceeding with the code.
- jaxen.jar
- dom4j-1.6.jar
2. Below is the code to read data from the XML file.
        File inputFile = new File(System.getProperty("user.dir") +"\\properties.xml");
        SAXReader saxReader = new SAXReader();
        Document document = saxReader.read(inputFile);
        String mobileTesting = document.selectSingleNode("//menu/mobiletesting").getText();
        String emailTextBox = document.selectSingleNode("//menu/email").getText();
        String signUpButton = document.selectSingleNode("//menu/signup").getText();
3. Initially, we need to create a File object and pass it as a parameter to the ‘read’ method of the SAXReader class. Once the XML file data is read successfully, we can access individual nodes of the XML document using the ‘selectSingleNode’ method.
Step 4) Using XML file in test scripts
An XML file can be used in test scripts by reading data from the XML file and passing the data as a parameter to the findElement method. The below code demonstrates the usage of data read from an XML file in test scripts.
driver.findElement(By.xpath(mobileTesting)).click();
driver.findElement(By.id(emailTextBox)).sendKeys("testguru99@gmail.com");
driver.findElement(By.id(signUpButton)).click();
The below code demonstrates the use of an XML file in selenium WebDriver
package com.objectrepository.demo;
import java.io.*;
import java.util.*;
import org.dom4j.*;
import org.dom4j.io.SAXReader;
import org.openqa.selenium.By;
import org.openqa.selenium.WebDriver;
import org.openqa.selenium.chrome.ChromeDriver;

public class DemoORXML {

    public static void main(String[] args) throws DocumentException {
        // Creating WebDriver Instance
        WebDriver driver;
        System.setProperty("webdriver.chrome.driver", "G:\\chromedriver.exe");
        driver = new ChromeDriver();
        driver.get("https://demo.guru99.com/test/guru99home/");
        driver.manage().window().maximize();
        // Reading XML File
        File inputFile = new File(System.getProperty("user.dir") +"\\properties.xml");
        SAXReader saxReader = new SAXReader();
        Document document = saxReader.read(inputFile);
        String mobileTesting = document.selectSingleNode("//menu/mobiletesting").getText();
        String emailTextBox = document.selectSingleNode("//menu/email").getText();
        String signUpButton = document.selectSingleNode("//menu/signup").getText();

        // Navigating to Mobile Testing and back
        driver.findElement(By.xpath(mobileTesting)).click();
        driver.navigate().back();
        // Entering Form Data
        driver.findElement(By.id(emailTextBox)).sendKeys("testguru99@gmail.com");
        driver.findElement(By.id(signUpButton)).click();

    }
}
Download the WebDriver Eclipse Project