iOS App Testing Tutorial
⚡ Smart Summary
iOS App Testing verifies that an application installs, performs, and behaves correctly on Apple devices. It combines manual techniques with automated frameworks like XCTest and XCUITest to catch crashes, incompatibilities, and memory leaks early.
What is iOS App Testing?
iOS App Testing is a testing process in which an iOS application is tested on real Apple devices to check whether it works as expected or not for specific user actions like installation time, user interface, user experience, appearance, behaviour, functionality, load time, performance, App Store listing, OS version support, etc.
Why iOS App Testing?
iOS App Testing is required because iOS is Apple’s platform for mobile applications, first released on June 29, 2007. Unlike Android, Apple doesn’t license iOS for installation on non-Apple hardware. iOS and iOS applications can only be installed on Apple devices; hence, your iOS app must be compatible with the iOS versions and iOS devices your users own.
.png)
The figure below shows common questions developers face when creating an iOS application.

It doesn’t matter how much time you invest in design and implementation; mistakes are inevitable, and bugs will appear. The figure below shows some common bugs in iOS applications.

Application crashing
One of the most frustrating problems when using Apple’s devices is that an application may crash frequently during execution. Often, the app crashes because of bugs or memory leaks in the code.
Application incompatibilities
Your iOS application may run perfectly on the current iOS version, but if iOS is upgraded, it may not work due to incompatibility issues.
Security vulnerability
A security vulnerability in iOS allows a hacker to attack your iOS devices and steal your private information. Over the years, severe iPhone security vulnerabilities have been discovered in different iOS versions.
Memory leaks
Memory leaks are blocks of allocated memory that the program no longer uses. Memory leaks cause your iOS application to crash.
They are bugs and should always be fixed.
iOS testing MindMap
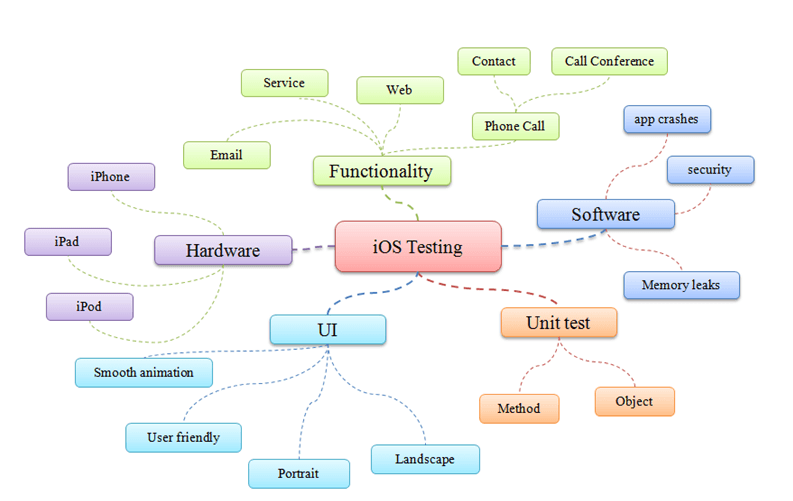
As shown in the above figure, the iOS Testing MindMap shows all the items that a tester should consider when conducting testing on iOS.
iOS Application Testing Checklist
This checklist is specifically designed to test the characteristics of iOS mobile applications. Obviously, it tests only generic application characteristics and not the functionality of the app.
- Check the installation time taken by the application onto the device. Make sure that the application is installed within an acceptable time.
- Once the application is installed, check whether the application has an app icon and name. Also, make sure that both icon and name are self-explanatory, reflecting the core intention of the application.
- Launch the application and check whether a splash screen is displayed.
- Check the splash screen timeout and time taken to load the home screen. The Home screen of the application should load within an acceptable time. If the Home screen takes too long to load, there is more chance for the user to quit or even uninstall the application itself. Also, check how the contents are loaded on the Home screen.
- The main function of the application should be apparent immediately. It should speak for itself.
- Check whether the app supports both landscape and portrait orientations. If so, check the app in both orientations. The application’s user interface should adjust accordingly.
- Without an internet connection, launch the application. Make sure that the app behaves as designed/desired. There is a chance that the application may crash on launch or may just display a blank screen.
- If the application uses location services, then check whether the location permission alert is displayed or not. This alert should be prompted to the user only once.
- If the application sends push notifications, then check whether the push notification permission alert is displayed or not. This alert should also be prompted to the user only once.
- Launch the application, quit it and relaunch. Check whether the app behaves as designed/desired
- Close the application by tapping the Home button of the device and open the app again. Check whether the app works as designed/desired.
- Once installed, check whether the app is listed in the iPhone’s settings app.
- After the application is made live, check whether the application can be found in the “App Store.” There will be supported OS versions for the application. So, make sure the application can be found in the “App Store” of devices on supported OS versions. Also, the application should not be listed in the “App Store” of devices on unsupported OS versions.
- Check whether the application goes to sleep mode when running in the background to prevent battery drain.
- If the performance of the application is slow or whenever contents are loading, check whether there is a progress status icon (“Loading…”), preferably with a specific message.
- Search the application with its name in the device search bar. Check whether the app is listed
- Check whether the appearance of buttons that perform standard actions is not altered in the app (for instance: refresh, organize, trash, Reply, back, etc.)
- Check whether standard buttons are not used for functions other than those they are normally used for
iOS Testing Strategy
Once you know what to check, the next step is how to test it. The figure below introduces some common types of iOS testing strategy.

Automated testing
Automated testing is one of the biggest advantages in iOS testing. It enables you to detect bugs and performance issues quickly. The benefits of automated testing are shown below:
- Automated testing can run on multiple devices, saving your time
- Automated testing can target SDKs. You can run tests on different SDK versions
- Automated testing increases your testing productivity and saves software development costs
- There are many open source testing frameworks that support automated testing on iOS
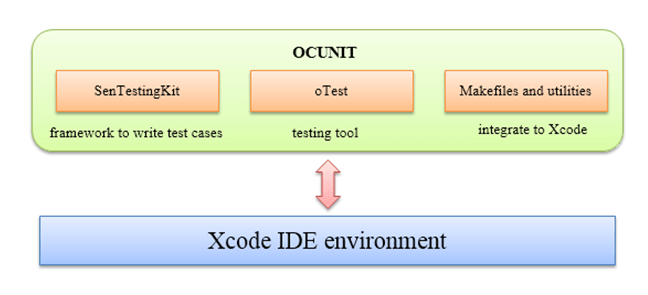
Unit testing with OCUnit
When the original iOS SDK was released, it lacked Unit Testing capabilities. So Apple brought the OCUnit unit test solution into iOS SDK version 2.2.
OCUnit was a testing framework for Objective-C on the Mac (now macOS). The biggest advantage of the OCUnit framework was its tight integration into the Xcode development environment, as shown below.
Note: OCUnit (SenTestingKit) is deprecated; since Xcode 5, Apple’s XCTest framework has replaced it as the standard — see the XCTest section below. Screenshots here show an older Xcode version.
Some of the benefits of OCUnit are shown in the figure below.

UI Testing with UIAutomation

UI Automation was a JavaScript library provided by Apple Inc., which could be used to perform automated tests on real devices and on the iOS Simulator. This framework was added in iOS SDK 4.0. Using UI Automation, you could automate testing of the application not only on the simulator but also on a real device.
Note: Apple deprecated UI Automation in Xcode 8 (2016) and later removed it. Use XCUITest for new UI test projects; the classes and screenshots below reflect the older toolchain.
UIAutomation brought these benefits:
- Reduced effort on Manual Testing
- Required less effort to execute all your tests
- Simplified the UI testing procedure (push a few buttons and run your full test suites)
The UIAutomation instrument worked from scripts written in JavaScript. It simulated user events on the target iOS application.
UIAutomation Cons vs. Pros
| Pros | Cons | |
|---|---|---|
| 1. | Good support for gesture and rotation | It’s not open source, less support from the developer |
| 2. | Can run UIAutomation tests on the device, not only the simulator. | Can’t integrate with other tools extremely well |
| 3. | Developed in JavaScript, a popular programming language. |

The above figure represents some common classes in the UIAutomation framework.
- The UIAElement class is the super class for all user interface elements in the context of the Automation
- The UIATarget class represents the high-level user interface elements of the system under test
- The UIALogger class provides test and error information on retrieval functionality
- The UIAActivityView class allows access to, and control of, activity views within your app.
- The UIAActionSheet class allows access to, and control of, action sheets within your app.
- User Event Action
- UISlider class
- UIAButton class
- UIAKey class
- UIAKeyboard class
Other Automated testing frameworks
- Frank: Automated Acceptance Test framework for iPhone and iPad (no longer actively maintained)
- KIF: is an iOS integration test framework. It allows for easy automation of iOS apps by leveraging the accessibility attributes that the OS makes available for those with visual disabilities.
- Appium: a popular open source, cross-platform framework that automates iOS apps through Apple’s XCUITest driver
XCTest and XCUITest: Apple’s Modern Testing Frameworks
OCUnit and UIAutomation are important history, but both are now retired. Apple replaced OCUnit with XCTest in Xcode 5 (2013) and deprecated UIAutomation in Xcode 8 (2016) in favor of XCUITest, the UI testing component of XCTest. These are the test frameworks Apple ships and supports in every current version of Xcode.
With XCTest, you write unit tests in Swift or Objective-C and run them from the Xcode Test Navigator, the xcodebuild command line, on the Simulator, or on real devices. XCUITest drives your app through the accessibility layer, so UI tests behave much like a real user.
| Legacy framework | Modern replacement | What changed |
|---|---|---|
| OCUnit (SenTestingKit) | XCTest | Same unit testing concepts, now built into every Xcode project template |
| UIAutomation (JavaScript) | XCUITest | UI tests are written in Swift or Objective-C instead of JavaScript |
💡 Tip: Cross-platform tools such as Appium automate iOS through XCUITest under the hood, so these skills transfer directly.
Manual testing
Automation brings speed, but the manual techniques below add human judgment that scripts cannot provide.
Exploratory Testing
It is testing without a formal test plan. Exploratory Testing is a low-cost testing method, but it can miss potential bugs in your iOS application.
Exploratory Testing Cons vs. Pros
| Pros | Cons | |
|---|---|---|
| 1. | Less preparation is needed; serious bugs are detected early. | Requires high skill of the tester |
| 2. | No Test Plan is needed, which speeds up bug detection. | Test coverage is low. It does not guarantee that all your requirements are tested. |
| 3. | Most bugs are discovered early by some sort of exploratory testing | Lack of testing documentation |
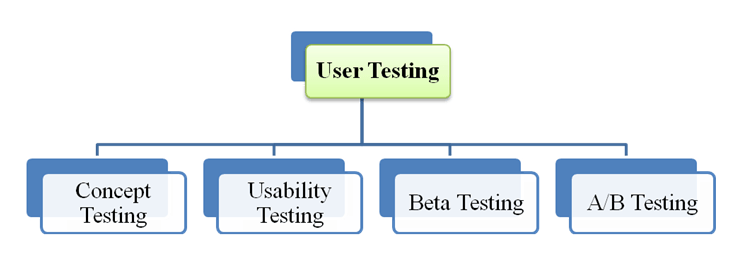
User Testing
User testing is a type of Manual Testing on iOS. The purpose of this testing is to create better apps, not only bug-free apps. The figure below shows four types of User Testing.
Concept testing
Evaluate user response to an application idea before releasing it to the market. The procedures of concept testing on iOS are described in the figure below.

Usability Testing
Usability Testing is a test of how easy it is to use your iOS application. In iOS testing, a usability test can be recorded to remember or to share with others.
Some tools that support usability testing on iOS are:
Trymata mobile user testing apps for Android and iOS.
Delight.io, this tool can capture real user interaction on your iOS apps.
Beta testing
Beta Testing is the integration testing with real data to get final feedback from users. To distribute your apps for beta testing, you have to follow the steps below.

–Pre-condition: If you are beta testing a final candidate for a release, be sure to validate the app before distributing it to testers.
–Find tester via service: you collect device IDs from testers and add them to your Apple Developer account
–Create ad-hoc distribution: Ad Hoc distribution allows the tester to run your app on their device without needing Xcode. This step includes 2 sub-steps
- Create distribution certificates
- Create Ad-hoc provisioning profiles
–Solicit feedback from tester: Testers conduct testing and send bug reports to you. After your app is released, you can get the reports from App Store Connect (formerly iTunes Connect).
Note: Today, most teams distribute beta builds with TestFlight, which lets you invite up to 10,000 external testers without collecting device IDs manually.
A/B testing
A/B testing is one of the most powerful ways to evaluate the effectiveness of your iOS app. It uses randomized experiments with two devices, A and B.

A/B testing includes three main steps
- Configure a test: Prepare 2 versions of your iOS app (A & B) and a test metric
- Test: Test the 2 iOS app versions above on devices simultaneously.
- Analyze: Measure and select the better version to release
The following tools support A/B testing on iOS.
- Arise: A/B testing for both iOS and Android. It can be integrated into your iOS app and makes the testing process quicker.
Best practices for A/B testing
- Define the target of your test. Any test is useless without a target.
- Watch end users use your app the first time
- Run one test only per update. It saves your time when conducting testing
- Monitor your test carefully. You can learn from your test by monitoring it.
iOS testing Best practice
Here are some tips you should know when organizing the testing of your iOS application
- Test the application on a real device to get a realistic view of performance
- Improve your testing methods, because traditional testing methods are no longer sufficient to cover all tests in iOS testing
- Use the console log to test the iOS application. This iOS feature includes information from every application on the device.
- Document application bugs using the built-in screenshot command. It helps the developer understand how the bugs occur.
- Crash reporting tools are useful when testing your application. They can detect crashes and log details so you can investigate the bugs easily.
MYTHS about iOS testing
This section examines a few popular myths and realities of iOS testing
Testing applications on iOS and Android is the same thing.
iOS and Android are two platforms developed by Apple Inc. and Google respectively. They are totally different in test environments, test frameworks, and programming languages.
Testing the application on the iOS Simulator is enough.
The iOS Simulator is not strong enough for testing an app, because the iOS Simulator has some limitations:
- Hardware limitations (Camera, Microphone input, Sensor)
- Your app’s UI may appear to run both faster and smoother than on a device
- API Limitations
- Some frameworks unsupported (Media Player, Store Kit, Message UI..)
Everyone will download my apps on the app store because they have many features
The more features your application has, the more bugs you could get. No user will download your application if it still has many defects.