
UIAutomatorViewer Tutorial: Inspector for Android Testing
 Editorial Team
⚡ Smart Summary
UIAutomatorViewer is a graphical inspector bundled with the Android SDK that captures a device screenshot, renders the view hierarchy, and exposes the attributes Appium needs to locate buttons, fields and labels reliably.

What is UIAutomatorViewer?
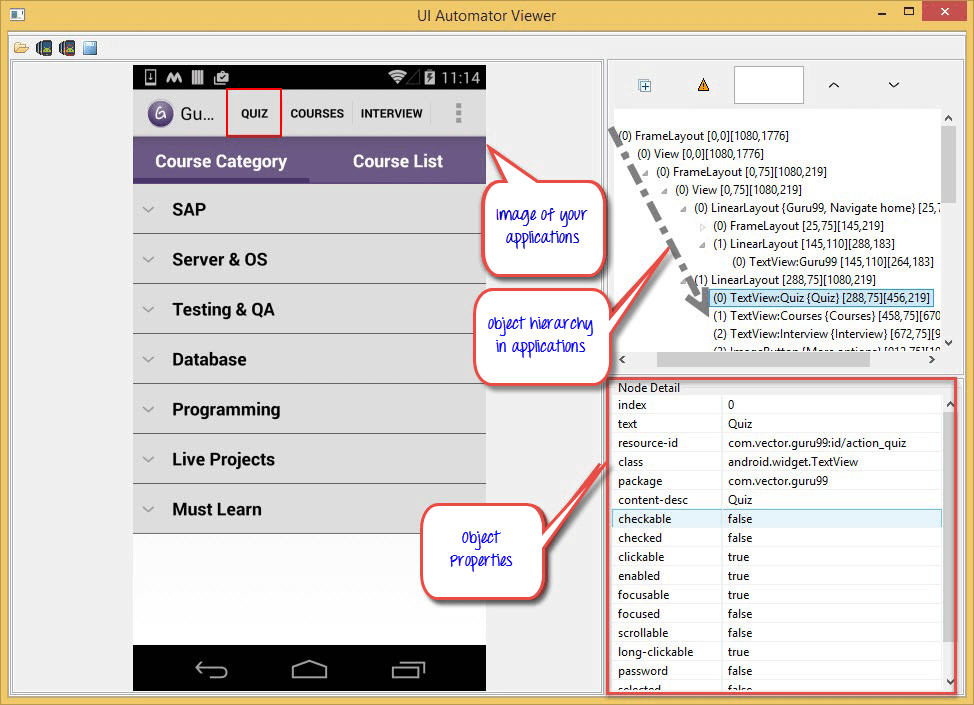
UIAutomatorViewer is a GUI tool to scan and analyze the UI components of an Android application. To automate any Android application using Appium, a user needs to identify the objects in the AUT (Application Under Test). With UIAutomatorViewer you can inspect the UI of an Android application to find out the hierarchy and view different properties (id, text…) of the element.
While executing automation scripts, Appium uses UIAutomatorViewer to identify different properties of the object and use the properties to identify the required object. That single idea — read the attribute in the inspector, then reuse it as a locator in the script — is what the rest of this page walks through.
The screenshot below shows the tool in its normal working state: the captured device screen on the left, the node tree on the upper right and the property sheet for the selected node underneath it.
Prerequisites for Using UIAutomatorViewer
The inspector reads the live screen of a real handset or emulator, so a small amount of setup has to be in place before the window will show anything at all.
- A Java Development Kit: uiautomatorviewer is a Java desktop application started by a batch script, so a JDK must be installed and reachable on the system path.
- The Android SDK: the viewer ships inside the SDK tools folder, so the SDK has to be installed before the launcher exists on disk.
- Platform-tools and adb: the viewer talks to the device through the Android Debug Bridge, so adb must be installed and able to see the handset.
- Developer options and USB debugging: both have to be switched on in the device settings, otherwise adb never lists the device.
- A data-capable USB cable and driver: a charge-only cable, or a missing manufacturer driver on Windows, produces an empty device list.
- The application under test: the app has to be installed and open on the device, because the inspector captures whatever is currently on screen.
With those six items in place, the download step is short.
How to Download and Install UIAutomatorViewer
UIAutomatorViewer is a part of the Android SDK manager and will be accessible once you install the SDK manager. Download and install the Android SDK from the official Android Studio download page.
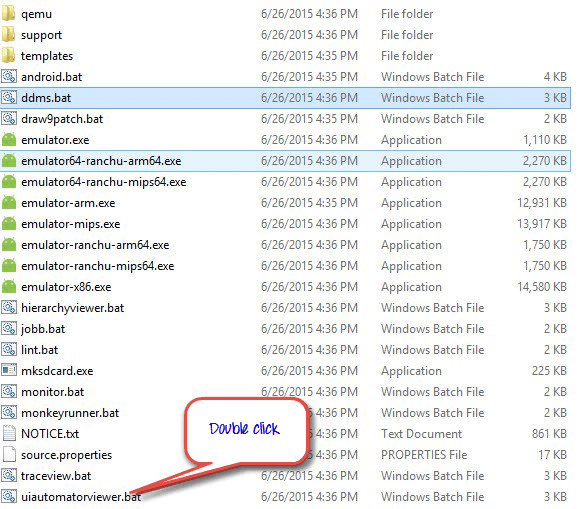
Once the Android SDK is installed, navigate to this path:
c:\users\<username>\AppData\Local\Android\sdk\tools
You will notice a batch file with this name:
uiautomatorviewer.bat
Double click on it to launch the UIAutomatorViewer GUI. The folder listing looks like the one below, with the batch file sitting alongside the other SDK tools.
⚠️ Version note: Android’s own UI Automator legacy documentation still describes launching the tool from <android-sdk>/tools/, but the obsolete standalone Android SDK Tools package is no longer offered by the SDK Manager in current Android Studio releases. Long-standing installations and older SDK archives still contain the launcher; on a fresh installation the file is usually absent, and Appium Inspector is the practical replacement. The original steps above are kept because they remain correct for any machine that still has the tools folder.
How to Use UIAutomatorViewer to Find Objects in Your Application
The capture sequence is always the same: prepare the device, put the screen you care about in front of the camera, then take the snapshot.
- Enable developer options on your device. Read Android’s guide to configuring on-device developer options to see how to enable developer options on Android devices.
- Connect your Android device to the PC via a USB cable.
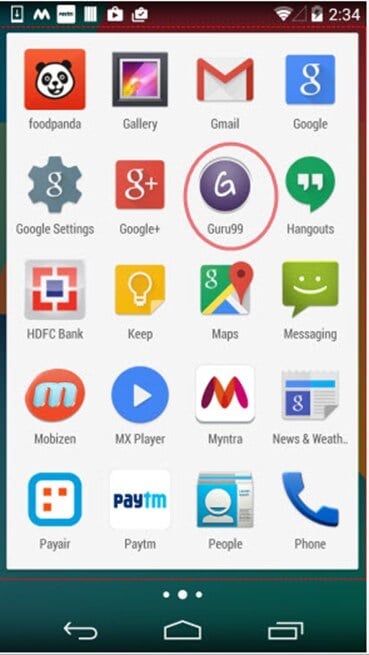
- Select the “Guru99” app from the applications list, as shown below.
- Click the Device screenshot button to refresh UIAutomatorViewer and to load the Guru99 application GUI into the tool. The button sits in the toolbar highlighted below.

- After the refresh is completed, a screenshot of the Guru99 application opens in the left pane.
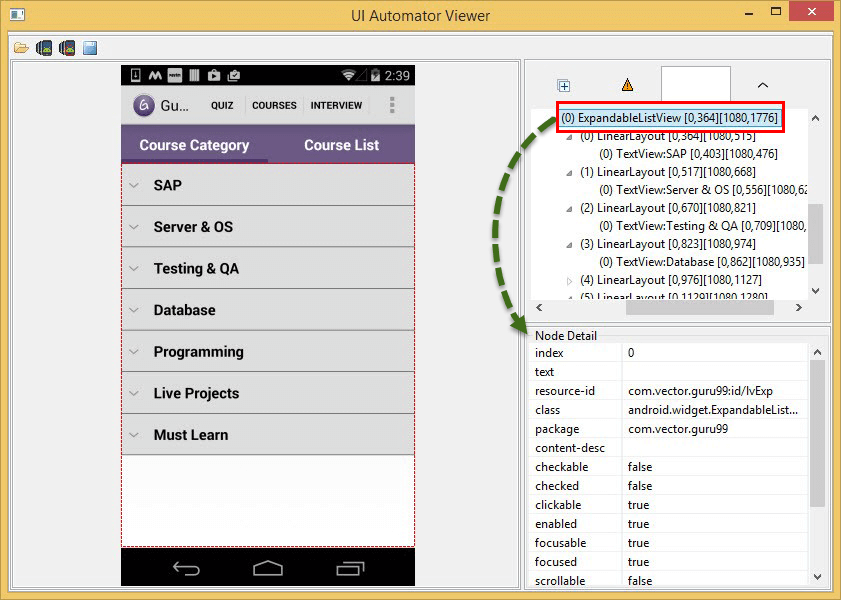
- As you see in the above image, on the right side of the window there are 2 panels.
The upper panel contains the node hierarchy — the way the UI components are arranged and contained. Clicking each node gives the properties of that UI element in the lower panel.
- Select the ‘Quiz’ button in the above image to view its different properties (text, resource-id…).

How to Use These Properties to Identify Elements for Automation
Well, you cannot use the properties directly — each property has another name in the automation API. Let us see how to put those property values to work. The following attributes can be used to identify the ‘Quiz’ button in the Guru99 app.
| Attribute in UIAutomatorViewer | Locator name in the script | Typical use |
|---|---|---|
| text | name | Visible label on a button or a static field |
| resource-id | id | The most stable choice when the developer sets one |
| class | className | Selecting a group of widgets of the same type |
| content-desc | accessibility id | Cross-platform locator that also helps screen readers |
Each mapping is visible directly in the node detail panel. The text attribute can be used as “name”, as the property row below shows.

The resource-id attribute can be used as “id”.

The class attribute can be used as “className”.

The content-desc attribute can be used as “AccessibilityId”.

Along with the above attributes, we can write XPaths for object identification. Those attribute names are also what you pass through desired capabilities and locator strategies once the script is running.
How to Build XPath Locators from UIAutomatorViewer Attributes
XPath is the fallback when no single attribute is unique on its own. The node detail panel gives you every value the expression needs, so an XPath is really just the attribute you already read, written in predicate form.
Work through the panel in this order:
- Select the node in the upper panel and read its class, text, resource-id and content-desc values in the lower panel.
- Prefer a single stable attribute. If resource-id is populated, use it and stop — no XPath is needed.
- If nothing is unique, combine two attributes in one predicate.
- If the label changes at runtime, switch the equality test for a partial match.
The patterns below use the attribute names exactly as UIAutomatorViewer reports them.
<!-- match on the visible label -->
//*[@text='Quiz']

<!-- match on the resource-id reported by the viewer -->
//*[@resource-id='com.example.app:id/quiz_button']

<!-- match on the widget class -->
//android.widget.Button[@text='Quiz']

<!-- partial match when the label is dynamic -->
//*[contains(@text,'Qui')]

<!-- two attributes combined for a unique match -->
//*[@class='android.widget.Button' and @content-desc='Quiz']
A few rules keep these expressions from turning brittle. Absolute paths that walk the whole tree break the moment a developer wraps a layout in one more container, so start every expression with the double slash and match on an attribute instead. Index-based predicates behave the same way — they survive until the screen gains a row. And an expression that is unique on a phone screen may match several nodes on a tablet layout, so re-inspect the same screen on both form factors before promoting the locator into a suite. The same discipline applies to XPath in Selenium, where the tree is a DOM rather than a view hierarchy.
Errors One Might Encounter While Using UIAutomatorViewer
Most failures happen before a single node is drawn, and nearly all of them come back to the connection between the workstation and the handset.
- I see the error — “No Android devices were detected by adb” — as shown in the screenshot below. How can I resolve this?

Solution: Make sure your device is connected to the PC.
The table below extends that answer to the other messages testers hit most often.
| Symptom | Likely cause | Fix |
|---|---|---|
| No Android devices were detected by adb | Device not attached, USB debugging off, or a charge-only cable | Reconnect with a data cable, enable USB debugging, then confirm the handset appears in the adb device list |
| Device listed as unauthorised | The RSA fingerprint prompt was never accepted on the handset | Unlock the screen, reconnect and tap Allow USB debugging |
| uiautomatorviewer.bat is missing | The obsolete SDK tools package is not installed | Use an existing SDK installation that still contains it, or switch to Appium Inspector |
| The hierarchy is empty or the capture fails | The screen changed during the dump, or the app blocks screen capture | Hold the screen still and take the snapshot again; secure screens cannot be captured |
| WebView content shows as a single node | The viewer reads native views only | Inspect web content with browser developer tools or an inspector that supports web context |
UIAutomatorViewer vs Appium Inspector vs Layout Inspector
Three inspectors are commonly used against Android screens, and they solve slightly different problems.
| Criterion | UIAutomatorViewer | Appium Inspector | Android Studio Layout Inspector |
|---|---|---|---|
| Ships with | The legacy Android SDK tools package | A standalone desktop application | Android Studio |
| Platforms inspected | Android only | Android and iOS | Android only |
| Needs a running server | No, it talks to adb directly | Yes, it connects to an Appium server session | No, it attaches to a debuggable process |
| Generates locator code | No, values are copied by hand | Yes, it suggests locators and can record actions | No, it is a debugging view |
| Best suited to | A quick attribute lookup on an older setup | Building and validating locators for a suite | Diagnosing layout and rendering problems |
For a suite that already runs through Appium, the Inspector is the natural successor: it reads the same attributes, runs the same UiAutomator2 driver underneath, and works against iOS as well. The Appium Inspector project is actively released, so it is the safer choice for new work, while Layout Inspector stays useful when the question is why a view renders oddly rather than how to address it. If you are still choosing a stack, the wider comparison in our guide to mobile app testing tools is a good next step, and sample mobile test cases show what these locators eventually feed into.
