Appium Tutorial for Beginners
⚡ Smart Summary
Appium Tutorial for Android and iOS Mobile Apps Testing introduces an open-source UI automation framework that drives native, hybrid, and web apps on both platforms with a single Selenium-compatible API. This guide explains how Appium works, installation steps, the Inspector, emulator attachment, and a Java Calculator test case.

What is Appium?
Appium is a freely distributed open-source mobile application UI testing framework. Appium allows native, hybrid, and web application testing and supports automation on physical devices as well as on emulators and simulators. It offers cross-platform application testing — a single API works for both Android and iOS test scripts.
Appium has no dependency on the mobile device OS. The framework wraps and translates Selenium WebDriver commands into UIAutomation (iOS) or UIAutomator (Android) commands depending on the device type, not the underlying operating system version.
Appium supports every language that has Selenium client libraries — Java, Objective-C, JavaScript with Node.js, PHP, Ruby, Python, C#, and more.
How Does Appium Work?
- Appium is an HTTP server written on the Node.js platform that drives iOS and Android sessions using the WebDriver JSON wire protocol. Node.js must be pre-installed on the system before starting the Appium server.
- When Appium is downloaded and installed, a server is set up on the local machine that exposes a REST API.
- The server accepts connection and command requests from the client and executes the commands on a mobile device (Android or iOS).
- It responds with HTTP responses. To execute requests, Appium calls into native mobile-automation frameworks to drive the application UI:
- Apple Instruments for iOS (Instruments are available only in Xcode 3.0 or later with OS X v10.5 and later).
- Google UIAutomator for Android API level 16 or higher.
- Selendroid for Android API level 15 or lower.
Prerequisites to Use Appium
- Install Android SDK (Studio) [Link].
- Install JDK (Java Development Kit) [Link].
- Install Eclipse [Link].
- Install TestNG for Eclipse [Link].
- Install Selenium Server JAR [Link].
- Appium Client Library [Link].
- APK App Info on Google Play [Link].
- Node.js (not strictly required — when Appium Server is installed, Node.exe and NPM are bundled with the current Appium version).
- Install Appium Desktop.
Install Appium Desktop
Appium Desktop is an open-source GUI application that installs and runs the Appium Server. It comes bundled with all prerequisites needed to use the Appium Server, and it ships with an Inspector to surface basic information about your apps and a Recorder to generate boilerplate code that automates mobile applications.
Step 1) Go to http://appium.io/ and click Download Appium.

Step 2) For Windows, select the .exe file and download it. The file is around 162 MB and will take time to download based on your internet speed.

Step 3) Click the downloaded .exe.

Step 4) On a Windows machine, there is no install wizard — Appium runs directly from the .exe. After you click the .exe, the following splash appears for a few minutes.

For macOS, you need to install the .dmg.
Step 5) The Server Start window opens. It populates the default host and port (which you can change) and displays the Appium version in use.

Step 6) Click Start Server. A new server is launched on the specified host and port, and the server log output appears in the console.

Step 7) Click New Session Window.

Step 8) Enter the Desired Capabilities and start a session.

Appium Inspector
Similar to the Selenium IDE record-and-playback tool, Appium has an Inspector for recording and playing back tests. It records and plays native application behavior by inspecting the DOM and generates test scripts in any supported language. Note that Appium Inspector is not supported on Microsoft Windows: on Windows it launches the Appium Server but fails to inspect elements. UIAutomator Viewer is the recommended fallback for inspecting elements on Windows.
Steps to start Appium Inspector on a Mac machine:
Step 1) Download and start your Appium server using the default IP address 0.0.0.0 and the port 4725.
- Select the source file or .app file from your local drive for testing.
- Check the “App Path” checkbox to enable the “Choose” button.
Step 2) Click the “Choose” button to browse to and select the test file from the local drive.

Step 3) Start the iOS Simulator on the Mac machine.
Step 4) Click the Launch button in the top-right corner. This enables a blue icon — click that icon to open Appium Inspector and the Simulator with the pre-selected application.

Step 5) Once launched, Appium Inspector shows the element hierarchy in a column-wise structure. The user can also apply actions such as Tap, Swipe, and similar gestures.

Step 6) Click Stop to end recording.
Attach an Android Emulator to Appium
Step 1) Install Android SDK on your system.
Open Control Panel > System and Security > System. From the left panel, click Advanced System Settings. In the System Properties pop-up, click the Advanced tab and then Environment Variables.

Step 2) From the Environment Variables pop-up, double-click Path and set the ANDROID_HOME variable to point to your SDK directory. Append the full SDK folder path. For example:
C:\User\ABC\Desktop\adt-bundled-windows-x86_64-20140321\sdk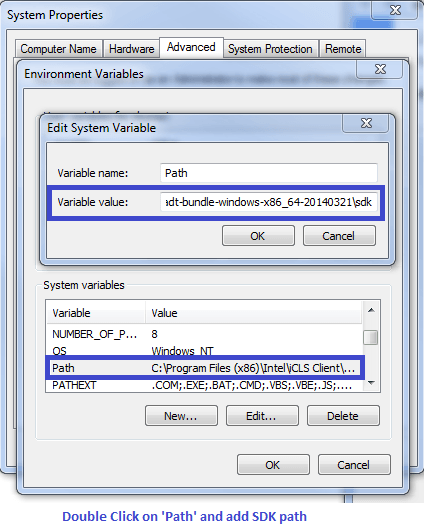
Step 3) Start an Android emulator, or attach an Android device to your system. Make sure USB debugging is enabled on the Android device: go to Device Settings > Developer Options > enable “USB Debugging”.
Step 4) Open Command Prompt and navigate to the Android SDK’s \platform-tools\ directory (for example, D:\adt-bundle-windows-x86_64-20130514\sdk\platform-tools).
Step 5) Run the adb devices command. Your connected device will appear listed in the Command Prompt window. The full form is: adb -s emulator-5554 install <Location of .apk file>.

Step 6) Run the adb start-server command. The ADB server starts, and Appium will use it to send commands to your Android device.
Step 7) Navigate to the Appium directory on your system and start Appium by clicking the Appium.exe file.
Step 8) Do not alter the default IP address or port number. Click Launch. Your Appium console starts at 127.0.0.1:4723 as shown below.

Step 9) Click Start. The Appium server is now running on your system.
Appium Test Case for a Native Android App (Calculator)
Step 1) Download the ADT Eclipse plugin or grab the ADT bundle separately from here.
Step 2) Open Eclipse and create a new Project > Package > Class.
Step 3) Import the Selenium library and TestNG into the new project.
Step 4) Create a small test program for Calculator.app that sums two numbers.
package src_Appium;

import java.net.MalformedURLException;
import java.net.URL;
import org.openqa.selenium.By;
import org.openqa.selenium.WebDriver;
import org.openqa.selenium.WebElement;
import org.openqa.selenium.remote.DesiredCapabilities;
import org.openqa.selenium.remote.RemoteWebDriver;
import org.testng.annotations.*;

public class Calculator {
    WebDriver driver;

    @BeforeClass
    public void setUp() throws MalformedURLException {
        // Set up desired capabilities and pass the Android app activity and package to Appium
        DesiredCapabilities capabilities = new DesiredCapabilities();
        capabilities.setCapability("BROWSER_NAME", "Android");
        capabilities.setCapability("VERSION", "4.4.2");
        capabilities.setCapability("deviceName", "Emulator");
        capabilities.setCapability("platformName", "Android");

        capabilities.setCapability("appPackage", "com.android.calculator2");
        // Package name of the app (get it from an APK info app)
        capabilities.setCapability("appActivity", "com.android.calculator2.Calculator");
        // Launcher activity of the app (get it from an APK info app)

        // Create a RemoteWebDriver instance and connect to the Appium server
        // Launches the Calculator app on the Android device using the capabilities above
        driver = new RemoteWebDriver(new URL("http://127.0.0.1:4723/wd/hub"), capabilities);
    }

    @Test
    public void testCal() throws Exception {
        // Locate the keys on the calculator by name
        WebElement two = driver.findElement(By.name("2"));
        two.click();
        WebElement plus = driver.findElement(By.name("+"));
        plus.click();
        WebElement four = driver.findElement(By.name("4"));
        four.click();
        WebElement equalTo = driver.findElement(By.name("="));
        equalTo.click();
        // Locate the calculator output by tag name
        WebElement results = driver.findElement(By.tagName("EditText"));
        // Check the calculated value on the edit box
        assert results.getText().equals("6") :
            "Actual value is : " + results.getText() + " did not match with expected value: 6";
    }

    @AfterClass
    public void teardown() {
        // Close the app
        driver.quit();
    }
}
Start the Appium Server and the Android Emulator from the AVD Manager, then click Run > TestNG. The program runs Calculator.app on the selected emulator and the result is displayed in the Eclipse console using the TestNG framework.
Limitations of Appium
- Appium does not support testing on Android versions lower than 4.2.
- Limited support for hybrid app testing — for example, it is not possible to test the switching action between a web view and a native view in either direction.
- No support for running Appium Inspector on Microsoft Windows.
Common Errors and Troubleshooting Steps in Appium
| Error | Troubleshooting Steps |
|---|---|
| error: The following desired capabilities are required, but were not provided: deviceName, platformName | Add the desired capabilities deviceName and platformName to the Appium script. For example: capabilities.setCapability("deviceName", "Emulator"); and capabilities.setCapability("platformName", "Android"); |
| error: Could not find adb. Please set the ANDROID_HOME environment variable with the Android SDK root directory path. | Set the SDK root directory in the system Environment Variables under the Path entry. |
| error: org.openqa.selenium.SessionNotCreatedException: A new session could not be created. | Set a correct App path and restart the Appium server. |
| How to find a DOM element or XPath in a mobile application? | Use UIAutomator Viewer to inspect DOM elements for Android applications. |