How to Download & Install Tensorflow in Jupyter Notebook
In this tutorial, we will explain how to install TensorFlow Anaconda Windows. You will learn how to use TensorFlow in Jupyter Notebook. Jupyter is a notebook viewer.
TensorFlow Versions
TensorFlow supports computations across multiple CPUs and GPUs. It means that the computations can be distributed across devices to improve the speed of the training. With parallelization, you don’t need to wait for weeks to obtain the results of training algorithms.
For Windows user, TensorFlow provides two versions:
- TensorFlow with CPU support only: If your Machine does not run on NVIDIA GPU, you can only install this version
- TensorFlow with GPU support: For faster computation, you can download TensorFlow GPU supported version. This version makes sense only if you need strong computational capacity.
During this tutorial, the basic version of TensorFlow is sufficient.
Note: TensorFlow does not provides GPU support on MacOS.
Here is how to proceed
MacOS User:
- Install Anaconda
- Create a .yml file to install Tensorflow and dependencies
- Launch Jupyter Notebook
For Windows
- Install Anaconda
- Create a .yml file to install dependencies
- Use pip to add TensorFlow
- Launch Jupyter Notebook
To run Tensorflow with Jupyter, you need to create an environment within Anaconda. It means you will install Ipython, Jupyter, and TensorFlow in an appropriate folder inside our machine. On top of this, you will add one essential library for data science: “Pandas”. The Pandas library helps to manipulate a data frame.
Install Anaconda
Download Anaconda version 4.3.1 (for Python 3.6) for the appropriate system.
Anaconda will help you to manage all the libraries required either for Python or R. Refer this tutorial to install Anaconda
Create .yml file to install Tensorflow and dependencies
It includes
- Locate the path of Anaconda
- Set the working directory to Anaconda
- Create the yml file (For MacOS user, TensorFlow is installed here)
- Edit the yml file
- Compile the yml file
- Activate Anaconda
- Install TensorFlow (Windows user only)
Step 1) Locate Anaconda,
The first step you need to do is to locate the path of Anaconda.
You will create a new conda environment that includes the necessaries libraries you will use during the tutorials about TensorFlow.
Windows
If you are a Windows user, you can use Anaconda Prompt and type:
C:\>where anaconda
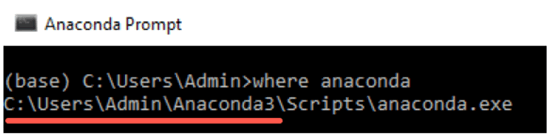
We are interested to know the name of the folder where Anaconda is installed because we want to create our new environment inside this path. For instance, in the picture above, Anaconda is installed in the Admin folder. For you, it can the same, i.e. Admin or the user’s name.
In the next, we will set the working directory from c:\ to Anaconda3.
MacOS
for MacOS user, you can use the Terminal and type:
which anaconda

You will need to create a new folder inside Anaconda which will contains Ipython, Jupyter and TensorFlow. A quick way to install libraries and software is to write a yml file.
Step 2) Set working directory
You need to specify the working directory where you want to create the yml file.
As said before, it will be located inside Anaconda.
For MacOS user:
The Terminal sets the default working directory to Users/USERNAME. As you can see in the figure below, the path of anaconda3 and the working directory are identical. In MacOS, the latest folder is shown before the $. The Terminal will install all the libraries in this working directory.
If the path on the text editor does not match the working directory, you can change it by writing cd PATH in the Terminal. PATH is the path you pasted in the text editor. Don’t forget to wrap the PATH with ‘PATH’. This action will change the working directory to PATH.

Open your Terminal, and type:
cd anaconda3
For Windows user (make sure of the folder before Anaconda3):
cd C:\Users\Admin\Anaconda3
or the path “where anaconda” command gives you

Step 3) Create the yml file
You can create the yml file inside the new working directory.
The file will install the dependencies you need to run TensorFlow. Copy and paste this code into the Terminal.
For MacOS user:
touch hello-tf.yml
A new file named hello-tf.yml should appear inside anaconda3

For Windows user:
echo.>hello-tf.yml
A new file named hello-tf.yml should appear

Step 4) Edit the yml file
You are ready to edit the yml file.
For MacOS user:
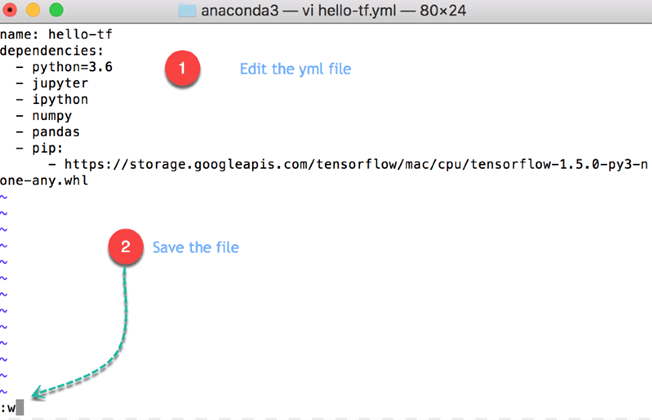
You can paste the following code in the Terminal to edit the file. MacOS user can use vim to edit the yml file.
vi hello-tf.yml
So far, your Terminal looks like this

You enter an edit mode. Inside this mode, you can, after pressing esc:
- Press i to edit
- Press w to save
- Press q! to quit
Write the following code in the edit mode and press esc followed by :w
Note: The file is case and intend sensitive. 2 spaces are required after each intend.
For MacOS
name: hello-tfdependencies:
  - python=3.6
  - jupyter
  - ipython
  - pandas
  - pip:
  - https://storage.googleapis.com/tensorflow/MacOS/cpu/tensorflow-1.5.0-py3-none-any.whl
Code Explanation
- name: hello-tf: Name of the yml file
- dependencies:
- python=3.6
- jupyter
- ipython
- pandas: Install Python version 3.6, Jupyter, Ipython,and pandas libraries
- pip: Install a Python library
- https://storage.googleapis.com/tensorflow/MacOS/cpu/tensorflow-1.5.0-py3-none-any.whl: Install TensorFlow from Google apis.
Press esc followed by :q! to quite the edit mode.

For Windows User:
Windows does not have vim program, so the Notepad is enough to complete this step.
notepad hello-tf.yml
Enter following into the file
name: hello-tfdependencies:
- python=3.6
- jupyter
- ipython
- pandas
Code Explanation
- name: hello-tf: Name of the yml file
- dependencies:
- python=3.6
- jupyter
- ipython
- pandas: Install Python version 3.6, Jupyter, Ipython,and pandas libraries
It will open the notepad, you can edit the file from here.

Note: Windows users will install TensorFlow in the next step. In this step, you only prepare the conda environment
Step 5) Compile the yml file
You can compile the .yml file with the following code :
conda env create -f hello-tf.yml
Note: For Windows users, the new environment is created inside the current user directory.
It takes times. It will take around 1.1gb of space in your hard disk.

In Windows

Step 6) Activate conda environment
We are almost done. You have now 2 conda environments.
You created an isolated conda environment with the libraries you will use during the tutorials. This is a recommended practice because each machine learning project requires different libraries. When the project is over, you can remove or not this environment.
conda env list
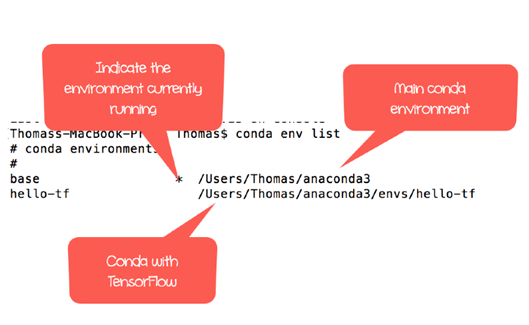
The asterix indicates the default one. You need to switch to hello-tf to activate the environment
For MacOS user:
source activate hello-tf
For Windows user:
activate hello-tf

You can check all dependencies are in the same environment. This is important because it allows Python to use Jupyter and TensorFlow from the same environment. If you don’t see the three of them located in the same folder, you need to start all over again.
For MacOS user:
which python
which jupyter
which ipython

Optional: You can check for update.
pip install --upgrade tensorflow
Step 7) Install TensorFlow For Windows user
For windows user:
where python
where jupyter
where ipython
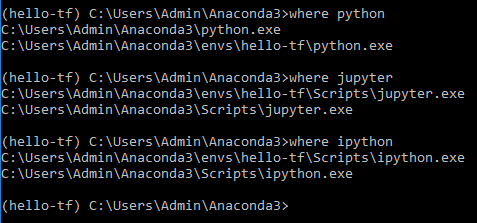
As you can see, you now have two Python environments. The main one and the newly created on i.e. hello-tf. The main conda environment does not have tensorFlow installed only hello-tf. From the picture, python, jupyter and ipython are installed in the same environment. It means, you can use TensorFlow with a Jupyter Notebook.
You need to install TensorFlow using pip command. Only for Windows user
pip install tensorflow

How to Import Tensorflow in Jupyter Notebook
This part is the same for both OS. Now, let’s learn how to import TensorFlow in Jupyter Notebook.
You can open TensorFlow with Jupyter.
Note: Each time you want to open TensorFlow, you need to initialize the environment
You will proceed as follow:
- Activate hello-tf conda environment
- Open Jupyter
- Import tensorflow
- Delete Notebook
- Close Jupyter
Step 1) Activate conda
For MacOS user:
source activate hello-tf
For Windows user:
conda activate hello-tf

Step 2) Open Jupyter
After that, you can open Jupyter from the Terminal
jupyter notebook

Your browser should open automatically, otherwise copy and paste the url provided by the Terminal. It starts by http://localhost:8888
Inside the TensorFlow Jupyter Notebook, you can see all the files inside the working directory. To create a new Notebook, you simply click on new and Python 3
Note: The new notebook is automatically saved inside the working directory.

Step 3) Import Tensorflow
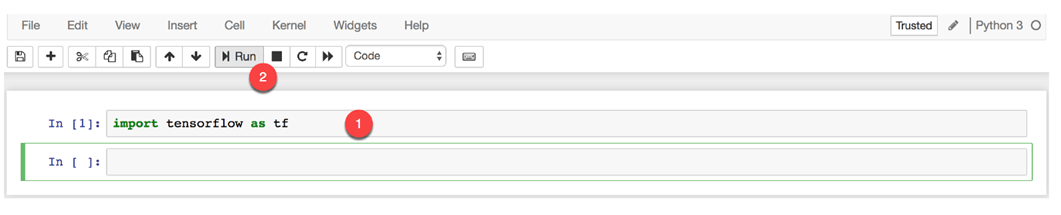
Inside the notebook, you can import TensorFlow in Jupyter Notebook with the tf alias. Click to run. A new cell is created below.
import tensorflow as tf
Let’s write your first code with TensorFlow.
hello = tf.constant('Hello, Guru99!')
hello
A new tensor is created. Congratulation. You successfully install TensorFlow with Jupyter on your Machine.

Step 4) Delete file
You can delete the file named Untitled.ipynb inside Jupyer.

Step 5) Close Jupyter
There are two ways of closing Jupyter. The first way is directly from the notebook. The second way is by using the terminal (or Anaconda Prompt)
From Jupyter
In the main panel of Jupyter Notebook, simply click on Logout

You are redirected to the log out page.

From the terminal
Select the terminal or Anaconda prompt and run twice ctr+c.
The first time you do ctr+c, you are asked to confirm you want to shut down the notebook. Repeat ctr+c to confirm


You have successfully logged out.
Jupyter with the main conda environment
If you want to launch TensorFlow with jupyter for future use, you need to open a new session with
source activate hello-tf
If you don’t, Jupyter will not find TensorFlow
