How to Download & Install RStudio in Anaconda [Windows/Mac]
What is R?
R is a programming language. To use R, we need to install an Integrated Development Environment (IDE). Rstudio is the Best IDE available as it is user-friendly, open-source and is part of the Anaconda platform.
What is Anaconda?
Anaconda free open source is distributing both Python and R programming language. Anaconda is widely used in the scientific community and data scientist to carry out Machine Learning project or data analysis.
Why use Anaconda?
Anaconda will help you to manage all the libraries required for Python in RStudio, or R. Anaconda will install all the required libraries and IDE into one single folder to simplify package management. Otherwise, you would need to install them separately.
How to Install RStudio in Anaconda

How to Install RStudio in Anaconda for Mac
Below are the steps to install RStudio in Anaconda for Mac:
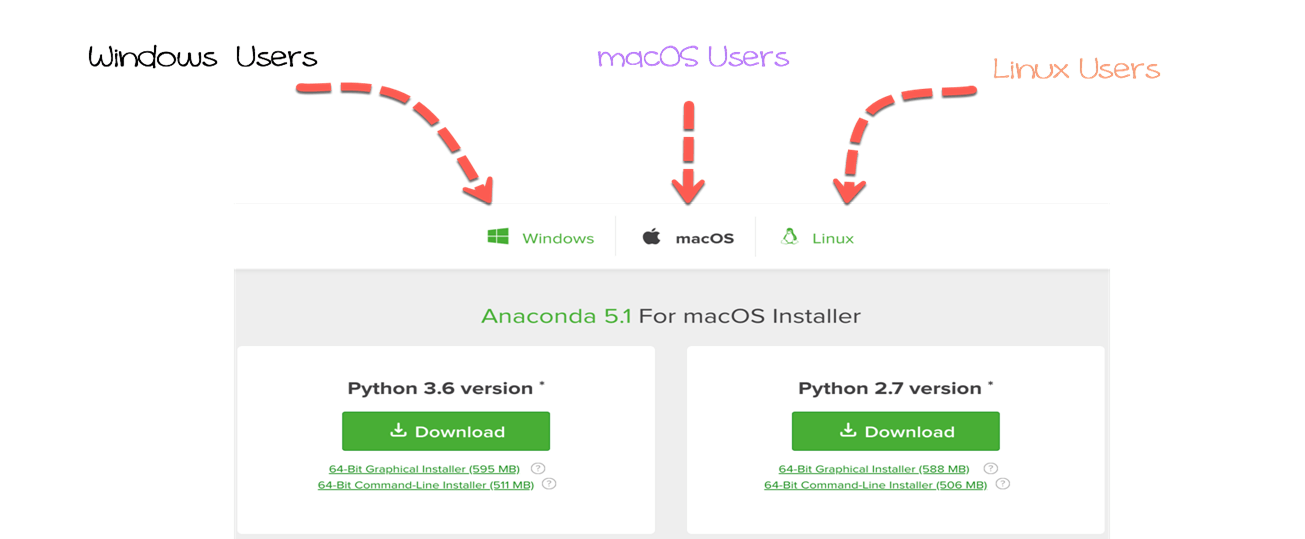
Step 1) Download Anaconda for Python 3.6 for your OS.
Go to https://www.anaconda.com/download/ and download Anaconda
By default, Chrome selects the downloading page of your system. In this tutorial, Anaconda install RStudio is done for Mac. If you run on Windows or Linux, download Anaconda 5.1 for Windows installer or Anaconda 5.1 for Linux installer.
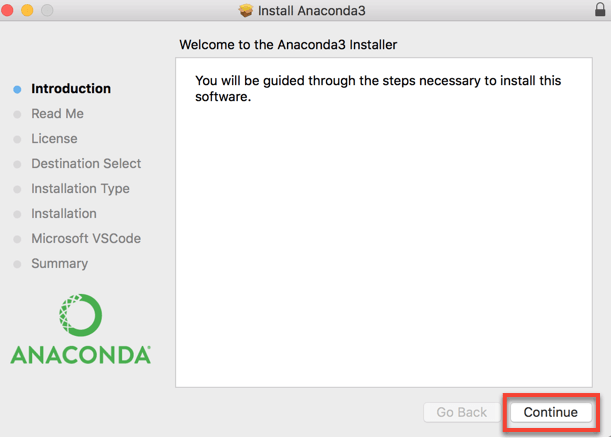
Step 2) Start Anaconda RStudio installation
You are now ready to install Anaconda RStudio. Double-click on the downloaded file to begin the installation. It is .dmg for mac and .exe for windows.You will be asked to confirm the installation. Click Continue button.

You are redirected to the Anaconda3 Installer.
Step 3) Continue with installation process
Next window displays the ReadMe. After you are done reading the document, click Continue

Step 4) Read the End User Agreement
This window shows the RStudio Anaconda End User License Agreement. Click Continue to agree.
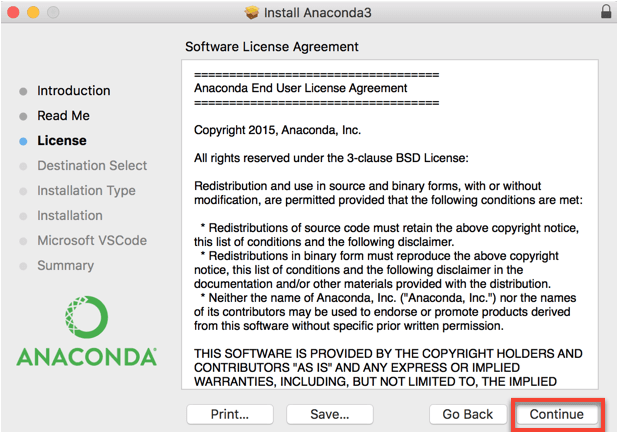
Step 5) Click on the Agree button
You are prompted to agree, click Agree to go to the next step.

Step 6) Locate the installation path
Click Change Install Location to set the location of Anaconda. By default, Anaconda is installed in the user environment: Users/YOURNAME/.

Select the destination by clicking on Install for me only. It means Anaconda will be accessible only to this user.

Step 7) Start installing Anaconda
You can install Conda in R now. Click Install to proceed. Anaconda takes around 2.5 GB on your hard drive.

A message box is prompt. You need to confirm by typing your password. Hit Install Software

It may take some time to Install Conda in R. It depends on your machine.

Step 8) Install VS Code if you want
Anaconda asks you if you want to install Microsoft VSCode. You can ignore it and hit Continue

Step 9) Finish the installation
The installation is completed. You can close the window.

You are asked if you want to move “Anaconda3” installer to the Trash. Click Move to Trash

You are done with the installation of Anaconda on a macOS system.
How to Install RStudio in Anaconda for Windows
Here are the steps to install RStudio in Anaconda for Windows:
Step 1) Open the downloaded exe and click Next

Step 2) Accept the License Agreement

Step 3) Select Just Me and click Next

Step 4) Select Destination Folder and Click Next

Step 5) Click Install in next Screen

Step 6) Installation will begin

Once done, Anaconda will be installed.
How to Install R
Install R on Mac
Here is a step by step process to install R on Mac:
Step 1) Anaconda uses the terminal to install libraries. The terminal is a quick way to install libraries. We need to be sure to point the installation toward the right path. In our case, we set the location of Anaconda to the Users/USERNAME/. We can confirm this by checking anaconda3 folder.
Open Computer and select Users, USERNAME and anaconda3. It confirms that we installed Anaconda on the right path. Now, let’s see how macOS write the path. Right-click, and then Get Info

Select the path Where and click Copy

Step 2) For Mac user:
- The shortest way is to use the Spotlight Search and write terminal.

The terminal sets the default working directory to Users/USERNAME. As you can see in the figure below, the path of anaconda3 and the working directory are identical. In macOS, the latest folder is shown before the $. For me, it is Thomas. The terminal will install all the libraries in this working directory.
If the path on the text editor does not match the working directory, you can change it by writing cd PATH in the terminal. PATH is the path you pasted in the text editor. Don’t forget to wrap the PATH with “PATH”. This action will change the working directory to PATH.

Step 4) We are ready to install R. I recommend you to install all packages and dependencies with the conda command in the terminal.
## In the terminalconda install r-essentials --yes
r-essentials means conda will install R and all the necessary libraries used by data scientist.

Conda is downloading the libraries
It takes some time to upload all the libraries. Be patient…you are all set.
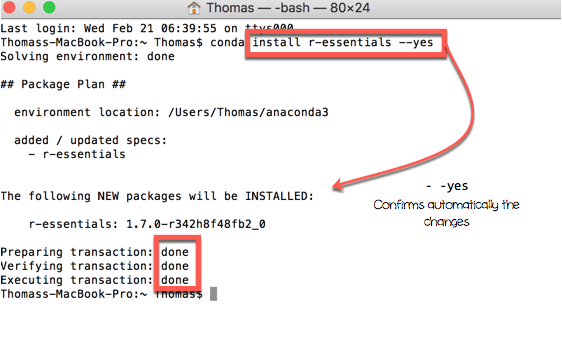
In the terminal, you should see Executing transaction: done. If so, you have successfully installed R.
You can check where R is located.

Install R on Windows
Following is a step by step process to install R on Windows:
Step 1) Open the Anaconda command prompt

Step 2) In the command prompt
- Enter the R install command
- Environment will be determined
- List of packages to be installed will be listed

Step 3) Enter y and hit the return key to start installation

Step 4) Installation will take time, and you will get done message.

How to Install RStudio
Mac User
In the terminal, write the following code to install RStudio Anaconda:
## In the terminalconda install -c r rstudio --yes
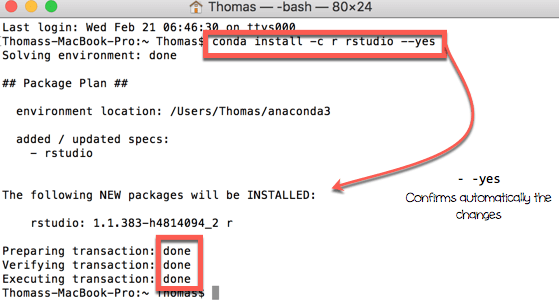
In the terminal, you should see Executing transaction: done. If so, you have successfully installed Rstudio.
You are all set now, congratulation!
Windows User
Step 1) Enter command to install RStudio on Anaconda prompt
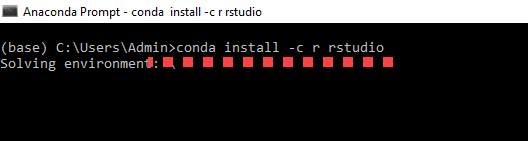
Step 2) You will be shown a list of packages that will be installed. Enter y

Step 3) R Studio will be installed

Warning
Avoid as much as you can to install RStudio Anaconda library using pip for Python, and R. Conda libraries gather a lot of packages, you don’t need to install RStudio on Anaconda prompt libraries outside of conda environment.
Run Rstudio
Directly run the command line from the terminal to open Rstudio. You open the terminal and write rstudio. You can also use Desktop Shortcut

Or

A new window will be opened with Rstudio.

Test
Open Rstudio from the terminal and open a script. Write the following command:
- ## In Rstudio summary(cars)
- Click Run
- Check Output

If you can see the summary statistics, it works. You can close Rstudio without saving the files.
Install package
Install package with anaconda is trivial. You go to your favorite browser, type the name of the library followed by anaconda r.

You choose the link that points to anaconda. You copy and paste the library into the terminal.

For instance, we need to install randomForest for the tutorial on random forest; we go https://anaconda.org/r/r-randomforest.

Run conda install -c r r-randomforest –yes from the terminal.

The installation is completed.
Note that Thorough this tutorial, you won’t need to install many libraries as the most used libraries came with the r-essential conda library. It includes ggplot for the graph and caret for the machine learning project.
Open a library
To run the R function randomForest(), we need to open the library containing the function. In the Rstudio script, we can write library(randomForest)
## In Rstudiolibrary(randomForest)
## randomForest 4.6-12
## Type rfNews() to see new features/changes/bug fixes.
Warning: Avoid as much as possible to open unnecessary packages. You might ended up creating conflicts between libraries.
Run R code
We have two ways to run codes in R
- We can run the codes inside the Console. Our data will be stored in the Global Environment but no history is recorded. We won’t be able to replicate the results once R is closed. We need to write the codes all over again. This method is not recommended if we want to replicate our save our codes

- Write the code in the script. We can write as many lines of codes as we want. To run the code, we simple select the rows we want to return. Finally, click on run. We can see the output in the Console. We can save our script and open it later. Our results won’t we lost.

Warning: In we point the cursor at the second row (i.e., slice_vector[1:5]), the Console displays an error. That’s, we didn’t run the line number 1.

Similarly, if we point the cursor to an empty row and click on run, R return an empty output.
