
Jupyter Notebook Tutorial: How to Install & use Jupyter?
 Editorial Team
⚡ Smart Summary
Jupyter Notebook is an open-source web application that combines live code, equations, visualizations and narrative text in one shareable document, and it runs equally well on a laptop or an AWS server.
What is Jupyter Notebook?
Jupyter Notebook is an open-source web application for writing and sharing live codes, equations, visualizations with rich text elements. It provides a convenient way to write paragraph, equations, titles, links and figures to run data analysis. It is also useful for sharing interactive algorithms with your audience for teaching or demonstrating purpose.
Introduction to Jupyter Notebook App
The Jupyter Notebook App is the interface where you can write your scripts and codes through your web browser. The app can be used locally, meaning you don’t need internet access, or a remote server.

Each computation is done via a kernel. A new kernel is created each time you launch a Jupyter Notebook.
Current installs ship Notebook 7, built on JupyterLab. jupyter notebook still works, and both read the same .ipynb file.
How to use Jupyter Notebook
In the session below, you will learn how to use Jupyter Notebook. You will write a simple line of code to get familiar with the environment of Jupyter.
Step 1) You add a folder inside the working directory that will contain all the notebooks you will create during the tutorials about TensorFlow.
If Jupyter is missing, run pip install notebook first, as the TensorFlow install guide does. Then open the Terminal and write
mkdir jupyter_tf
jupyter notebook
Code Explanation
- mkdir jupyter_tf: Create a folder named jupyter_tf
- jupyter notebook: Open Jupyter web-app

Step 2) You can see the new folder inside the environment. Click on the folder jupyter_tf.

Step 3) Inside this folder, you will create your first notebook. Click on the button New and Python 3.

Step 4) You are inside the Jupyter environment. So far, your notebook is called Untitled.ipynb. This is the default name given by Jupyter. Let’s rename it by clicking on File and Rename
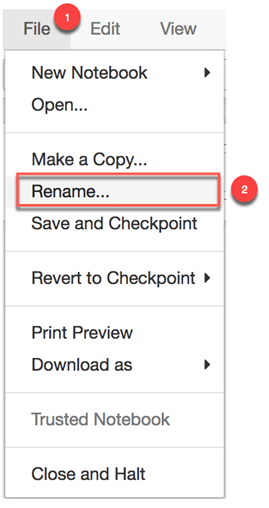
You can rename it Introduction_jupyter

Inside the Jupyter Notebook interface, you write code, annotation or text inside cells.

Inside a cell, you can write a single line of code.

or multiple lines. Jupyter reads the code one line after another.
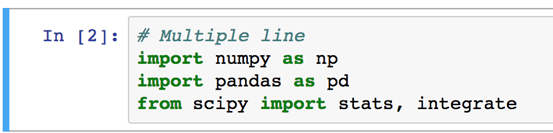
For instance, if you write following code inside a cell.
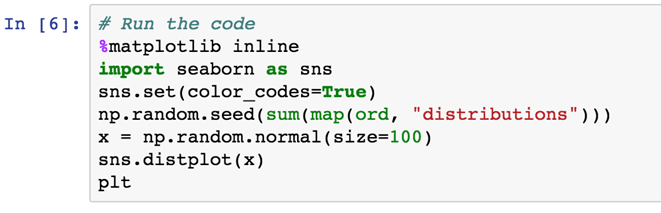
It will produce this output.

Step 5) You are ready to write your first line of code. You can notice the cell has two colors. The green color means you are in the editing mode.

The blue color, however, indicates you are in executing mode.

Your first line of code will print Guru99!. Inside the cell, you can write
print("Guru99!")
There are two ways to run a code in Jupyter:
- Click and Run
- Keyboard Shortcuts
To run the code, you can click on Cell and then Run Cells and Select Below

You can see the code is printed below the cell and a new cell has appeared right after the output.

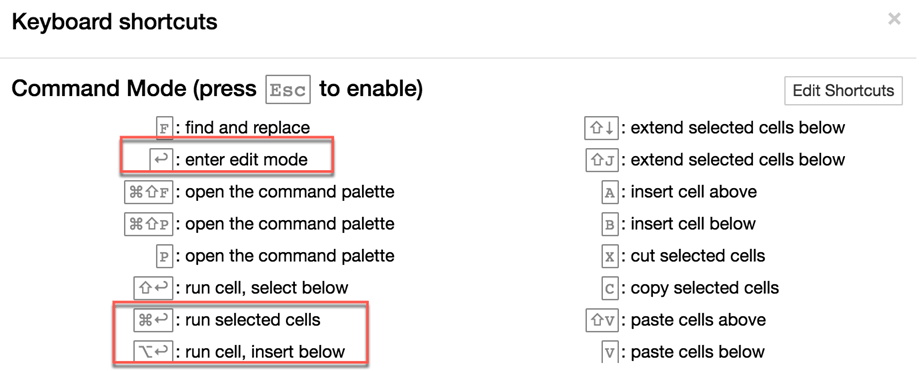
A faster way to run a code is to use the Keyboard Shortcuts. To access the Keyboard Shortcuts, go to Help and Keyboard Shortcuts

Below the list of shortcuts for a MacOS keyboard. You can edit the shortcuts in the editor.
Following are shortcuts for Windows
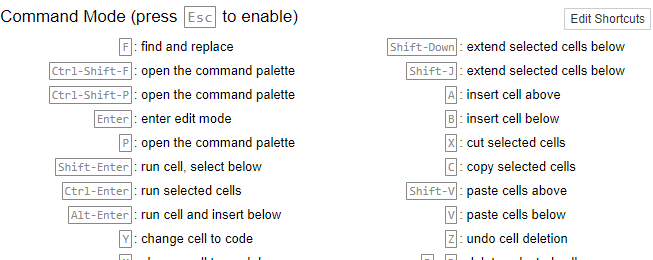
Write this line
print("Hello world!")
and try the keyboard shortcut. Alt+Enter executes the cell and inserts a new empty cell below.

Step 6) It is time to close the Notebook. Go to File and click on Close and Halt

Note: Jupyter automatically saves the notebook with checkpoint. If you have the following message:

It means Jupyter didn’t save the file since the last checkpoint. You can manually save the notebook

You will be redirected to the main panel. You can see your notebook has been saved a minute ago. You can safely logout.

Install Jupyter Notebook with AWS
When a dataset outgrows local memory, move the notebook to a cloud server. Below is a step by step process to install and run Jupyter Notebook on AWS:
If you do not have an account at AWS, create a free account here.
We will proceed as follow
- Part 1: Set up a key pair
- Part 2: Set up a security group
- Part 3: Launch instance
- Part 4: Install Docker
- Part 5: Install Jupyter
- Part 6: Close connection
Part 1: Set up a key pair
Step 1) Go to Services and find EC2

Step 2) In the panel and click on Key Pairs

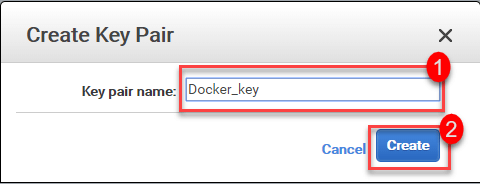
Step 3) Click Create Key Pair

- You can call it Docker key
- Click Create
A file named Docker_key.pem downloads.
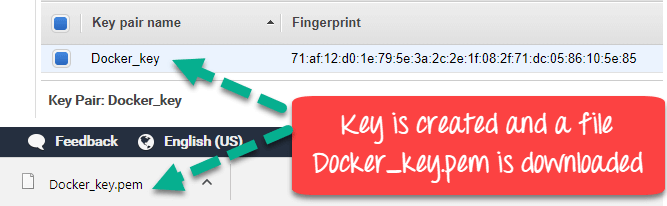
Step 4) Copy and paste it into the folder key. We will need it soon.
For Mac OS users only
This step concerns Mac OS users only. Windows and Linux users can jump ahead to Part 2.
You need to set a working directory that will contain the file key
First of all, create a folder named key. For us, it is located inside the main folder Docker. Then, you set this path as your working directory
mkdir Docker/key
cd Docker/key

Part 2: Set up a security group
Step 1) You need to configure a security group. You can access it with the panel

Step 2) Click on Create Security Group

Step 3) In the next Screen
- Enter the Security group name “jupyter_docker” and the description Security Group for Docker.
- Add the four inbound rules listed below:
- ssh: port range 22, source Anywhere
- http: port range 80, source Anywhere
- https: port range 443, source Anywhere
- Custom TCP: port range 8888, source Anywhere
- Click Create.

Step 4) The newly created Security Group will be listed

Part 3: Launch instance
You are finally ready to create the instance
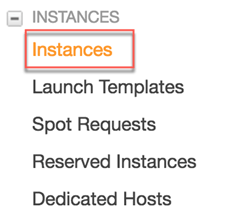
Step 1) Click on Launch Instance

The default server is enough. Choose the Amazon Linux AMI. Screenshots show image 2018.03.0; current consoles offer Amazon Linux 2023, so match labels, not pixels.
AMI stands for Amazon Machine Image. It contains the information required to start an instance that runs on a virtual server in the cloud.

Note that AWS has a server dedicated to deep learning such as:
- Deep Learning AMI (Ubuntu)
- Deep Learning AMI
- Deep Learning Base AMI (Ubuntu)
All of them come with recent binaries of deep learning frameworks pre-installed in separate virtual environments:
Each image is fully configured with NVIDIA CUDA, cuDNN and NCCL as well as Intel MKL-DNN.
Step 2) Choose t2.micro. It is a free tier server. AWS offers for free this virtual machine equipped with 1 vCPU and 1 GB of memory. This server provides a good tradeoff between computation, memory and network performance. It suits small and medium workloads.

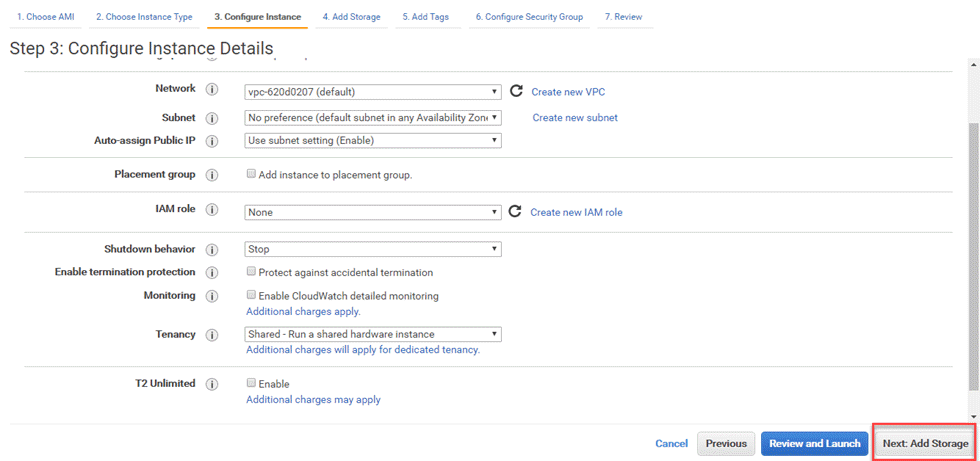
Step 3) Keep settings default in next screen and click Next: Add Storage
Step 4) Increase storage to 10GB and click Next
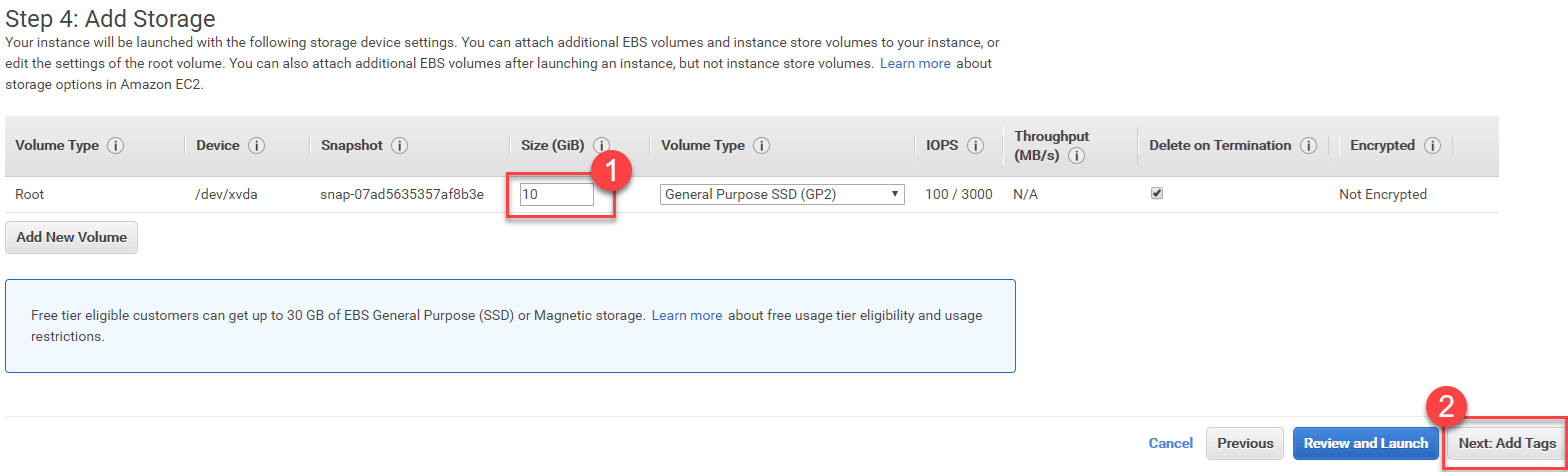
Step 5) Keep settings default and click Next: Configure Security Group

Step 6) Choose the security group you created before, which is jupyter_docker

Step 7) Review your settings and Click the launch button

Step 8) The last step is to link the key pair to the instance.

Step 9) Instance will launch

Step 10) Below is a summary of the instances currently in use. Note the public IP

Step 11) Click on Connect

You will find the connection details

Launch your instance (Mac OS users)
First, point the terminal working directory at the folder holding the key-pair file.
run the code
chmod 400 docker.pem
Open the connection with this code.
There are two commands. Sometimes the first one stops Jupyter opening the notebook.
In this case, use the second one to force the connection in Jupyter Notebook on EC2.
# If able to launch Jupyter
ssh -i "docker.pem" ec2-user@ec2-18-219-192-34.us-east-2.compute.amazonaws.com
# If not able to launch Jupyter
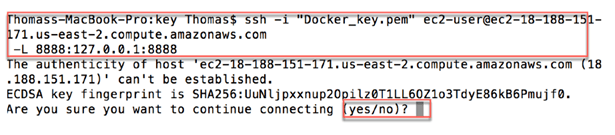
ssh -i "docker.pem" ec2-user@ec2-18-219-192-34.us-east-2.compute.amazonaws.com -L 8888:127.0.0.1:8888
The first time, you are prompted to accept the connection
Launch your instance (Windows users)
Step 1) Go to this website to download PuTTY and PuTTYgen PuTTY
You need to download
- PuTTY: launch the instance
- PuTTYgen: convert the pem file to ppk

Now that both programs are installed, you need to convert the .pem file to .ppk. PuTTY can only read .ppk. The pem file contains the unique key created by AWS.
Step 2) Open PuTTYgen and click on Load. Browse the folder where the .pem file is located.

Step 3) After you loaded the file, you should get a notice informing you that the key has been successfully imported. Click on OK
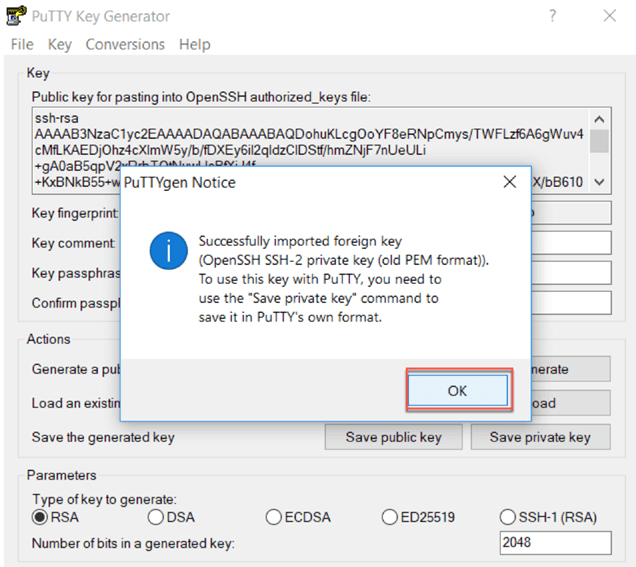
Step 4) Then click on Save private key. You are asked if you want to save this key without a passphrase. Click on yes.

Step 5) Save the Key

Step 6) Go to AWS and copy the public DNS

Open PuTTY and paste the Public DNS in the Host Name

Step 7)
- On the left panel, unfold SSH and open Auth
- Browse the Private Key. You should select the .ppk
- Click on Open.

Step 8)
When this step is done, a new window will be opened. Click Yes if you see this pop-up
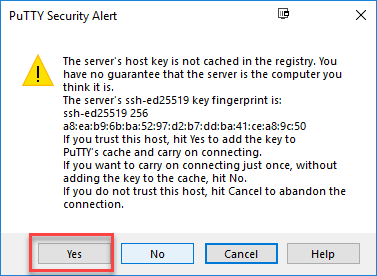
Step 9)
You need to login as: ec2-user

Step 10)
You are connected to the Amazon Linux AMI.

Part 4: Install Docker
The Docker tutorial covers the container vocabulary used below.
While you are connected to the server through PuTTY or Terminal, you can install the Docker engine.
Execute the following codes. On Amazon Linux 2023, use dnf for yum and systemctl start docker for service docker start.
sudo yum update -y
sudo yum install -y docker
sudo service docker start
sudo usermod -a -G docker ec2-user
exit
Launch again the connection
ssh -i "docker.pem" ec2-user@ec2-18-219-192-34.us-east-2.compute.amazonaws.com -L 8888:127.0.0.1:8888
Windows users reconnect with PuTTY exactly as described above.
Part 5: Install Jupyter
Step 1) Create the Jupyter container from a pre-built image:
## Tensorflow
docker run -v ~/work:/home/jovyan/work -d -p 8888:8888 jupyter/tensorflow-notebook
## Spark
docker run -v ~/work:/home/jovyan/work -d -p 8888:8888 jupyter/pyspark-notebook
Code Explanation
- docker run: Run the image
- v: attach a volume
- ~/work:/home/jovyan/work: Volume
- 8888:8888: port
- jupyter/datascience-notebook: Image
For other pre-built images, browse the Jupyter Docker Stacks repository. Since October 2023 these images ship on Quay.io, so pull quay.io/jupyter/tensorflow-notebook or quay.io/jupyter/pyspark-notebook for PySpark; the Docker Hub copies are frozen.
Let the container write into the mounted work folder so notebooks survive a restart:
sudo chown 1000 ~/work
Step 2) Install tree so you can inspect the working directory:
sudo yum install -y tree

Step 3) Check the container and its name
Run the commands below in order:
- List the running containers:
docker ps
- Read the container log for the Jupyter URL. Here the container is named vigilant_easley:
docker logs vigilant_easley
- Copy the URL, with its token, from the log.

Step 4) In the URL from the log, replace the host (90a3c09282d6 or 127.0.0.1) with your instance public DNS:
http://(90a3c09282d6 or 127.0.0.1):8888/?token=f460f1e79ab74c382b19f90fe3fd55f9f99c5222365eceed

Step 5) The new URL becomes,
http://ec2-174-129-135-16.compute-1.amazonaws.com:8888/?token=f460f1e79ab74c382b19f90fe3fd55f9f99c5222365eceed
Step 6) Copy and paste the URL into your browser.
Jupyter Opens

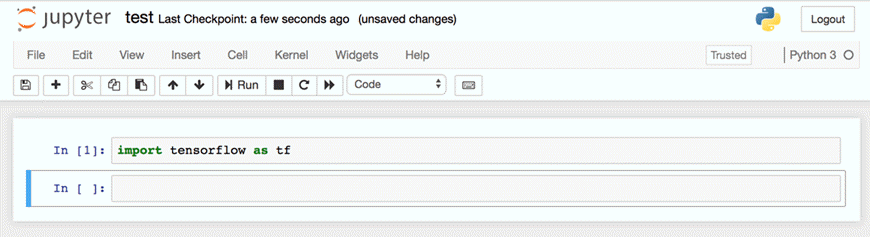
Step 7) You can now create a new notebook inside your work folder.
Part 6: Close connection
Close the connection in the terminal
exit
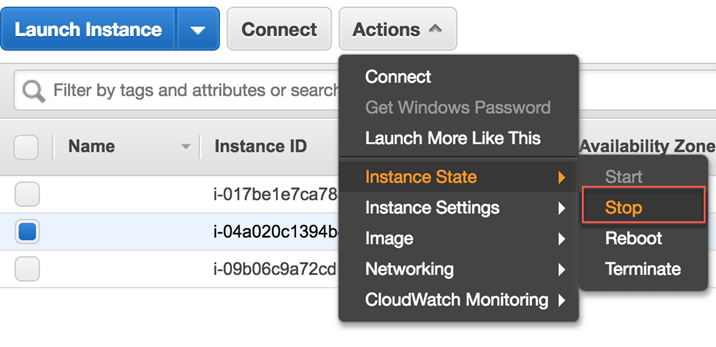
Go back to AWS and stop the server.
Troubleshooting
If Docker does not work, rebuild the image using
docker run -v ~/work:/home/jovyan/work -d -p 8888:8888 jupyter/tensorflow-notebook
