
REST API Testing Tutorial: Sample Manual Test Cases
 Editorial Team
⚡ Smart Summary
REST API Testing validates RESTful web services by sending HTTP requests such as GET, POST, PUT, and DELETE, then verifying the status code, response headers, and payload returned by the server.

What is REST API Testing?
REST API Testing is an open-source web automation testing technique that is used for testing RESTful APIs for web applications. The purpose of REST API testing is to record the response of the REST API by sending various HTTP/S requests to check if the REST API is working fine or not. REST API testing is done by GET, POST, PUT and DELETE methods.
REST stands for Representational State Transfer. It is an architectural style and an approach for communication used in the development of Web Services. REST has become a logical choice for building APIs, because it enables users to connect and interact with cloud services efficiently.
An API, or Application Programming Interface, is a set of programming instructions for accessing a web-based software application. In other words, it is a set of commands used by one program to communicate with another directly and use each other’s functions to get information.
For example, a Google website can have an API for search, translations, and calendars. In general, APIs look like the example below, with a server name, paths, and parameters.
http://<server name>/v1/export/Publisher/Standard_Publisher_Report?format=csv



But why invest testing effort at this layer at all?
Why REST API Testing Matters
A REST API sits between the user interface and the database, which makes it the layer where most business logic actually lives. A defect in a pricing rule or a permission check surfaces in the API response long before anyone spots a wrong number on a screen, so testing here catches problems earlier and closer to their cause.
Speed is the second reason. A request completes in milliseconds and needs no browser, no rendering engine, and no fragile element locators. A tester can exercise dozens of endpoints in the time one interface test takes to load a page, and the same request behaves identically whether the front end is a website, a mobile app, or a partner integration.
Stability is the third reason. Layouts change constantly, but a published REST contract is expected to stay steady. Tests written against that contract survive redesigns, so they protect the parts of the product that other teams actually build on.
Types of API Methods
There are mainly 4 types of API Testing methods: GET, POST, DELETE, and PUT.
- GET– The GET method is used to extract information from the given server using a given URI. While using a GET request, it should only extract data and should have no other effect on the data.
- POST– A POST request is used to create a new entity. It can also be used to send data to the server, for example, customer information, file upload, etc. using HTML forms.
- PUT– Create a new entity or update an existing one.
- DELETE– Removes all current representations of the target resource given by a URI.
How to Test REST API
REST API testing requires an application to interact with a sample API for testing. To test an API, you require two things:
- Testing Tool/Framework to drive the API
- Writing down your own code to test the sample REST API
REST API test cases can be tested with tools like:
- Advanced Rest Client
- Postman-Rest Client
- Curl in Linux
Here we will be using Advanced Rest Client. Below are the steps to get Advanced Rest Client.
How to Get Advanced Rest Client?
- Go to Google Chrome’s Web Store
- Search for “Advanced Rest Client” or directly go here and Install the extension
- Select the “Advanced Rest Client” icon under chrome’s app section – chrome://apps/
The Web Store listing appears as shown below.

Once the installation is done, follow the test below for testing a RESTful API.
Steps for Testing REST API
Here we are using the REST client extension in the Chrome browser. To understand it in a clear way, we are using a dummy API for testing:
http://ip.jsontest.com/
Step 1) Open Advanced REST client
Launch the app Advanced REST client (ARC), once it is installed successfully.
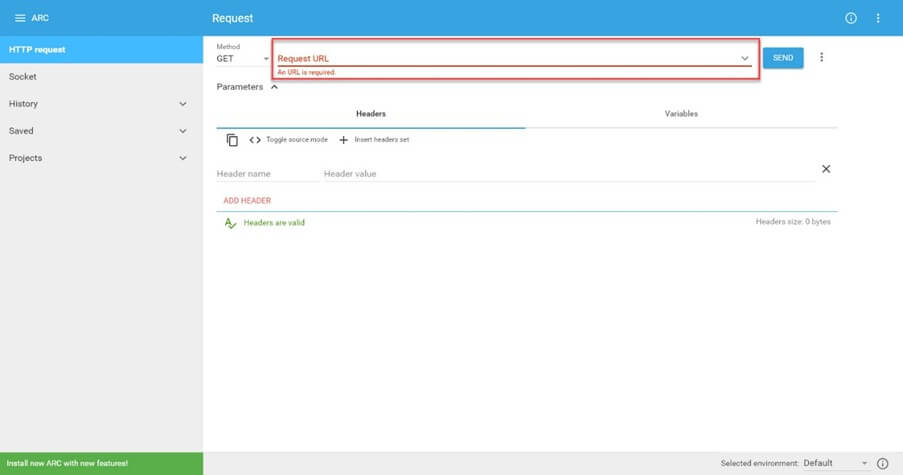
Step 2) Enter the URL of API to test
Enter the sample REST API URL for testing in the URL textbox.

Step 3) Select the HTTP method
Select the method for the type of HTTP methods in API testing to hit- e.g. POST

Step 4) Provide Headers set
Provide Headers Set, in the Headers textbox. Click on Insert header set.

Step 5) Confirm the Headers set
Next Click on USE THIS SET.

Step 6) Provide required Body content
- Now switch to Body Tab.
- Set the required Body content type and Editor view e.g. Body content type : application/json
- Editor view : Raw input.
- Under Payload, pass the request body of the demo API for testing in the form of key-value pairs, for example {“key1″:”value1″,”key2″:”value2”}. If it is a POST API, then we need to pass a body or parameters. We will pass it under the given payload.
{"property" : ["Sites"], "report_type" : ["ALL"]}

⚠️ Warning: A Content-Type of application/json with a payload that is not valid JSON returns 400 Bad Request.
Step 7) Submit the details to start the test
- Hit the send button.
- You can click on DETAILS button to see the Response headers.

Here are the response details:

The response still has to be judged against an expected result.
Validating the Results
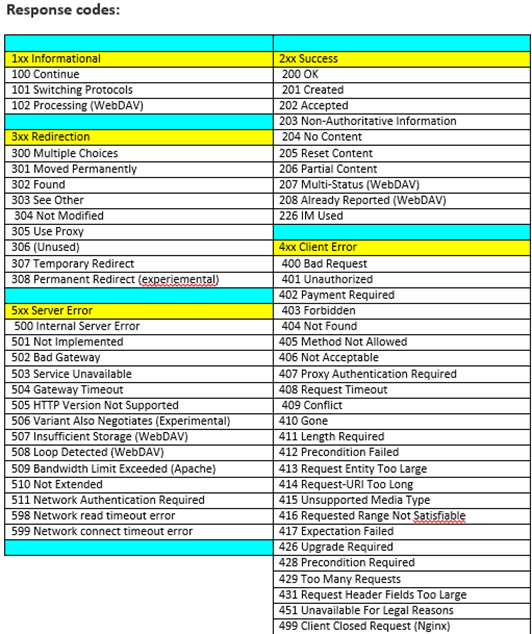
Mainly, for Web API Testing, we need to check the response code, the response message, and the response body.
Response codes fall into five families:
| Family | Category | Meaning |
|---|---|---|
| 1xx | Informational | Received, still processing |
| 2xx | Success | Completed; 200 OK, 201 Created |
| 3xx | Redirection | A further action is required |
| 4xx | Client Error | Bad payload, token, or resource |
| 5xx | Server Error | Valid request, server failed |
Below are the response codes one might encounter.
One request proves the endpoint works. A suite proves it keeps working.
REST API Test Cases You Must Cover
A useful REST API suite spreads across several categories instead of repeating the same happy-path call with different data:
- Happy path: Send a valid request to each endpoint and confirm the status code, the schema, and every field value.
- Negative cases: Send malformed JSON, an unsupported method, and a missing resource ID, then expect 400, 405, and 404 rather than 500.
- Boundary values: If a field accepts 1 to 200 characters, test 0, 1, 200, and 201. Validation rules break at the edges.
- Special characters: Push accented letters, emoji, quotes, and multi-byte text through every field to expose encoding faults.
- Contract checks: Compare the response against the published OpenAPI or Swagger specification so undocumented changes are caught early.
- Sequencing: Call endpoints in a realistic order, such as POST then GET then DELETE, because state carries between calls.
- Performance sanity: Record response times on every run and flag any endpoint that drifts past the threshold agreed with the team.
REST API Test Tool
Different tools suit different stages of testing.
| Tool | Type | Best for |
|---|---|---|
| Advanced Rest Client | Desktop client | Quick manual calls |
| Postman | Desktop client | Collections and team workspaces |
| JMeter | Load testing | Response times under load |
| SoapUI | Functional testing | REST and SOAP together |
| REST Assured | Java library | Automating stable cases |
| cURL | Command line | Pasting calls into bug reports |
See the roundup of API testing tools.
Most real endpoints refuse to answer until the request proves who sent it.
REST API Authentication and Security Checks
Public demo endpoints answer anyone, but a production REST API sits behind an authentication scheme, and an authorisation flaw is far more damaging than a wrong field value. First identify the mechanism: a static API key, HTTP Basic credentials, an OAuth 2.0 bearer token, or a signed JSON Web Token.
Once an authenticated request succeeds, work through the failure paths deliberately:
- No credentials: remove the Authorization header. Expect 401 Unauthorized and no record data in the body.
- Malformed credentials: corrupt one character of the token. Expect 401 again, with a message that does not explain why.
- Expired credentials: reuse a token past its expiry. Confirm it is rejected rather than honoured, a common clock-skew defect.
- Wrong privilege level: authenticate as a low-privilege user and call an administrator-only endpoint. Expect 403 Forbidden, not 200.
- Another user’s record: change the ID so user A requests user B’s data. Success here is a serious access-control defect.
Finally, confirm every call travels over HTTPS, that failed responses leak no stack traces or version banners, and that rapid repeats trigger 429 Too Many Requests.
REST API testing also brings difficulties that interface testing does not.
Challenges for API Testing
The interesting problems for testers while REST API testing are:
- To make sure that the test harness varies the parameters of the API calls in such a way that it verifies the functionality as well as exposes the failures. It includes exploring boundary conditions and assigning common parameters
- Creating interesting parameter value combinations for calls with two or more parameters
- Identifying the content under which the API calls have to be made. This might include setting external environment conditions (peripheral devices, files, etc.) as well as internally stored data that affects the API
- Sequencing API calls as per the order in which the function will be executed
- To make the API produce useful results from successive calls.
