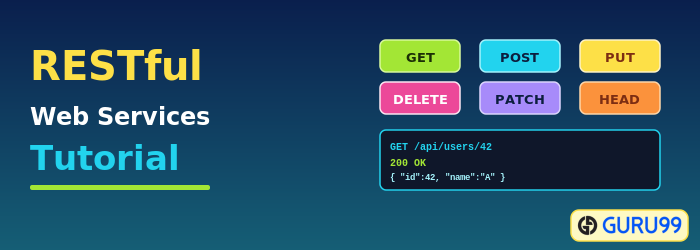
RESTful Web Services Tutorial: REST API Example
⚡ Smart Summary
RESTful Web Services provide a lightweight, stateless approach for applications to exchange data over HTTP using standard verbs. They expose resources through clean URLs, enabling scalable, platform-independent communication between distributed clients, servers, mobile devices, and modern cloud and AI platforms.
What is Restful Web Services?
Restful Web Services is a lightweight, maintainable, and scalable service that is built on the REST architecture. A Restful Web Service exposes an API from your application in a secure, uniform, stateless manner to the calling client. The calling client can then perform predefined operations using the Restful service. The underlying protocol for REST is HTTP, and REST stands for REpresentational State Transfer.
In simple terms, REST defines a standard way for resources, such as documents, images, or database records, to be created, read, updated, and deleted over the web. Because it relies on plain HTTP, almost any programming language or device can consume a RESTful service without special tooling.
Why Use Restful Web Services?
Before exploring the technical details, it helps to understand why REST became so popular. RESTful Web Services rose to prominence for the following reasons:
1. Heterogeneous languages and environments – This is one of the fundamental reasons, which is the same as we have seen for SOAP as well.
- It enables web applications that are built on various programming languages to communicate with each other.
- With the help of Restful services, these web applications can reside in different environments; some could be on Windows, and others could be on Linux.
In the end, no matter what the environment is, the result should always be the same: the applications should be able to talk to each other. Restful web services offer this flexibility to applications built on various programming languages and platforms.
The picture below gives an example of a web application that has a requirement to talk to other applications such as Facebook, Twitter, and Google.
If a client application had to work with sites such as Facebook and Twitter, the developers would ordinarily need to know what language and platform those sites were built on. Based on that, they could write the interfacing code, but this approach could prove to be a nightmare to maintain.
Instead, Facebook, Twitter, and Google expose their functionality in the form of Restful web services. This allows any client application to call these web services via REST, regardless of the underlying technology.

2. The event of Devices – Nowadays, everything needs to work on Mobile devices, whether it be a mobile phone, a notebook, or even a car system.
Imagine the amount of effort required to code applications on these devices to talk to normal web applications. Again, Restful APIs make this job simpler because, as mentioned in point one, you really do not need to know the underlying layer of the device.
3. The event of the Cloud – Everything is moving to the cloud. Applications are slowly moving to cloud-based systems such as Azure or Amazon. Azure and Amazon provide many APIs based on the Restful architecture. Hence, applications now need to be developed in such a way that they are compatible with the cloud. Since all cloud-based architectures work on the REST principle, it makes sense for web services to be programmed on a REST-based architecture to make the best use of cloud services.
RESTful Key Elements
REST web services have come a long way since their inception. In 2002, the Web consortium released the definition of WSDL and SOAP web services. This formed the standard of how web services were implemented.
In 2004, the web consortium also released the definition of an additional standard called RESTful. Over the past several years, this standard has become quite popular and is now used by many of the most popular websites around the world, including Facebook and Twitter.
REST is a way to access resources that lie in a particular environment. For example, you could have a server that hosts important documents, pictures, or videos. All of these are examples of resources. If a client, such as a web browser, needs any of these resources, it has to send a request to the server. REST services define a standard way in which these resources can be accessed.
The key elements of a RESTful implementation are as follows:
- Resources – The first key element is the resource itself. Let us assume that a web application on a server has records of several employees. Let’s assume the URL of the web application is https://demo.guru99.com. Now, in order to access an employee record resource via REST services, one can issue the command https://demo.guru99.com/employee/1. This command tells the web server to provide the details of the employee whose employee number is 1.
- Request Verbs – These describe what you want to do with the resource. A browser issues a GET verb to instruct the endpoint that it wants to get data. However, there are many other verbs available, including POST, PUT, and DELETE. So, in the case of the example https://demo.guru99.com/employee/1, the web browser is actually issuing a GET verb because it wants to get the details of the employee record.
- Request Headers – These are additional instructions sent with the request. They might define the type of response required or the authorization details.
- Request Body – This is the data sent with the request. Data is normally sent in the request body when a POST request is made to the REST web service. In a POST call, the client tells the REST web service that it wants to add a resource to the server. Hence, the request body would have the details of the resource that needs to be added.
- Response Body – This is the main body of the response. So, in our RESTful API example, if we were to query the web server via the request https://demo.guru99.com/employee/1, the web server might return an XML document with all the details of the employee in the response body.
- Response Status codes – These are the general codes returned along with the response from the web server. An example is the code 200, which is normally returned when there is no error while returning a response to the client.
Restful Methods
The diagram below shows most of the verbs (POST, GET, PUT, and DELETE) and a REST API example of what they would mean.
Let’s assume that we have a RESTful web service defined at the location https://demo.guru99.com/employee. When the client makes any request to this web service, it can specify any of the normal HTTP verbs of GET, POST, DELETE, and PUT. Below is what would happen if the respective verbs were sent by the client.
- POST – This would be used to create a new employee using the RESTful web service.
- GET – This would be used to get a list of all employees using the RESTful web service.
- PUT – This would be used to update all employees using the RESTful web service.
- DELETE – This would be used to delete all employees using the RESTful service.
Now let’s take a look from the perspective of just a single record. Let’s say there was an employee record with the employee number of 1. The following actions would have their respective meanings.
- POST – This would not be applicable, since we are fetching data of employee 1, which is already created.
- GET – This would be used to get the details of the employee with employee number 1 using the RESTful web service.
- PUT – This would be used to update the details of the employee with employee number 1 using the RESTful web service.
- DELETE – This is used to delete the details of the employee with employee number 1.

Restful Architecture
An application or architecture considered RESTful or REST-style has the following characteristics.
1. State and functionality are divided into distributed resources – This means that every resource should be accessible via the normal HTTP commands of GET, POST, PUT, or DELETE. So, if someone wanted to get a file from a server, they should be able to issue the GET request and get the file. If they want to put a file on the server, they should be able to issue either the POST or PUT request. Finally, if they wanted to delete a file from the server, they can issue the DELETE request.
2. The architecture is client/server, stateless, layered, and supports caching.
- Client-server is the typical architecture where the server can be the web server hosting the application, and the client can be as simple as the web browser.
- Stateless means that the state of the application is not maintained in REST. For example, if you delete a resource from a server using the DELETE command, you cannot expect that delete information to be passed to the next request.
In order to ensure that the resource is deleted, you would need to issue the GET request. The GET request would be used to first get all the resources on the server, after which one would need to see if the resource was actually deleted.
RESTFul Principles and Constraints
The REST architecture is based on a few characteristics, which are elaborated below. Any RESTful web service has to comply with the characteristics below in order for it to be called RESTful. These characteristics are also known as design principles that need to be followed when working with RESTful-based services.
- RESTFul Client-Server


This is the most fundamental requirement of a REST-based architecture. It means that the server will have a RESTful web service that provides the required functionality to the client. The client sends a request to the web service on the server. The server then either rejects the request or complies and provides an adequate response to the client.
- Stateless
The concept of stateless means that it is up to the client to ensure that all the required information is provided to the server. This is required so that the server can process the response appropriately. The server should not maintain any sort of information between requests from the client. It is a very simple, independent question-answer sequence. The client asks a question, and the server answers it appropriately. When the client asks another question, the server will not remember the previous question-answer scenario and will need to answer the new question independently.
- Cache

The cache concept helps with the problem of statelessness described in the last point. Since each server-client request is independent in nature, sometimes the client might ask the server for the same request again, even though it has already asked for it in the past. This request will go to the server, and the server will give a response, which increases the traffic across the network. The cache is a concept implemented on the client to store requests that have already been sent to the server. So, if the same request is given by the client, instead of going to the server, it would go to the cache and get the required information. This saves the amount of back-and-forth network traffic from the client to the server.
- Layered System
The concept of a layered system is that any additional layer, such as a middleware layer, can be inserted between the client and the actual server hosting the RESTFul web service. (The middleware layer is where all the business logic is created. This can be an extra service that the client interacts with before it makes a call to the web service.) But the introduction of this layer needs to be transparent so that it does not disturb the interaction between the client and the server.
- Interface/Uniform Contract
This is the underlying technique of how RESTful web services should work. RESTful basically works on the HTTP web layer and uses the key verbs below to work with resources on the server.
- POST – To create a resource on the server.
- GET – To retrieve a resource from the server.
- PUT – To change the state of a resource or to update it.
- DELETE – To remove or delete a resource from the server.
REST vs SOAP: Key Differences
Developers often weigh REST against SOAP when designing a web service. Both allow distributed applications to communicate, but they differ sharply in philosophy. REST is an architectural style that uses simple HTTP verbs and lightweight formats such as JSON, while SOAP is a strict protocol that relies on XML envelopes and a formal contract. The table below summarizes the most important distinctions.
| Aspect | REST | SOAP |
|---|---|---|
| Type | Architectural style | Strict protocol |
| Data format | JSON, XML, plain text, HTML | XML only |
| Transport | HTTP only | HTTP, SMTP, TCP, and others |
| State | Stateless | Stateless or stateful |
| Performance | Faster and lighter | Heavier due to XML overhead |
| Best for | Web, mobile, and public APIs | Enterprise apps needing strict security |
In practice, REST is the default choice for public web and mobile APIs because it is faster and easier to consume, while SOAP remains useful for enterprise systems that demand built-in security and formal contracts.
Create your first Restful web service in ASP.NET
Now, in this REST API tutorial, we will learn how to create a Restful web service in ASP.NET.
Web services can be created in a variety of languages, and many integrated development environments can be used to create REST-based services.
In this RESTful API example, we are going to create our REST application in .NET using Visual Studio. We are going to have a Restful web service that will work on the set of data below.
The set of data below represents a REST API example of a company that exposes the tutorials they have based on the Tutorialid.
| Tutorialid | TutorialName |
|---|---|
| 0 | Arrays |
| 1 | Queues |
| 2 | Stacks |
In our REST API tutorial example, we are going to implement the Restful verbs below.
- GET Tutorial – When a client invokes this Restful API, they will be given the entire set of tutorials available from the web service.
- GET Tutorial/Tutorialid – When a client invokes this Restful API, they will be given the tutorial name based on the Tutorialid sent by the client.
- POST Tutorial/Tutorialname – When a client invokes this Restful API, the client will submit a request to insert a Tutorialname. The web service will then add the submitted tutorial name to the collection.
- DELETE Tutorial/Tutorialid – When a client invokes this Restful API, the client will submit a request to delete a Tutorialname based on the Tutorialid. The web service will then delete the submitted tutorial name from the collection.
Let’s follow the steps below to create our first RESTful web service, which carries out the above implementation.
How to Create Your First Restful Web Service
Step 1) Create a new project.
The first step is to create an empty Asp.Net web application. From Visual Studio 2013, click on the menu option File->New project.

Once you click on the New Project option, Visual Studio will give you another dialog box for choosing the type of project and entering the necessary details. This is explained in the next step.
Step 2) Enter the project name and location.
- Ensure that you first choose the C# web template of the ASP.NET web application. The project has to be of this type in order to create a web services project. By choosing this option, Visual Studio will carry out the necessary steps to add the required files for any web-based application.
- Give a name for your project, which in our case is “Webservice.REST”.
- Then ensure that you give a location where the project files will be stored.
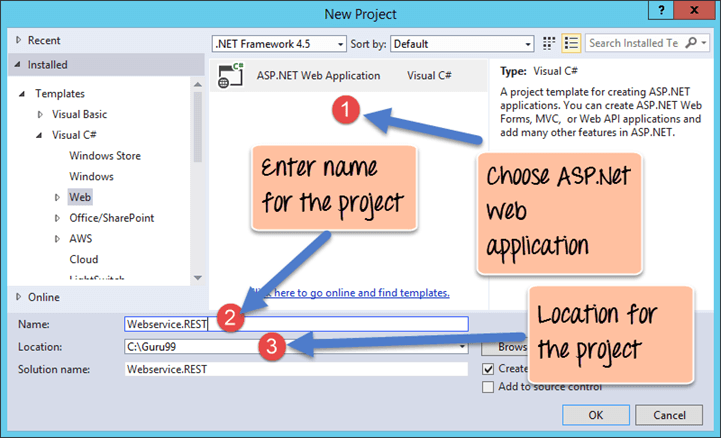
Once done, you will see the project file created in your solution explorer in Visual Studio 2013.

Step 3) Create the web service file.
The next step is to create the web service file that is going to hold the RESTful web service.
- First, right-click on the project file as shown below.

- In this step,
- Right-click on the project file.
- Choose the option “Add->New item.”
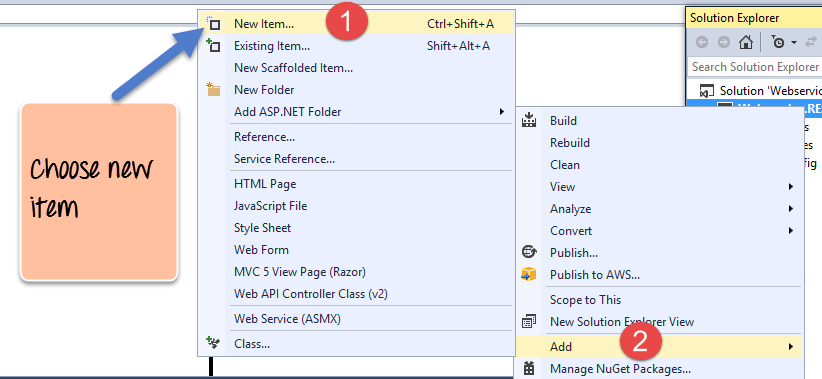
In the dialog box that appears, you need to perform the following.
- Choose the option WCF Service (Ajax-enabled). Choosing a file of this type causes Visual Studio to add some basic code that helps you create a RESTful web service. WCF stands for Windows Communication Foundation. WCF is a library for applications of various platforms (or the same platform) to communicate over various protocols such as TCP, HTTP, and HTTPS. Ajax is Asynchronous JavaScript and XML. AJAX allows web pages to be updated asynchronously by exchanging small amounts of data with the server behind the scenes.
- Next, give a name for the service, which is TutorialService in our case.
- Finally, click the Add button to add the service to the solution.

Step 4) Make a configuration.
The next step is to make a configuration change to enable this project to work with RESTful web services. This requires a change to the file called Web.config. This file appears in the same window as the Webservice project file. The file Web.config contains all the configurations that make the web application work as it should. The change being made allows the application to send and receive data as a pure RESTful web service.
- Click on the Web.config file to open the code.

- Find the line <enableWebScript>.

- Change the line to <webHttp>.

Step 5) Add our code for implementation.
The next step is to add our code for implementation. All of the code below has to be written in the TutorialService.svc file.
- The first bit is to add code to represent our data, which will be used in our program. So we are going to have a list of string variables with values of “Arrays”, “Queues”, and “Stacks”. This will represent the tutorial names available through our hosting web service.
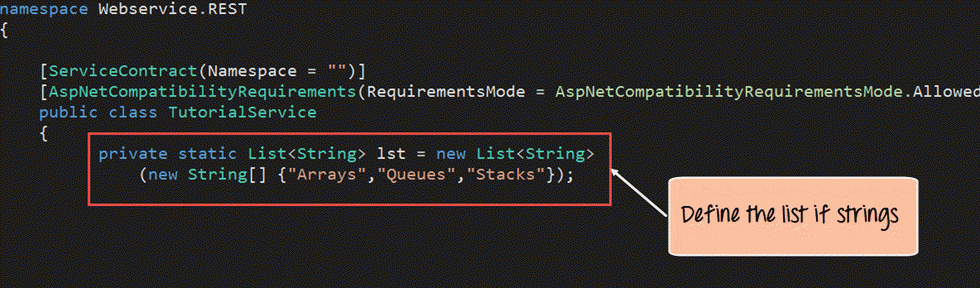
namespace Webservice.REST
{
[ServiceContract(Namespace = "")]
[AspNetCompatibilityRequirements(RequirementsMode = AspNetCompatibilityRequirementsMode.Allowed)]
public class TutorialService
{
private static List<String> lst = new List<String>
(new String[] {"Arrays","Queues","Stacks"});
Step 6) Define the code for our GET method.
Next, we will define the code for our GET method. This code will also reside in the same TutorialService.svc file. This code will run whenever we call the service from our browser.
The method below will be used to fulfill the scenario below.
- If a user wants a list of all tutorials available, then the code below would need to be written to accomplish this.

[WebGet(UriTemplate = "/Tutorial")]

public String GetAllTutorial()
{
    int count = lst.Count;
    String TutorialList = "";
    for (int i = 0; i < count; i++)
        TutorialList = TutorialList + lst[i] + ",";
    return TutorialList;
}
Code Explanation:-
- The first line of code is the most important. It is used to define how we can call this method via a URL. So, if the link to our web service is http://localhost:52645/TutorialService.svc and we append ‘/Tutorial’ to the URL, as in http://localhost:52645/TutorialService.svc/Tutorial, the above code will be invoked. The ‘WebGet’ attribute is a parameter that allows this method to be a RESTful method so that it can be invoked via the GET verb.
- This section of code is used to go through our list of strings in the ‘lst’ variable and return all of them to the calling program.
Step 7) Return the output.
The code below ensures that if a GET call is made to the Tutorial service with a Tutorial id, it would return the corresponding tutorial name based on the Tutorial id.

[WebGet(UriTemplate = "/Tutorial/{Tutorialid}")]

public String GetTutorialbyID(String Tutorialid)
{
    int pid;
    Int32.TryParse(Tutorialid, out pid);
    return lst[pid];
}
Code Explanation:-
- The first line of code is the most important. It defines how we can call this method via a URL. So, if the link to our web service is http://localhost:52645/TutorialService.svc and we append ‘/Tutorial/{Tutorialid}’ to the URL, we would be able to call the web service as http://localhost:52645/TutorialService.svc/Tutorial/1, for example. The web service would then return the tutorial name that had the Tutorial id of 1.
- This section of code is used to return the tutorial name that has the Tutorial id passed to the web method.
- By default, what needs to be remembered is that whatever is passed to the URL in the browser is a string.
- But you have to remember that the index to our list has to be an integer, so we are adding the necessary code to first convert the Tutorialid to an integer.
- We then use it to access the index position in our list and return the value to the calling program accordingly.
Step 8) Write the code for the POST method.
The next step is to write the code for our POST method. This method will be invoked whenever we want to add a string value to our list of tutorials via the POST method. For example, if you wanted to add the tutorial name “Software Testing”, then you would need to use the POST method.

[WebInvoke(Method = "POST", RequestFormat = WebMessageFormat.Json,
ResponseFormat = WebMessageFormat.Json, BodyStyle = WebMessageBodyStyle.Wrapped,
UriTemplate = "/Tutorial/{str}")]

public void AddTutorial(String str)
{
    lst.Add(str);
}
Code Explanation:-
- The first line is the ‘WebInvoke’ attribute, which has been attached to our method. This allows the method to be invoked via the POST call. The RequestFormat and ResponseFormat attributes have to be mentioned as JSON, since when posting values to a RESTFul web service, the values have to be in this format.
- The second line of code is used to add the string value passed via the POST call to our existing list of tutorial strings.
Step 9) Add a method to handle the DELETE operation.
Finally, we are going to add our method to handle the DELETE operation. This method will be invoked whenever we want to delete an existing string value from our list of tutorials via the DELETE method.

[WebInvoke(Method = "DELETE", RequestFormat = WebMessageFormat.Json,
UriTemplate = "/Tutorial/{Tutorialid}", ResponseFormat = WebMessageFormat.Json,
BodyStyle = WebMessageBodyStyle.Wrapped)]

public void DeleteTutorial(String Tutorialid)
{
    int pid;
    Int32.TryParse(Tutorialid, out pid);
    lst.RemoveAt(pid);
}
Code Explanation:-
- The first line is the ‘WebInvoke’ attribute, which has been attached to our method. This allows the method to be invoked via the DELETE call. The RequestFormat and ResponseFormat attributes have to be mentioned as JSON, since the values have to be in this format. Note that the Method parameter is being set to “DELETE.” This means that whenever we issue the DELETE verb, this method will be invoked.
- The second line of code is used to take the Tutorialid sent via the DELETE call and subsequently delete that id from our list. (The Int32 function in the code is used to convert the Tutorial id from a string variable to an integer.)
Running your first Restful web service
Now that we have created our entire web service in the section above, let’s see how we can run the Tutorial service so that it can be invoked from any client.
To run the web service, please follow the steps below.
Step 1) Right-click on the project file – Webservice.REST.

Step 2) Choose the menu option ‘Set as StartUp Project’. This will ensure that this project is run when Visual Studio runs the entire solution.

Step 3) The next step is to run the project itself. Depending on the default browser installed on the system, the appropriate browser name will appear next to the run button in Visual Studio. In our case, we have Google Chrome showing up. Just click on this button.

Output:-
When the project is run, you can browse to your TutorialService.svc/Tutorial section, and you will get the output below.

In the output above,
- You can see that the browser is invoking the ‘GET’ verb and executing the ‘GetAllTutorial’ method in the web service. This module is used to display all the tutorials exposed by our web service.
Testing your first Restful web service
In the section above, we have already seen how to use the browser to execute the ‘GET’ verb and invoke ‘GetAllTutorial’.
- Let’s now use the browser to execute the following use case scenario.
GET Tutorial/Tutorialid – When a client invokes this Restful API, they will be given the tutorial name based on the Tutorialid sent by the client.
In your browser, append the string /1 after the Tutorial word in the URL. If you hit the enter button, you will get the output below.

Now you will see the output of “Queues”, which corresponds to the number 1 in our list of tutorial strings. This means that the ‘GetTutorialbyID’ method is now being invoked from our web service. It also shows that the value of 1 is being passed successfully via the browser to our web service and to our method, and that is why we are getting the correct corresponding value of “Queues” in the browser.
- Next, let’s consume our web service by executing the scenario below. For this, you need to install the tool called Fiddler, which is a free downloadable tool.
POST Tutorial/Tutorialname – When a client invokes this Restful API, the client will submit a request to insert a Tutorialname. The web service will then add the submitted tutorial name to the collection.
Run the Fiddler tool and perform the steps below.
- Go to the composer section. This is used to create requests that can be submitted to any web application.
- Make sure the request type is “POST” and the correct URL is being hit, which in our case should be http://localhost:52645/TutorialService.svc/Tutorial.
- Make sure the Content-Type is marked as application/json. Remember that our POST request method in our web service only accepts JSON-style data, so we need to ensure this is specified when we are sending a request to our application.
- Finally, we need to enter our data. Remember that our method for POST accepts a parameter called ‘str’. So here we are specifying that we want to add a value called “Trees” to our collection of tutorial names and ensure that it is tagged to the ‘str’ variable name.
Finally, just click the Execute button in Fiddler. This will send a request to the web service to POST the data “Trees” to our web service.

Now, when we browse to the Tutorial URL to show all the strings in our tutorial list, you will see that the value of “Trees” is also present. This shows that the POST request to the web service was successfully executed and that it was successfully added to our tutorial list.

- Next, let’s consume our web service by executing the scenario below. For this, we also need to use the Fiddler tool.
DELETE Tutorial/Tutorialid – When a client invokes this Restful API, the client will submit a request to delete a Tutorialname based on the Tutorialid. The web service will then delete the submitted tutorial name from the collection.
Run the Fiddler tool and perform the steps below.
- Go to the composer section. This is used to create requests that can be submitted to any web application.
- Make sure the request type is “DELETE” and the correct URL is being hit, which in our case should be http://localhost:52645/TutorialService.svc/Tutorial. Ensure that the id used to delete a string in the list is sent via the URL as a parameter. In our REST example, we are sending 1, so this will delete the 2nd element in our collection, which is “Queues”.
Finally, just click the Execute button in Fiddler. This will send a request to the web service to DELETE the data “Queues” from our web service.

Now, when we browse to the Tutorial URL to show all the strings in our tutorial list, you will notice that the value of “Queues” is no longer present.
This shows that the DELETE request to the web service was successfully executed. The element at index number 1 in our list of tutorial strings was successfully deleted.

RESTful API Best Practices
Building a REST API that works is only the first step; building one that scales and stays maintainable requires discipline. The practices below help keep your endpoints predictable, secure, and easy for other developers and AI agents to consume.
- Use nouns, not verbs, in URLs. Endpoints such as /employees/1 are clearer than /getEmployee?id=1, because the HTTP verb already describes the action.
- Return meaningful status codes. Send 200 for success, 201 for a created resource, 400 for a bad request, 401 for unauthorized access, 404 for a missing resource, and 500 for server errors.
- Version your API. Adding a version segment such as /v1/ in the path lets you evolve the service without breaking existing clients.
- Secure every endpoint. Use HTTPS, along with API keys or OAuth 2.0 tokens, and validate all incoming input.
- Support pagination and filtering. Returning large collections in pages keeps responses fast and reduces server load.
Following these conventions makes your RESTful web service intuitive to integrate, whether the consumer is a mobile app, a partner system, or an automated AI workflow.