What is WSDL? Meaning & Example
⚡ Smart Summary
WSDL (Web Services Description Language) is an XML-based file that tells a client application what a web service does and how to call it. This resource explains WSDL structure, elements, messages, port types, bindings, and a publishing example.
What is WSDL?
Web Services Description Language (WSDL) is an XML-based file that basically tells the client application what the web service does. The WSDL file is used to describe in a nutshell what the web service does and gives the client all the information required to connect to the web service and use all the functionality provided by the web service.
In this tutorial, we are going to focus on the most important part of web services, and that is the WSDL, or the Web Services Description Language. It acts as the contract between the web service and any client that wants to consume it.
Structure of a WSDL Document
A WSDL document is used to describe a web service. This description is required so that client applications are able to understand what the web service actually does.
- The WSDL file contains the location of the web service, and
- The methods which are exposed by the web service.
The WSDL file itself can look very complex to any user, but it contains all the necessary information that any client application would require to use the relevant web service. Below is the general structure of a WSDL file:
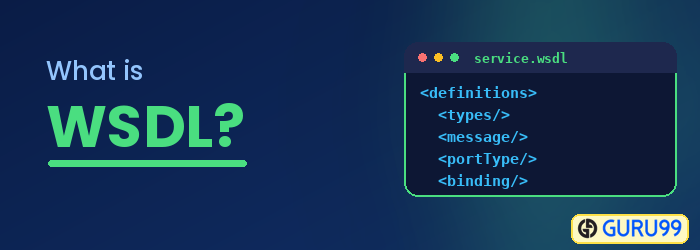
- Definition
- TargetNamespace
- DataTypes
- Messages
- Porttype
- Bindings
- Service
One key thing to note here is that the definition of messages, which is what is passed by the SOAP protocol, is actually defined in the WSDL document. The WSDL document tells a client application what the types of SOAP messages are which are sent and accepted by the Web service.
In other words, the WSDL is just like a postcard which has the address of a particular location. The address provides the details of where the message should be delivered. Hence, in the same way, the WSDL file is the postcard which has the address of the web service that can deliver all the functionality the client wants.
<!-- WSDL definition structure -->
<definitions
      name="Guru99Service"
      targetNamespace=http://example.org/math/
      xmlns=http://schemas.xmlsoap.org/wsdl/>
   <!-- abstract definitions -->
      <types> ...
      <message> ...
      <portType> ...

   <!-- concrete definitions -->
      <binding> ...
      <service> ...
</definition>
Below is a diagram of the structure of a WSDL file.

Structure of a WSDL
WSDL Elements
The WSDL file contains the following main parts:
- The <types> tag is used to define all the complex datatypes which will be used in the message exchanged between the client application and the web service. This is important because if the web service works with a complex data type, then the client application should know how to process it. Data types such as float, numbers, and strings are all simple data types, but there could be structured data types provided by the web service. For example, there could be a data type called EmployeeDataType which could have 2 elements called “EmployeeName” of type string and “EmployeeID” of type number or integer. Together they form a complex data type.
- The <messages> tag is used to define the message which is exchanged between the client application and the web server. These messages explain the input and output operations which can be performed by the web service. An example of a message can be one which accepts the EmployeeID of an employee, and the output message can be the name of the employee based on the EmployeeID provided.
- The <portType> tag is used to encapsulate every input and output message into one logical operation. So there could be an operation called “GetEmployee” which combines the input message of accepting the EmployeeID from a client application and then sending the EmployeeName as the output message.
- The <binding> tag is used to bind the operation to a particular port type. This is so that when the client application calls the relevant port type, it will be able to access the operations bound to it. Port types are just like interfaces. So if a client application needs to use a web service, they need to use the binding information to ensure that they can connect to the interface provided by that web service.
- The <service> tag is a name given to the web service itself. Initially, when a client application makes a call to the web service, it will do so by calling the name of the web service. For example, a web service can be located at an address such as http://localhost/Guru99/Tutorial.asmx. The service tag will have the URL defined, which tells the client application that a web service is available at this location.
Why WSDL
A web service is an important component in building modern-day web applications. Their main purpose is to allow multiple applications built on various programming languages to talk to each other. For instance, we can have a .Net web application talk to a Java application via a Web service.
A web service has the following key features:
- It is built using the XML programming language. Almost all modern-day technologies such as .Net and Java have corresponding commands that have the ability to work with XML. Hence, XML was taken as the most appropriate language for building web services.
- Web services communicate over HTTP. HTTP is a protocol used by all web-based applications. Hence, it made sense to ensure that Web services also had the ability to work over the HTTP protocol.
- Web services conform to a particular language specification. This specification is set by the W3C, which is the governing body for all web standards.
- Web services have a description language known as WSDL, which is used to describe the web service.
The WSDL file is written in plain old XML. The reason that it is in XML is so that the file can be read by any programming language. So if the client application was written in .Net, it would understand the XML file. Similarly, if the client application was written in the Java programming language, then it would also be able to interpret the WSDL file.

The WSDL file is what binds everything together. From the above diagram, you can see that you can create a web service in the .Net language. So this is where the service gets implemented. If you did not have the WSDL file and wanted a Java class to consume the web service, you would need a lot of coding effort to achieve this. But now with the WSDL file, which is in XML and can be understood by any programming language, you can easily have a Java class consume the .Net web service. Hence, the amount of coding effort is greatly reduced.
WSDL Message Part
The WSDL consists of a section called “messages” which is denoted by the <message> element. This element is basically used to describe the data that gets exchanged between the web service and the client application.
Each web service will always have 2 types of messages:
- One is for the input of the web service, and the other is for the output of the web service.
- The input is used to describe the parameters which are accepted by the web service. This is an important aspect of the client application so that it knows the values to be sent as parameters to the web service.
- The other type of message is the output message which tells what results are provided by the web service.
Each message, in turn, will have a <part> element which is used to describe the parameter used by the input and output message.
Below is a simple example of what a message for a web service looks like. The functionality of the web service is to provide the name of a “Tutorial” once a “Tutorial ID” is submitted as a parameter to the web service.

- As we can see, the web service has 2 messages, one for the input and the other for the output.
- The input message is known as TutorialNameRequest which has one parameter called TutorialID. This parameter is of the type number, which is specified by the xsd:number type.
- The output message is known as TutorialNameResponse which has one parameter called TutorialName. This parameter is of the type string, which is specified by the xsd:string type.
Port Type Binding
Ports are used in WSDL to define one complete operation which is offered by the web service. In the previous topic, we saw that our web service provided 2 messages, one for the input called “TutorialNameRequest” and the other for the output called “TutorialNameResponse.” Together the input and output message form what is known as one complete operation.
WSDL provides an element called <portType> which is used to define the operations provided by the Web service.

So in our above example we can note the following:
- The name of the port type which encapsulates the operation is given as “Tutorial_PortType.”
- The operation itself is given a name of “Tutorial.” So our operation basically provides a TutorialName if the TutorialID is given as an input parameter.
- Next are our 2 messages, one for the input and the other for the output, which form our operation.
In addition to the <portType> element, there is also the <binding> element which is used to define how the messages will be transferred.
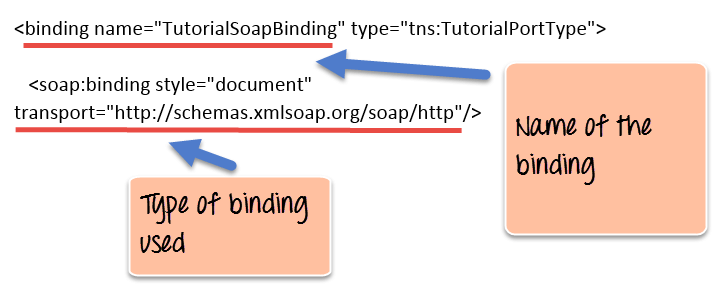
- The above example shows that the binding consists of a binding name which in our case is given as “TutorialSoapBinding”. Binding, in simple terms, is the information which the client application uses to actually bind itself to the web service. Once it is bound to the web service, it then has the ability to call the various operations that are exposed by the web service.
- The transport layer is given as http:// which means that the messages will transfer over the HTTP protocol.
Creating WSDL File
The WSDL file gets created whenever a web service is built in any programming language. Since the WSDL file is pretty complicated to be generated from plain scratch, all editors such as Visual Studio for .Net and Eclipse for Java automatically create the WSDL file.
Below is an example of a WSDL file created in Visual Studio.
<?xml version="1.0"?>
<definitions name="Tutorial"
      targetNamespace=http://Guru99.com/Tutorial.wsdl
      xmlns:tns=http://Guru99.com/Tutorial.wsdl
      xmlns:xsd1=http://Guru99.com/Tutorial.xsd
      xmlns:soap=http://schemas.xmlsoap.org/wsdl/soap/
      xmlns="http://schemas.xmlsoap.org/wsdl/">
   <types>
      <schema targetNamespace=http://Guru99.com/Tutorial.xsd
         xmlns="http://www.w3.org/2000/10/XMLSchema">
         <element name="TutorialNameRequest">
            <complexType>
               <all>
                  <element name="TutorialName" type="string"/>
               </all>
            </complexType>
         </element>
         <element name="TutorialIDRequest">
            <complexType>
               <all>
                  <element name="TutorialID" type="number"/>
               </all>
            </complexType>
         </element>
      </schema>
   </types>
   <message name="GetTutorialNameInput">
      <part name="body" element="xsd1:TutorialIDRequest"/>
   </message>
   <message name="GetTutorialNameOutput">
      <part name="body" element="xsd1:TutorialNameRequest"/>
   </message>
   <portType name="TutorialPortType">
      <operation name="GetTutorialName">
         <input message="tns:GetTutorialNameInput"/>
         <output message="tns:GetTutorialNameOutput"/>
      </operation>
   </portType>
   <binding name="TutorialSoapBinding" type="tns:TutorialPortType">
      <soap:binding style="document" transport="http://schemas.xmlsoap.org/soap/http"/>
      <operation name="GetTutorialName">
         <soap:operation soapAction="http://Guru99.com/GetTutorialName"/>
         <input>
            <soap:body use="literal"/>
         </input>
         <output>
            <soap:body use="literal"/>
         </output>
      </operation>
   </binding>
   <service name="TutorialService">
      <documentation>TutorialService</documentation>
      <port name="TutorialPort" binding="tns:TutorialSoapBinding">
         <soap:address location="http://Guru99.com/Tutorial"/>
      </port>
   </service>
</definitions>
The above WSDL file looks very intimidating to any user. We will cover the different parts in detail in the subsequent tutorials, but for now, let us have a summary look at what each section of the WSDL file actually does.
Publishing the Web Service Example
Now let us look at an example of how we can publish a web service and consume it by using Visual Studio. In this example, we will create a web service with one WebMethod. This method will accept an Integer parameter called “TutorialID.” The Web method will then return a string called “Web Services.”
We will then create a console-based application, which will consume this web service and call our web method accordingly. Let us look at the steps required to carry out this example.
Step 1) The first step is to create your web service. The detailed steps of how the Asp.Net web project and a web service are created have been explained here. Please follow the same steps to create the project and web service accordingly. The key part is to enter the below code in the Web services file.
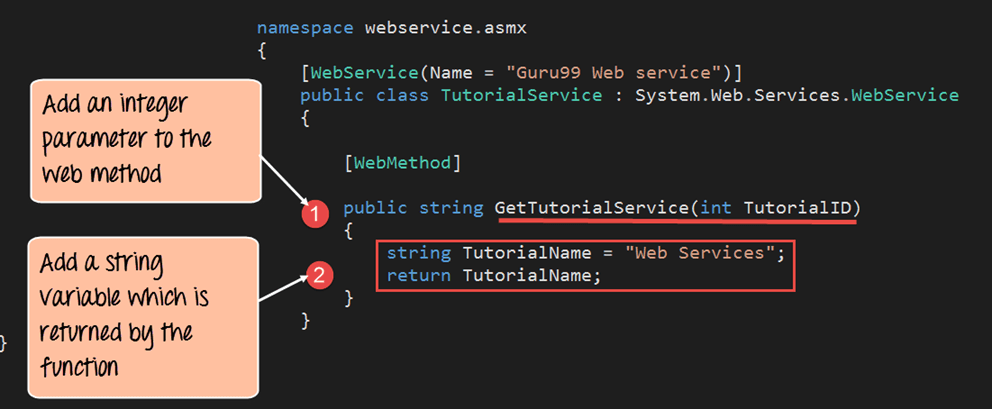
namespace webservic_asmx
{
   [WebService(Name = "Guru99 Web service")]
   public class TutorialService : System.Web.Services.WebService
   {
      [WebMethod]
      public string GetTutorialService(int TutorialID)
      {
         string TutorialName = "Web Services";
         return TutorialName;
      }
   }
}
Code Explanation:
- Here we are creating a WebMethod called “Guru99WebService.” In this web method, we are including an integer parameter which needs to be passed whenever this web method is called.
- Next we are defining a variable called “TutorialName” which will hold the string value of “Web Services.” This is the value which will be returned when the web service is called.
Step 2) Once we have defined the web services file, the next step is to create a client project which will consume this web service. Let us create a simple console application which will call this web service, invoke the “Guru99WebService,” and then display the output of the web method in the console log screen. Follow the below steps to create a console application. Right-click the Visual Studio solution file and choose the option Add->New project.

Step 3) In this step,
- Ensure to first choose the Visual C# Windows option. Then choose the option of creating a console application.
- Give a name for your project which in our case has been given as “DemoApplication.”

After you click the OK button in the above screen, you will be able to see the project in the Solution Explorer in Visual Studio.

Step 4) In this step, you will be setting the DemoApplication Console application as the startup project. This is done to ensure that this application launches first when the entire Visual Studio project is run. This Console application will, in turn, call the web service which will be automatically launched by Visual Studio. To complete this step, right-click the DemoApplication project and choose the option “Set as StartUp Project.”

Step 5) The next step is to add the service reference of our “Guru99Webservice” to our console application. This is done so that the DemoApplication can reference the web service and all of the web methods in the web service. To do this, right-click the DemoApplication project file and choose the menu option Add->Service Reference.

Step 6) In this step, we will provide the different values which are required to add our service reference.
- Firstly, we need to choose our discover option. This option will automatically pick up the WSDL file for our TutorialService web service.
- Next, we should give a name for our service reference. In our case, we are giving it a name of Guru99Webservice.
- Then we need to expand the TutorialService.asmx option so that we can see the “GetTutorialService” method on the right-hand side. Here TutorialService.asmx is the name of our Visual Studio .Net file which contains the code for our web service.
- We will then see our Web method which we had in our web service known as “GetTutorialService.”

When we click on the “OK” button, all of the required code to access this web service will be added to our DemoApplication Console application as shown below. The screenshot shows that the “Guru99Webservice” was successfully added to our console application.

Step 7) The next step is to add the code to our console application to access the web method in our web service. Open the Program.cs code file which comes automatically with the console application and add the below code.

namespace DemoApplication
{
   class Program
   {
      static void Main(string[] args)
      {
         var client = new Guru99Webservice.Guru99WebserviceSoapClient();

         Console.WriteLine(client.GetTutorialService(1));

         Console.ReadKey();
      }
   }
}
Code Explanation:
- The first part is to choose the Program.cs file. This is the main file which is created by Visual Studio when a console application is created. This file is what gets executed when the console application (in our case, DemoApplication) is executed.
- We then create a variable called “client” which will be set to an instance of our Service reference which was created in an earlier step. In our case, the service reference is ‘Guru99Webservice.Guru99WebserviceSoapClient()’.
- We are then calling our Web method ‘GetTutorialService’ in the TutorialService web service. Remember that our GetTutorialService method accepts an integer parameter, so we are just passing an integer parameter to the web method.
- This final line is just to ensure the console log screen remains active so that we can view the output. This command will wait for some input from the user.
Output
When all of the above steps are followed, and the DemoApplication is run, the below output will be displayed.

From the output, we can clearly see that the DemoApplication calls our Web service and that the string returned by the Web service is displayed in our Console log.