
Apache ANT Tutorial: What is Ant Build Tool? Example
 Editorial Team
⚡ Smart Summary
Apache ANT is a Java based build tool that automates compilation, testing, packaging, and deployment through an XML build file. This article defines the tool, traces its history, covers Windows installation, explains project structure, and compares it against Maven and Gradle.

What is a Build Tool?
A build tool is a programming tool which is used to build a new version of a program. It automates the creation of an executable application from any source code.
Without a build tool, a developer would manually compile every source file, copy resources, run the test suite, and package the result on each change. A build tool records those steps once and repeats them identically on every machine.
What is Apache Ant?
Apache Ant is a Java-based command-line tool for building Java applications with the full portability of pure Java code. It allows developers to adopt agile principles and test-driven development to automate the repetitive development tasks like generating documentation. Ant is an acronym for Another Neat Tool.

As the diagram shows, Ant reads a build file, resolves the order of the targets inside it, and then runs the individual tasks that compile, copy, test, and package the application.
What is Apache Ant Build tool used for?
Here are important benefits of using the build tool:
- A build tool allows you to automate specific repetitive tasks such as compiling the source code, running software tests, and creating files for software deployment.
- Build tools mostly run without a graphical user interface.
- It helps you to convert source code into executable code.
- It offers an option to recompile a file only if necessary.
- It allows you to compile large numbers of files in a relatively short time.
- Two widely popular build tools used by Java developers are Apache Maven and Ant.
History of Apache Ant
Now we will learn about the history of the Apache Ant build tool.
Here are important historical landmarks from the Apache Ant tool:
- James Duncan Davidson created Ant in July 2000.
- It was initially used to build Tomcat and came as a built-in product of the Tomcat distribution kit.
- In May 2014, Apache Ant version 1.9.4 was released with many advanced features.
- The 1.10.x line began in 2017 and remains the actively maintained branch.
- Version 1.10.17 was released on 10 April 2026 and requires a minimum Java 8 runtime.
Features of Apache Ant
Here are the essential features of Apache Ant:
- It is an open-source project.
- It allows you to run builds on both Windows and UNIX or Linux systems.
- You only require a JVM, as it runs anywhere a JVM is available.
- It offers an extensive range of predefined tasks.
- It helps you to copy files from one location to another.
- It offers an interface to develop custom tasks.
- It allows you to invoke builds from the command line, which integrates easily with free and commercial IDEs.
- It allows you to deploy the binaries to a test server.
- It offers an extensible architecture.
- It offers backward compatibility across releases.
How to Install and Configure Apache Ant on Windows
Now we will learn the process of installing Apache Ant on Windows.
We are assuming that you have already downloaded and installed the Java Development Kit (JDK) on your computer. Make sure that the JAVA_HOME environment variable is set to the folder where your JDK is installed. Follow the steps below for installing Ant:
Step 1) Download the binaries.
Download the binaries from https://ant.apache.org/bindownload.cgi

Step 2) Unzip files.
Unzip this zip file to a convenient location such as c:\folder, using WinZip, WinRAR, 7-Zip, or a similar tool.

Step 3) Create an environment variable.
Create an environment variable for “ANT_HOME” and assign the value of the variable to the location of the Ant folder.
- Right-click on the This PC icon.
- Click on Properties.

Step 4) Go to system settings.
Click on “Advanced system settings”.

Step 5) On system properties,
click on the “Advanced” tab.

Step 6) Find the environment variables.
Click on the “Environment variables…” button.

Step 7) Create a new variable.
Click on “New” to create a new user variable.
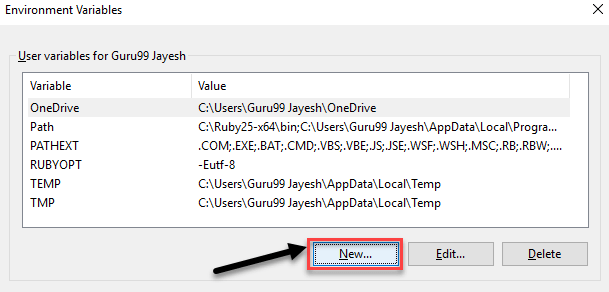
Step 8) Enter the variable details.
Enter the new user variable details.
- Enter the variable name as ANT_HOME.
- Enter the variable value as the folder where Ant was unzipped, for example C:\apache-ant-1.10.17.
- Click on the “OK” button.

Step 9) Variable created.
Click on the “OK” button.

Step 10) Close the screen.
Click on “OK” to close the screen.

💡 Tip: ANT_HOME must point at the installation folder itself, not at the bin folder inside it. Then append %ANT_HOME%\bin to the Path variable, so the ant command is recognised from any directory.
You can verify a successful Ant installation by typing the “ant -version” command in the command prompt.
You will see the following screen:

Example of Apache ANT
The build file below defines a single target named hello that prints a message. The project element declares a name and a default target, so Ant knows what to run when no target is named on the command line.
<?xml version="1.0"?>
<project name="HelloWorld" default="hello" basedir=".">

    <target name="hello">
        <echo>Hello, World</echo>
    </target>

</project>
Save this file as “build.xml”, then follow these two steps:
- Open the command prompt and move to the directory that contains build.xml.
- Run
ant hello, or simplyant, because hello is declared as the default target. To use a different file name, runant -f mybuild.xml hello.
Output:
Buildfile: C:\projects\demo\build.xml

hello:
     [echo] Hello, World

BUILD SUCCESSFUL
Total time: 0 seconds
ANT Project Structure

ANT Project Structure
As the structure diagram shows, every build will contain three nodes:
- Project
- Target
- Task
Project
Everything inside the build file in Apache ANT is under a project.
Attributes:
- Name: The name of the project.
- Basedir: This is the directory from which all the paths will be calculated. This can be overridden by using the “basedir” property.
- Default: Helps you to define the default target for this project. If no target is given, then Ant will execute the default.
Target
A target is a set of tasks, which is defined to reach a specific state in the build process.
Attributes:
- Name: Name of the target (required).
- Description: Description of the target.
- Depends: Which target this current target depends upon.
- If: Executes the target only if a value is set for a target property.
- Unless: Executes the target only if the property value is not set.
Tasks
A task is a piece of code which can be executed. Tasks have multiple arguments or attributes.
The general method pattern to write a task is:
<name attribute1="value" attribute2="value2"…/>
You can either use a built-in task, or you can build your own task. The table below lists the tasks that appear in almost every Java build file.
| Task | Purpose | Typical Attributes |
|---|---|---|
| echo | Print a message to the console | message |
| mkdir | Create a directory | dir |
| delete | Remove files or directories | dir, includeemptydirs |
| javac | Compile Java source files | srcdir, destdir, includeantruntime |
| jar | Package classes into a jar archive | destfile, basedir |
| copy | Copy files between locations | file, todir |
| junit | Run unit tests | haltonfailure, printsummary |
Complete build.xml Example with Multiple Targets
A realistic build file chains several targets together. The depends attribute guarantees the order, so Ant cleans the output folder, compiles the source, and only then builds the jar.
<?xml version="1.0"?>
<project name="DemoApp" default="jar" basedir=".">

    <!-- reusable values -->
    <property name="src.dir"   value="src"/>
    <property name="build.dir" value="build"/>

    <target name="clean" description="Remove previous output">
        <delete dir="${build.dir}"/>
    </target>

    <target name="compile" depends="clean" description="Compile sources">
        <mkdir dir="${build.dir}/classes"/>
        <javac srcdir="${src.dir}" destdir="${build.dir}/classes"
               includeantruntime="false"/>
    </target>

    <target name="jar" depends="compile" description="Package the jar">
        <mkdir dir="${build.dir}/jar"/>
        <jar destfile="${build.dir}/jar/DemoApp.jar"
             basedir="${build.dir}/classes">
            <manifest>
                <attribute name="Main-Class" value="com.guru99.Main"/>
            </manifest>
        </jar>
    </target>

</project>
Output:
Buildfile: C:\projects\DemoApp\build.xml

clean:
   [delete] Deleting directory C:\projects\DemoApp\build

compile:
    [mkdir] Created dir: C:\projects\DemoApp\build\classes
    [javac] Compiling 3 source files to C:\projects\DemoApp\build\classes

jar:
    [mkdir] Created dir: C:\projects\DemoApp\build\jar
      [jar] Building jar: C:\projects\DemoApp\build\jar\DemoApp.jar

BUILD SUCCESSFUL
Total time: 1 second
Apache Ant vs Maven vs Gradle
Three build tools dominate the Java ecosystem, and each one takes a different position on how much structure to impose.
| Parameter | Apache Ant | Apache Maven | Gradle |
|---|---|---|---|
| Build script format | XML | XML | Groovy or Kotlin DSL |
| Approach | Procedural, you define every step | Declarative, convention over configuration | Declarative with scripted extensions |
| Dependency management | Not built in, added through Apache Ivy | Built in with central repository | Built in, Maven compatible |
| Project structure | Completely free | Fixed standard layout | Convention based but overridable |
| Incremental builds | Limited | Limited | Yes, with a build cache |
| Learning curve | Low for XML users | Moderate | Steeper, requires the DSL |
| Best suited for | Legacy projects and highly custom builds | Standard Java projects | Large multi-module and Android projects |
Ant remains the pragmatic choice when a build does not fit a standard layout, or when an existing project already depends on hand-written targets.
Best practices of Using Apache Ant
Here are some best practices for using Apache Ant.
- You should automate build numbering using property files.
- Implement a configurable build with the help of default and build property files. These files allow you to store properties that define the data for your build process, such as compiler version and optimization settings.
- You can reuse prebuilt libraries using library property files.
- Give every target a description attribute, so that
ant -projecthelplists a usable summary of the build. - Keep the clean target separate, and never delete a directory that also holds source files.
Advantages of Using Apache Ant
Here are the benefits of using Apache Ant:
- Ant is platform-neutral, so it helps you to manage platform-centric properties such as file separators.
- Ant allows you to perform platform-specific tasks, such as modifying the modified time of a file using the ‘touch’ command.
- Ant scripts are written using plain XML, so if you are already familiar with XML, you will be able to learn Ant quickly.
- Ant offers a large list of predefined tasks.
- It offers an interface for developing customised tasks.
- You can easily invoke Ant from the command line, which allows integration with free and commercial IDEs.
- You only need a JVM, so it runs anywhere a JVM is available.
- Apache Ant is an open-source library which allows users to access the source code and reproduce it.
- Apache Ant is a cross-platform tool which allows you to handle the Java classpath and file directory structure in an affordable manner.
- Apache Ant is easily extensible using Java and other programming languages.
- Apache Ant offers built-in support for J2EE development, such as EJB compilation and packaging.
- You can use it for a small personal project as well as for a large software project or website.
Ant is frequently paired with a test runner and a continuous integration server. See JUnit for the test layer, Jenkins for scheduled builds, and using Apache Ant with Selenium for browser test automation. Reports produced during a build can be rendered with JasperReports.
