JasperReports Tutorial: What is Jasper Report for Java?
⚡ Smart Summary
JasperReports for Java is an open source reporting engine that turns application data into pixel perfect documents. This article explains the reporting lifecycle, Jaspersoft Studio installation, report template creation, band structure, a Pentaho comparison, and the practical limitations teams encounter.

What is JasperReports for Java?
JasperReports is an open-source reporting tool for Java that is used for reporting of applications. This reporting tool helps in writing rich content onto the screen, to the printer, or into a variety of files like HTML, PDF, XLS, RTF, CSV, XML, ODT and TXT. JasperReports can also be used for Java-enabled applications like Java EE or web applications to generate dynamic content.
Three product names appear together in most discussions, and separating them early prevents confusion later on this page.
| Name | What It Is | Who Uses It |
|---|---|---|
| JasperReports Library | The Java library that compiles, fills, and exports reports | Java developers embedding reports in an application |
| Jaspersoft Studio | The Eclipse based visual designer that produces JRXML files | Report designers building layouts |
| JasperReports Server | A standalone server that stores, schedules, and delivers reports | Teams distributing reports to business users |
This page focuses on the library and on Jaspersoft Studio, because those two components are all that is required to design and run a first report. Note that the community edition now covers only those two components, since JasperReports Server is no longer offered as a community download.
Why use Jasper Reports?
Here are many reasons for using a Jasper report tool:
- It offers report generation performance and delivery to users.
- It helps you to represent your data in textual or graphical format.
- It is a standalone and embedded reporting server for reporting compilation and execution.
- It allows role-based access control to all reports in the repository.
- A Spring Security framework is available for integration with in-house authentication systems.
- It offers a secure, scheduled, and automatically delivered interactive reporting engine.
- You can embed reports into Java or non-Java applications.
- Various formats of reports can be exported.
- It can generate watermarks that are laid over the primary image.
- It offers a complete set of SOAP, REST, and Web Services.
- It allows you to use single report data from multiple data sources.
Because the library is released under the LGPL licence, it can be bundled inside commercial products without a per-seat fee, which is the reason many Java teams select it over proprietary reporting engines.
Features of Jasper Reports
Now, we will cover the features of JasperReports.
Here are the important features of the Jasper Reports tool:
- Offers flexible report layout across bands, columns, and free-form regions.
- Developers can supply data in multiple ways, including JavaBeans collections, SQL queries, and XML documents.
- Multiple data sources can be combined inside a single report through subreports and data adapters.
- Watermarks can also be applied over the primary image.
- You can generate subreports that are nested inside a parent layout.
- It helps you to export reports in a variety of formats like PDF, HTML, RTF, and Microsoft Excel files.
- The engine allows report definitions to include charts such as bar, pie, line, and time series.
- Report expressions can be written in Java, Groovy, or JavaScript.
These capabilities are exposed through a fixed processing sequence, which the next section describes stage by stage.
Lifecycle of JasperReports
Now we will learn about the lifecycle of JasperReports.
Following is the general flow of the life cycle of Jasper Reports:

The diagram above shows the four stages in order. Each stage produces a file that becomes the input of the next stage, which is why the sequence can never be reversed.
| Stage | Input | Output | File Extension |
|---|---|---|---|
| Designing | Layout decisions | Report template | .jrxml |
| Compiling | .jrxml file | Compiled binary template | .jasper |
| Executing | .jasper file plus data | Filled report | .jrprint |
| Exporting | .jrprint file | Final document | .pdf, .html, .xls, and others |
Designing the report
This will be the first step where we create the JRXML file. It is a simple XML document which defines the report layout. You can develop this file using any text editor, or a report designer.
However, if you are using the report designer, we can visualize the layout of the report, and the real structure of the JRXML can be ignored.
Compiling the report
In this life cycle stage, the JRXML which is built in the first stage is compiled, and a binary object called the Jasper file (file with jasper extension) is generated.
This compilation is done to get better performance during execution. These generated Jasper files should be shipped along with your application to run the reports.
Executing the report
In this stage, the data from the application is gathered and filled in the compiled report format. There is a class called net.sf.jasperreports.engine.JasperFillManager which offers functions to fill the data in the reports.
The output will be stored in a Jasper print file (file with jrprint extension) which can be used to print or export the report.
Exporting the report to the desired format
In this last stage, you need to export the Jasper print file which is created earlier into any format using the class JasperExportManager. As Jasper offers multiple formats of exports, we can use the same input to create various representations of the data.
How to Install Jasper Reports – Environment Setup
Now, let us learn the step by step process for JasperReports environment setup. The screenshots below were captured with the 6.9 installer. The current community release is 6.21.3, published on 23 April 2024, and the sequence of screens is unchanged, although the version number in the file name differs.
Step 1) Download jasper reports community edition
Go to this Link and click on the Download Now option to install Jasper Reports Community edition.

Step 2) Select Jaspersoft Studio CE
From the community editions, select Jaspersoft Studio CE.

Step 3) Download Jaspersoft Studio
Go to this link and click on the Download button, then open the downloaded installer executable for your operating system.

Step 4) Click on the agree button
The following screen will appear. Select the I agree button.

Step 5) Choose location
Select your installation location and click on the Next button.

Step 6) Progress is running now
You will see the progress on the next screen.

Step 7) Click on the finish button
In the next screen, click on the finish button.

Step 8) Progress is complete
The following screen will appear in your window.

Step 9) Get Started
Next, click on the Get started option.

Step 10) Start working with Jasper Reports studio
The following screen will appear and you can start working with Jasper Reports studio.

💡 Tip: Jaspersoft Studio is an Eclipse based application and needs a compatible Java runtime present on the machine. If the installer refuses to start, confirm the installed JDK version before reinstalling.
Creating a Report Template Example
Now let us learn how to create a report template in JasperReports.
The report template file used in JasperReports is a simple XML file having the jrxml extension. This file contains the jasperReport tag as its root element. The JasperReports framework can handle different types of data sources.
A report template is designed and created using the following steps.
Step 1) Creating the JRXML file in Jaspersoft Studio.
- Go to the File option.
- Select the New sub-menu.
- Click on the Jasper Report option.

Step 2) Selecting the desired template.
- Select your template, for example, cherry.
- Click on the “Next” button.

Step 3) Selecting a parent folder.
- Select the MyReports folder.
- Enter the file name, for example, “Cherry Report.”
- Click on the “Next” button.

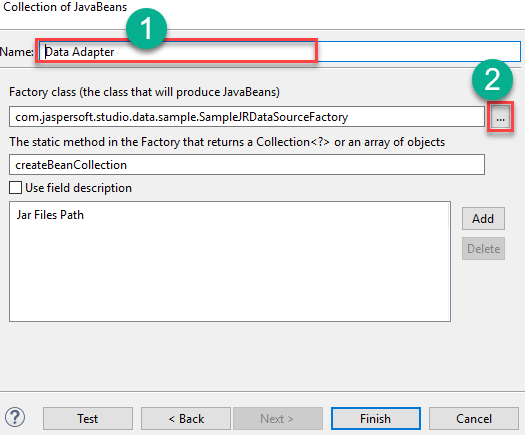
Step 4) In the Data Source window, click on the “New” button to create a new data adapter.

Step 5) Selecting a data adapter.
- Select the data adapter from the list box. For example, “Collection of JavaBeans.”
- Click on the “Next” button.

Step 6) Entering data adapter details and selecting the factory class.
- Enter a name for your adapter.
- Select the factory class by clicking on the “…” button.
Step 7) Entering the prefix or pattern.
- Enter the name prefix or pattern.
- Click matching items.
- Click on the “OK” button.

Step 8) Defining the factory class and adding the path to jar files.
- Enter the name of a static method in the factory class. In this Jasper reports example, this is createBeanCollection.
- If your JavaBeans definition has field descriptions, and you would like to use these as names in Jaspersoft Studio, check the use field description checkbox.
- Add a path to your jar files.
- Click on the “Finish” button.

Step 9) Click on the “Next” button.

Step 10) Congratulations! You have added all necessary report creation information successfully. Click on the “Finish” button.

The report will be generated as shown in the screen below.

The above file requires compilation into JasperReport binary format, which is called the jasper file.
The interface net.sf.jasperreports.engine.design.JRCompiler, which is part of the JasperReports library, plays an important role in the compilation of this report template file.
Implementation of this interface can be written in Java, JavaScript, Groovy, or any other scripting language.
You can compile a JRXML file using the following two methods:
- Programmatic compilation from Java code.
- Compilation using an Apache Ant task.
The snippet below shows the programmatic route, where one line compiles the template and a second line fills it with a JavaBeans collection.
import net.sf.jasperreports.engine.*;
import net.sf.jasperreports.engine.data.JRBeanCollectionDataSource;

public class ReportRunner {

    public static void main(String[] args) throws JRException {

        // 1. Compile the JRXML template into a .jasper file
        JasperReport report = JasperCompileManager.compileReport("CherryReport.jrxml");

        // 2. Fill the compiled template with a collection of beans
        JRBeanCollectionDataSource source =
                new JRBeanCollectionDataSource(EmployeeFactory.createBeanCollection());

        JasperPrint print = JasperFillManager.fillReport(report, null, source);

        // 3. Export the filled report to PDF
        JasperExportManager.exportReportToPdfFile(print, "CherryReport.pdf");

        System.out.println("Report exported successfully");
    }
}
Output:
Report exported successfully
Understanding the Different Report Bands
A JasperReports layout is divided into horizontal sections called bands. Each band has a fixed printing rule, and understanding those rules is what allows a designer to control exactly where a value appears in the finished document.
Following are the standard report bands adopted by most of the commercial report generating tools.
- Title
- Page header
- Column header
- Detail
- Column footer
- Page footer
- Last page footer
- Summary
- Group header
- Group footer
- Background
- No data
Let us learn each reporting band in detail.
Title
This band is shown at the starting of the report. It can be placed on its own first page by setting the attribute isTitleNewPage="true".
Page Header
The page header band is shown at the beginning of each page. It excludes the first page if the title band is used, and the last page if the summary band is used with the setting isSummaryWithPageHeaderAndFooter="false".
Column Header
Column headers appear before the detail band on each page.
Detail
The detail section is iterated for each record in the data source supplied. It is also allowed to have multiple detail bands (1, 2, and so on).
Column Footer
This section appears below the detail band on each page where the detail band is present. The default setting is the end of the page, but this can be switched to sit under the last detail band by setting the attribute isFloatColumnFooter="true".
Page Footer
This section will be displayed at the end of each page, excluding the summary band, the title band, and the last non-summary band.
Last Page Footer
This section appears on the final page, in place of the normal page footer, when no summary band is given.
Summary
The summary section only appears at the end of the report on a new page when isSummaryNewPage="true" is set, and with page header and footer when isSummaryWithPageHeaderAndFooter="true" is set.
Group Header
This section only appears when it is defined, every time the group expression changes, before the detail band.
Group Footer
This section only displays if a group is defined, every time before the group expression changes, after the detail band.
Background
It is displayed on all the pages as a background to all other reporting bands.
No Data
This band will appear when no data source was passed, or the data source is empty and whenNoDataType="NoDataSection" is set.
Jasper vs. Pentaho
Now we will learn about the difference between Jasper and Pentaho.
Here are the major differences between Jasper and Pentaho:
| Parameters | Jasper | Pentaho |
|---|---|---|
| Reports | Jasper uses Jaspersoft Studio for designing the reports. | It uses the Pentaho Report Designer. |
| ETL support | Jaspersoft uses the Talend Open Studio version for ETL purposes. | It uses Pentaho Data Integrator as a default ETL tool. |
| Dashboard | Dashboard functionality is present only in the Enterprise edition of Jaspersoft. | Pentaho offers a wide range of features in their dashboards. |
| Mobile Business Intelligence | Jaspersoft has better mobile BI support. | Pentaho needs to rely on a third-party tool to enhance the mobile BI experience. |
| Documentation | Better marketing, sites, and documentation. | Documentation support is poor. |
| Best feature | Easier to research and find what you need. | Offers data mining and iPhone integration. |
| Paid version | The paid version offers features like ad hoc query web UI and dashboard creation web UI. | Offers features like LDAP integration, SSO, and auditing. |
Teams already invested in the Java stack usually pick Jasper, while teams that need heavy data integration alongside reporting often pick Pentaho.
Challenges faced while creating JasperReports
Here are a few challenges you will face while creating Jasper Reports:
- Core changes – when the business rules change or are enhanced, it is required to change the core logic of the report.
- Complicated reports – subreports and cross-tab reports are good examples.
- Chart reports or visual charts, for example graph, XY line, pie, bar, time series, and meter charts.
Disadvantages of using Jasper Reports
Here are the drawbacks of using Jasper Reports.
- Once you start making any change with parts of the package and removing features, it is very difficult to get back to the default package setting.
- It is too rigid, and editing of lines and creation of cross tabs is a challenging task.
- Some common tasks, like specifying sub-totals for a grouped report, are easier in other report designers.
- Jasper requires that you compile reports before running them. This means that report developers must have the entire Java SDK installed.
- Sometimes when you edit the report, it does not show the same preview as it is displayed on the web.