
Source Analyzer & Target Designer in Informatica
 Editorial Team
⚡ Smart Summary
Source Analyzer and Target Designer are the PowerCenter Designer tools that create and import the source and target definitions every Informatica mapping needs, using an ODBC data source to read the database metadata.

In ETL/Data Warehouse work, you will encounter different sources and targets.
Source Definition in Informatica
A Source Definition in Informatica is an entity from where you pull the records, and then you store these records in temporary tables (staging tables) or Informatica transformation caches. On the basis of the mapping design document or business requirement, you make a change in these data records (transform the data) and then you load the transformed data into another table structure, called the target table.
In every Informatica mapping, there will always be a source and a target. To manage different sources and targets in Informatica, you have to use Source Analyzer and Target Designer. These tools are integrated into the PowerCenter Designer tool and can be launched from there itself.
The Designer splits this work across dedicated tools.
| Designer tool | What it manages |
|---|---|
| Source Analyzer | Source definitions – the structures you read data from. |
| Target Designer | Target definitions – the structures you load data into. |
| Mapping Designer | The mapping that joins a source to a target through transformations. |
Source Analyzer in Informatica
Source Analyzer in Informatica is a tool that allows you to create and modify source definitions. With the help of Source Analyzer, you can create or import different types of sources in Informatica like flat files, relational databases, Excel worksheets, XML definitions, and so on.
Similarly, by using Target Designer you can create or import different types of targets. Informatica provides you the feature to either create a source or target from scratch by designing its structure, or you can create a source or target by importing the definitions. When you import a source from the database, the following metadata gets imported:
- Source (table) name
- Database location
- Name of columns
- Column data types
- Constraints
You can also define the key relationships in the tables, which is applicable only at the Informatica level and is stored in the repository.
The source or target created or imported in Informatica can be reused any number of times in different mappings. Every mapping must have at least one loadable target. Otherwise the mapping will be invalid.
Note – when you create a source or target in Source Analyzer or Target Designer, the structures are only created in Informatica. At the database level, no object is created. So you have to create database objects having the same structure as you have created in Informatica.
You can import the following types of sources using Source Analyzer:
- Relational tables (database tables), views and synonyms
- Flat files
- COBOL files
- XML files
Performance tip – to improve the performance of relational source tables, use indexes on the source database tables. On the target tables, disable or remove constraints and indexes for performance.
How to Open Source Analyzer in Informatica
Below is a step-by-step process for opening Source Analyzer in Informatica.
Step 1) Open the Informatica PowerCenter Designer tool.

Step 2) In the next screen:
- Double-click on the repository which you want to connect to
- Enter the user name
- Enter the password
- Click on the Connect button

After successful login, the folders of the user will be listed under the repository name.
Note –
- If login is not successful, check whether the user has privileges to connect to the repository
- If no folder is visible under the repository name, check whether the folder is created.
- If a folder was created recently, then disconnect from the repository and reconnect.

Step 3) In the next step:
- Right-click on the folder
- Select the open option

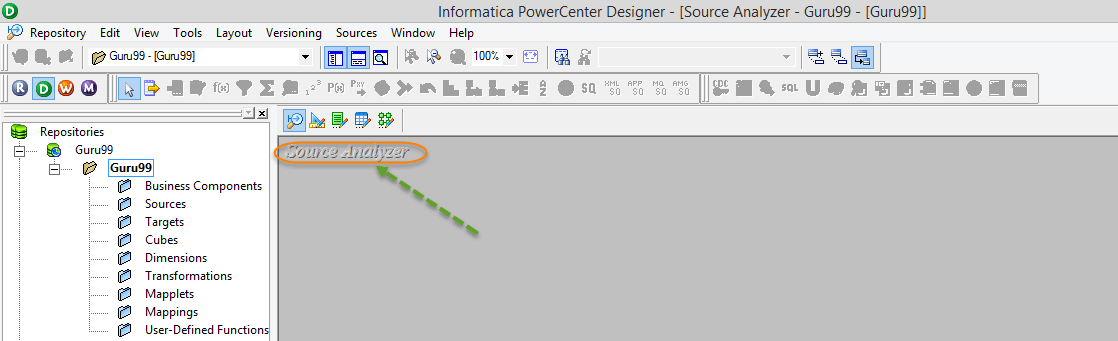
When a folder is open, subfolders of that folder will be listed, as shown below.

Step 4) Click on the Source Analyzer menu, as shown in the figure.
How to Import Source Table in Source Analyzer
Following are the steps to import a source table in Informatica Source Analyzer.
Step 1) Go to the “Sources” option. In Source Analyzer:
- Click on the tab “Sources” from the main menu
- Select the import from database option; after this the ODBC Connection box will open.

Step 2) Create the ODBC connection. If you already have an ODBC connection, move to Step 3. The five sub-steps below run in order.
-
Click on the button next to ODBC data source.

-
On the next page, select the User DSN tab and click the Add button.

A DSN (Data Source Name) is basically a data structure, and it contains specific details such as database type, location and user details. This information is required by the ODBC driver so that it can connect to that database.
-
When you click on the Add button, you will see a list of drivers for various databases (Oracle, SQL Server, Sybase, Microsoft Access, Excel, and so on). The driver which you select depends on what database you want to connect to. Select the driver for the data source. Here in guru99 you will be using Oracle database tables. Select the Oracle wire protocol driver.
-
On the next page, select the General tab and enter the database details. Then click on Test Connect.

Note – database details are specific to your installation, depending on the host name, port and SID you selected during database installation. You can get these details by opening the tnsnames.ora file located in your Oracle installation folder.

-
Once you have run a Test Connect, enter the database user name and password, and then select the “OK” button. If the connection is successful, it will show a message box.


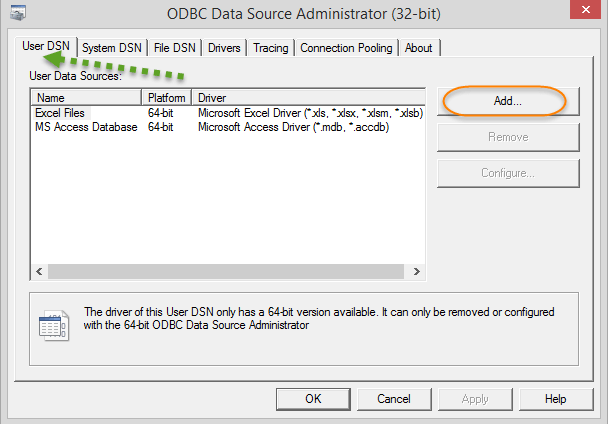


Select OK for the test connect window and the ODBC driver setup window. The created ODBC data source will be added to the user data sources. The ODBC data source is now ready.
Step 3) Create the schema tables. In guru99, you will be using Oracle’s Scott/Tiger schema tables. If you do not have these tables in the database, create them using the script below.
Step 4) Enter the database details. In the import tables window:
- Select the ODBC data source for the Oracle database.
- Enter the database user name
- Enter the database password
- Click on the connect/reconnect button. This will show tables for the database user.
- Expand the tree under the tables folder and select the EMP table
- Select the OK button.

Step 5) Verify and save the imported table. The table will be imported into the Informatica Source Analyzer. Use the “Ctrl+S” keys to save changes to the repository.

Similarly, you can import any other database tables in Source Analyzer.
How to Import Target in Informatica Target Designer
Here is the process to import a target in Informatica Target Designer.
In this tutorial, you will create the target table emp_target, which will have the identical structure of the source EMP table. To import the target table, the target table must be present in the database. To create the target table, use the script below. Types of targets available in Informatica are relational, XML and flat files.
Download the emp_target.sql File
Note – here in this tutorial, both the source and target tables are present in the same database schema (guru99). However, you can also create a target in a different schema.
Step 1) In the Informatica Designer, click the Target Designer icon to launch Target Designer.

Step 2) In the next step:
- Select the option “Targets” from the main menu
- Select “import” from the database option

Step 3) In the import table window:
- Select the ODBC data source for the Oracle database.
- Enter the database user name
- Enter the database password
- Click on the connect/reconnect button. This will show tables for the database user.
- Expand the tree under the tables folder and select the EMP_TARGET table
- Select the OK button

This will import the target into Target Designer of Informatica PowerCenter, as shown below. Use the “Ctrl+S” keys to save the changes.

In this tutorial, you have imported sources and targets. Now you are all set to create your first mapping.
How to Create a Folder in Informatica
Below are the steps on how to create a folder in Informatica.
Informatica folders are logical containers which keep the objects that you create in Informatica Designer and Workflow Manager (mappings, mapplets, sources, targets, and so on).
To create a folder:
Step 1) Open Repository Manager.

Note – if Informatica Designer is already open, then Repository Manager can be opened using the shortcuts available in the toolbox.

This will open Informatica Repository Manager in a separate window.
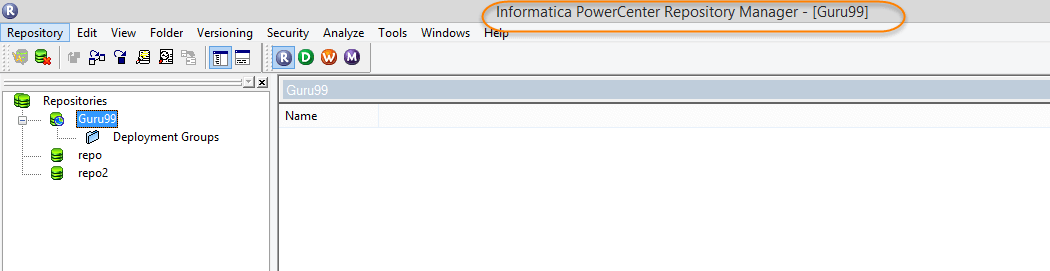
Step 2) Follow these steps:
- Click on the Folder menu
- Select the Create option

Step 3) In the next step:
- Enter the desired folder name
- Select OK

This will create a new folder and a message will appear saying “The folder has been successfully created.”

The newly created folder will then be listed under the respective repository.

This completes the tutorial. See you in the next one!
