How to Configure Client and Repository in Informatica
After installing Informatica server and client, Informatica server needs to be configured.
The Informatica architecture is a Service Oriented Architecture (SOA). Therefore, before using Informatica tools, server and client components needs to be installed and configured.
Prerequisite to configure clients, integration service and repository service.
- Informatica server and client should be installed.
- Informatica service should be up and running.
- Oracle or other compatible databases must be installed, and database service must be up.
- Database users must be created for repository service.
-
Domain administrator console credentials must be available (it is configured during server installation)
The following components needs to be set up before you can start working in Informatica PowerCenter.
- Informatica domain
- creating repository service
- creating integration service
- Creating users
What is Informatica domain?
Informatica Domain is a basic administrative unit for various services and hosts.
Using domain console you can perform various administrative tasks like adding a node, creating repository service, creating integration service, creating reporting service, managing & creating users, monitoring services, etc.
During installation of Informatica server, system prompts for setting up the domain credentials and database connection.
You need to use the same credentials when you access the domain console.
How to Open the Administrator Home Page
Step 1) From the program menu open the Informatica administrator home page

This will open up domain home page in the web browser.
Troubleshooting– if the home page doesn’t open up, check whether Informatica server process and database service are up and running. If not, start the same.
Step 2) Enter the domain credentials (these credentials are generated during server installation).
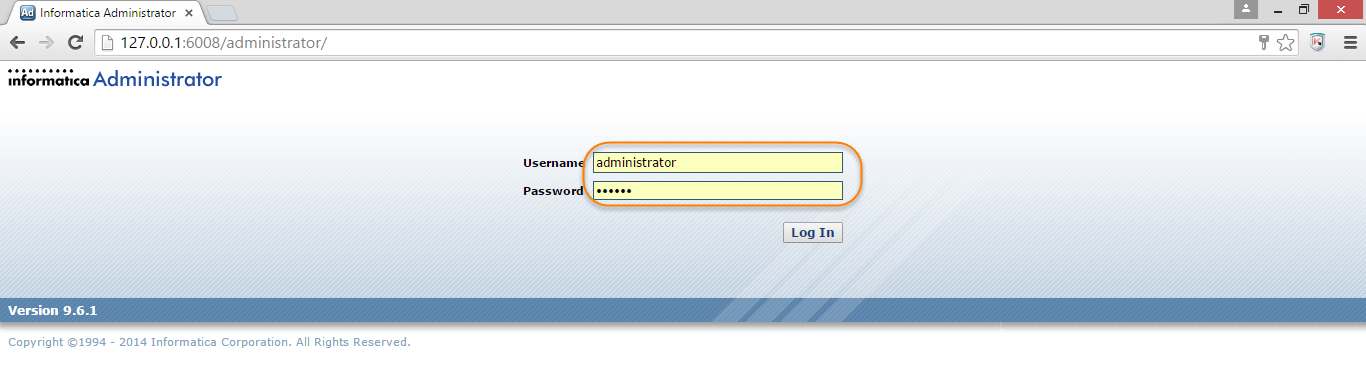
Step 3) On successful login the Informatica administrator home page will appear.

How to Create Repository Service
It is the first service that needs to be created in the domain console. The pre-requisite is to have a database user created in the database along with basic privileges (connect, resource), as this service maintains repository data in the database. You can create versioned objects in the repository using the enable version control option.
You can select oracle, DB2, Sybase or SQL Server databases to create a repository
Step 1)
- Right-click on the domain name
- Select new option
- Select PowerCenter repository service.

Step 2) In the next screen
- Enter Name for the repository
- Select License
- Select Node
- Click on Next Button

Step 3) In the next screen,
- Enter the database properties.
- Select the option – enable version control, if version control feature is required for Informatica development.
- Select finish button.

Note – the connection string name is the name of database instance service name.
Step 4) The Repository service will be created, and will be listed under the domain tree.

Troubleshooting – if there is an error during service creation, check whether the correct database credentials are provided, and connection string is correct. After any changes made to repository properties, recycle the repository service to make the changes effective.
How to create repository contents
After the repository service is created, repository contents needs to be created (this is one time activity for a repository). Without repository contents, you cannot start the repository service. Repository content is basically database tables which contains the details of objects created in Informatica.
Step 1) Select the repository service under the domain tree.

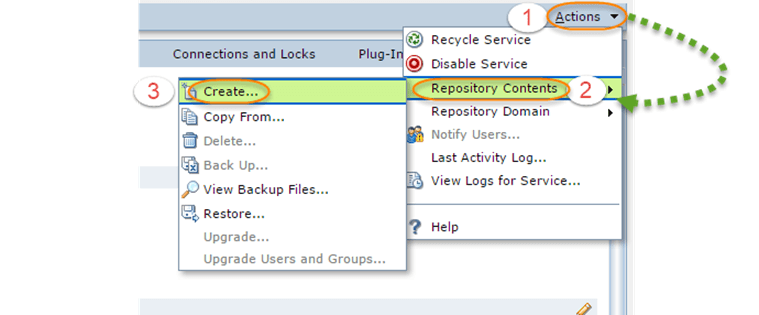
Step 2) After selecting the repository service.
- Select the action menu on right side of page
- Select repository contents option
-
Select create option
Step 3) In the next screen
- Select the options of local/global repository (we are keeping it unchecked to create local repository)
- Select version control (if required, we are keeping it unchecked to skip version control feature)
- Click ok.

Step 4) Once repository content is created, change the repository service from exclusive to normal mode
Note – If the repository service is in exclusive mode, users would not be able to connect to the repository
Select the edit property option of repository

Step 5)
- Select the mode from exclusive to normal
- Select the ok button.

Once done, the repository service will be running in normal mode.
How to create Integration Service
The integration service is responsible for the execution of workflows. Whenever, any workflow is executed from workflow manager, scheduler or command prompt, the integration service receives a request. This service locks the respective workflow, fetches the details about the workflow, mapping & session from the Informatica repository and executes the workflow. This service is also responsible for creating workflow logs, reading parameter files, creating process threads to execute workflows, execute any other task created in workflow manager, etc.
To Create Integration Service
Step 1)
- Right click on the domainnavigator tree
- Select new option
- Select PowerCenter integration service

Step 2) In this step we will,
- Enter integration service name
- Select the license
- Select a node and click next.

Step 3) On the next page
- Select the repository service
- Enter Informatica Administrator username and password.
- Select Finish.

Step 4)To enable Integration service.
- Click on the Integration service in domain tree and Select Actions option.
- Select the Enable service option

When both integration service and repository services are created and enabled, they should be in running status.

How to Configuring client and domain
Before you start using the Informatica integration and repository service of the Informatica server, you have to configure the Informatica domain at the client. To add the domain at client following steps are required.
Step 1) Open the Informatica repository designer
- Select repository menu
- Select configure domains

Step 2) Select the add new domain option

Step 3) In the add domain window
- Enter Domain name
- Enter Gateway host
- Enter Gateway port ( the port no is assigned during the Informatica server installation process)
- Select ok

Step 4) The repository will be listed on right side of the window. Select the checkbox and Select ok.

The repository will be listed in the repository manager navigation tree.

How to create user
To create mappings in Informatica designer and to perform various tasks like, executing workflows, managing repository folders, monitoring workflows, etc. a valid Informatica user is required, and the user must have privileges. A user can be administrator user or developer user based on the roles assigned to it. You can create any no. of users based upon requirement.
To create Informatica user
Step 1) In the Informatica Administrator home page Select security tab

Step 2) In this step we will,
- Select user tab
- Select action menu
- Select create user option

Step 3) On create user page
- Enter desired login name
- Enter desired password
- Confirm password
- Select ok

Step 4)The user must have privilege to domain and repository, to assign the privilege
- Click on username
- Select privileges tab
- Select the domain.

Step 5) In the edit role window
- Select check box of domain
- Select check box for repository service
- Select ok.
This will assign repository and domain privilege to the user.

Now you will be able to connect to the repository using client tools.
This completes the exercise of repository service creation, integration service creation, domain configuration, user creation and adding a repository in the client.