
Pearson & Spearman Correlation Matrix in R with Example
 Editorial Team
⚡ Smart Summary
Pearson and Spearman Correlation in R measure how strongly two variables move together, using cor() for a single pair and a correlation matrix for many. This walkthrough adds significance testing with Hmisc and visualises the result with GGally heat maps.

Bivariate Correlation in R
A Bivariate relationship describes a relationship -or correlation- between two variables in R. In this tutorial, we will discuss the concept of correlation and show how it can be used to measure the relationship between any two variables in R.
Correlation in R Programming
There are two primary methods to compute the correlation between two variables in R Programming:
- Pearson: Parametric correlation
- Spearman: Non-parametric correlation
Pearson Correlation Matrix in R
The Pearson correlation method is usually used as a primary check for the relationship between two variables.
The coefficient of correlation, written r, measures the strength of the linear relationship between two variables x and y. It is computed as follows:
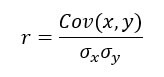
with
 is the standard deviation of x
 is the standard deviation of y
 is the standard deviation of x
 is the standard deviation of y
The correlation ranges between -1 and 1.
- A value of r near or equal to 0 implies little or no linear relationship between x and y.
- The closer r comes to 1 or -1, the stronger the linear relationship.
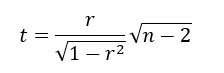
You can test whether r differs from zero with the t-statistic below, comparing it against the Student distribution with n – 2 degrees of freedom:
Spearman Rank Correlation in R
A rank correlation sorts the observations by rank and computes the level of similarity between the rank. A rank correlation has the advantage of being robust to outliers and is not linked to the distribution of the data. A rank correlation is also the right choice for ordinal variables.
Spearman’s rank correlation, written rho, also runs from -1 to 1, and values close to either extreme indicate a strong monotonic relationship. It is computed as follows:
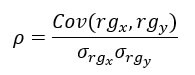
The numerator is the covariance between the ranks of x and y, and the denominator is the product of their standard deviations.
In R, both are computed with the cor() function, which takes three arguments: x, y and method.
cor(x, y, method)
Arguments:
- x: First vector
- y: Second vector
- method: The formula used to compute the correlation. Three string values:
- “pearson”
- “kendall”
- “spearman”
An optional argument can be added if the vectors contain missing value: use = “complete.obs”
We will use the BudgetUK dataset. This dataset reports the budget allocation of British households between 1980 and 1982. There are 1519 observations with ten features, among them:
- wfood: share food share spend
- wfuel: share fuel spend
- wcloth: budget share for clothing spend
- walc: share alcohol spend
- wtrans: share transport spend
- wother: share of other goods spend
- totexp: total household spend in pound
- income: total net household income
- age: age of household
- children: number of children
Example
library(dplyr)
PATH <- "https://raw.githubusercontent.com/guru99-edu/R-Programming/master/british_household.csv"
data <- read.csv(PATH) %>%
    filter(income < 500) %>%
    mutate(log_income = log(income),
           log_totexp = log(totexp),
           children_fac = factor(children, order = TRUE, labels = c("No", "Yes"))) %>%
    select(-c(X, X.1, children, totexp, income))
glimpse(data)
Code Explanation
- We first import the data and have a look with the glimpse() function from the dplyr library.
- Three households report an income of 500 or more, so filter(income < 500) removes them and the row count drops from 1,519 to 1,516.
- It is a common practice to convert a monetary variable in log. It helps to reduce the impact of outliers and decreases the skewness in the dataset.
Output:
## Observations: 1,516
## Variables: 10
## $ wfood        <dbl> 0.4272, 0.3739, 0.1941, 0.4438, 0.3331, 0.3752, 0...
## $ wfuel        <dbl> 0.1342, 0.1686, 0.4056, 0.1258, 0.0824, 0.0481, 0...
## $ wcloth       <dbl> 0.0000, 0.0091, 0.0012, 0.0539, 0.0399, 0.1170, 0...
## $ walc         <dbl> 0.0106, 0.0825, 0.0513, 0.0397, 0.1571, 0.0210, 0...
## $ wtrans       <dbl> 0.1458, 0.1215, 0.2063, 0.0652, 0.2403, 0.0955, 0...
## $ wother       <dbl> 0.2822, 0.2444, 0.1415, 0.2716, 0.1473, 0.3431, 0...
## $ age          <int> 25, 39, 47, 33, 31, 24, 46, 25, 30, 41, 48, 24, 2...
## $ log_income   <dbl> 4.867534, 5.010635, 5.438079, 4.605170, 4.605170,...
## $ log_totexp   <dbl> 3.912023, 4.499810, 5.192957, 4.382027, 4.499810,...
## $ children_fac <ord> Yes, Yes, Yes, Yes, No, No, No, No, No, No, Yes, ...
We can compute the correlation coefficient between income and wfood variables with the “pearson” and “spearman” methods.
cor(data$log_income, data$wfood, method = "pearson")
Output:
## [1] -0.2466986
cor(data$log_income, data$wfood, method = "spearman")
Output:
## [1] -0.2501252
Before extending this to every pair of variables, it is worth fixing how a single coefficient should be read.
How to Interpret a Correlation Coefficient
A coefficient is only useful once you can say what it means. The bands below are the conventional reading, and the sign is read separately from the strength.
| Absolute value of r | Strength of relationship |
|---|---|
| 0.00 to 0.19 | Very weak or none |
| 0.20 to 0.39 | Weak |
| 0.40 to 0.59 | Moderate |
| 0.60 to 0.79 | Strong |
| 0.80 to 1.00 | Very strong |
The value of -0.2467 computed earlier between log_income and wfood is therefore a weak negative relationship: richer households spend a slightly smaller share of their budget on food.
Three cautions apply to every coefficient.
- Correlation is not causation. A strong r says the two variables move together, never that one causes the other. A third, unmeasured variable often drives both.
- Pearson only sees straight lines. A perfect U-shaped relationship returns an r near zero. Always plot the data before trusting the number.
- Size matters more than significance. With 1,516 observations, a coefficient of 0.06 can be statistically significant and still practically meaningless.
How to Test Correlation Significance with cor.test()
cor() returns the coefficient and nothing else. For a single pair, cor.test() adds the p-value and a confidence interval in one call.
cor.test(data$log_income, data$wfood, method = "pearson")
The output has four parts worth reading.
- t and df: the test statistic and its degrees of freedom, n – 2.
- p-value: the probability of seeing a coefficient this large if the true correlation were zero.
- 95 percent confidence interval: the plausible range for the true correlation. If it excludes zero, the relationship is significant at that level.
- sample estimate: the coefficient itself, identical to what cor() returns.
The same function runs the rank-based tests by changing one argument:
# Spearman rank correlation with a p-value
cor.test(data$log_income, data$wfood, method = "spearman")

# One-sided test: is the correlation greater than zero?
cor.test(data$log_income, data$wfood, alternative = "greater")
When to use which. Use cor.test() when you are examining one specific pair, because it gives the confidence interval that rcorr() omits. Use rcorr() from Hmisc, shown above, when you need p-values for an entire matrix at once. Note that testing many pairs inflates the false-positive rate, so adjust the p-values with p.adjust(p_value, method = “BH”) before drawing conclusions from a large matrix.
Correlation Matrix in R
A bivariate correlation is a good start, but a multivariate view gives the broader picture. A correlation matrix is a square table holding the pairwise correlation of every variable against every other.
The cor() function returns a correlation matrix. The only difference with the bivariate correlation is we don’t need to specify which variables. By default, R computes the correlation between all the variables.
A correlation cannot be computed for a factor, so drop every categorical column before passing the data frame to cor().
A correlation matrix is symmetrical which means the values above the diagonal have the same values as the one below. It is more visual to show half of the matrix.
children_fac is excluded because cor() cannot operate on a factor.
# the last column of data is a factor level. We don't include it in the code
mat_1 <-as.dist(round(cor(data[,1:9]),2))
mat_1
Code Explanation
- cor(data[, 1:9]): Compute the correlation matrix on the nine numeric columns
- round(…, 2): Round every coefficient to two decimals
- as.dist(): Print only the lower triangle, since the matrix is symmetrical
Output:
##            wfood wfuel wcloth  walc wtrans wother   age log_income
## wfuel       0.11
## wcloth     -0.33 -0.25
## walc       -0.12 -0.13  -0.09
## wtrans     -0.34 -0.16  -0.19 -0.22
## wother     -0.35 -0.14  -0.22 -0.12  -0.29
## age         0.02 -0.05   0.04 -0.14   0.03   0.02
## log_income -0.25 -0.12   0.10  0.04   0.06   0.13  0.23
## log_totexp -0.50 -0.36   0.34  0.12   0.15   0.15  0.21       0.49
Significance level
A coefficient on its own does not say whether the relationship is statistically reliable. The rcorr() function from the Hmisc library returns the p-value for every pair. We can download the library from conda and copy the code to paste it in the terminal:
conda install -c r r-hmisc
The rcorr() requires a data frame to be stored as a matrix. We can convert our data into a matrix before to compute the correlation matrix with the p-value.
library("Hmisc")
data_rcorr <-as.matrix(data[, 1: 9])

mat_2 <-rcorr(data_rcorr)
# mat_2 <-rcorr(as.matrix(data)) returns the same output
The list object mat_2 contains three elements:
- r: Output of the correlation matrix
- n: Number of observation
- P: p-value
We are interested in the third element, the p-value. It is common to show the correlation matrix with the p-value instead of the coefficient of correlation.
p_value <-round(mat_2[["P"]], 3)
p_value
Code Explanation
- mat_2[[“P”]]: The p-values are stored in the element called P
- round(mat_2[[“P”]], 3): Round the elements with three digits
Output:
           wfood wfuel wcloth  walc wtrans wother   age log_income log_totexp
wfood         NA 0.000  0.000 0.000  0.000  0.000 0.365      0.000          0
wfuel      0.000    NA  0.000 0.000  0.000  0.000 0.076      0.000          0
wcloth     0.000 0.000     NA 0.001  0.000  0.000 0.160      0.000          0
walc       0.000 0.000  0.001    NA  0.000  0.000 0.000      0.105          0
wtrans     0.000 0.000  0.000 0.000     NA  0.000 0.259      0.020          0
wother     0.000 0.000  0.000 0.000  0.000     NA 0.355      0.000          0
age        0.365 0.076  0.160 0.000  0.259  0.355    NA      0.000          0
log_income 0.000 0.000  0.000 0.105  0.020  0.000 0.000         NA          0
log_totexp 0.000 0.000  0.000 0.000  0.000  0.000 0.000      0.000         NA
Visualizing Correlation Matrix in R
A heat map is another way to read a correlation matrix. The GGally library extends ggplot2 and is installed from CRAN rather than conda:
install.packages("GGally")

The library includes different functions to show the summary statistics such as the correlation and distribution of all the variables in a matrix.
The ggcorr() function has lots of arguments. We will introduce only the arguments we will use in the tutorial:
The ggcorr Function
ggcorr(df, method = c("pairwise", "pearson"),
  nbreaks = NULL, digits = 2, low = "#3B9AB2",
  mid = "#EEEEEE", high = "#F21A00",
  geom = "tile", label = FALSE,
  label_alpha = FALSE)
Arguments:
- df: Dataset used
- method: Formula to compute the correlation. By default, pairwise and Pearson are computed
- nbreaks: Return a categorical range for the coloration of the coefficients. By default, no break and the color gradient is continuous
- digits: Round the correlation coefficient. By default, set to 2
- low: Control the lower level of the coloration
- mid: Control the middle level of the coloration
- high: Control the high level of the coloration
- geom: Control the shape of the geometric argument. By default, “tile”
- label: Boolean value. Display or not the label. By default, set to `FALSE`
Basic heat map
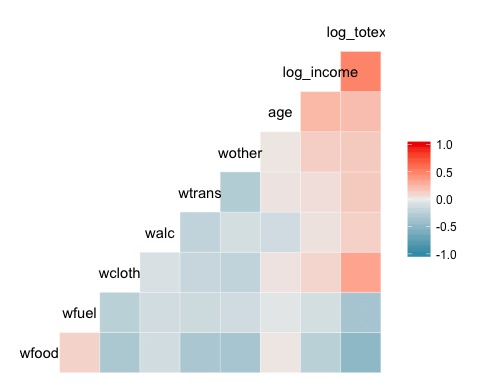
The most basic plot of the package is a heat map. The legend of the graph shows a gradient color from – 1 to 1, with hot color indicating strong positive correlation and cold color, a negative correlation.
library(GGally)
ggcorr(data)
Code Explanation
- ggcorr(data): Only one argument is needed, which is the data frame name. Factor level variables are not included in the plot.
Output:
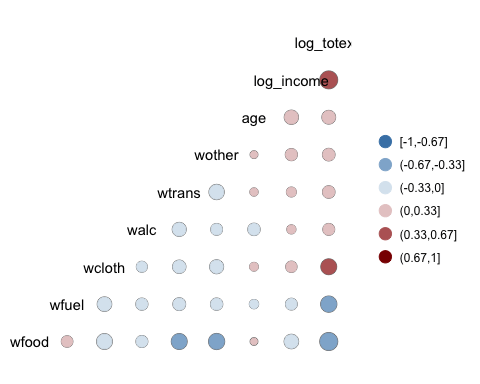
Adding Control to the Heat Map
We can add more controls to the graph:
ggcorr(data,
    nbreaks = 6,
    low = "steelblue",
    mid = "white",
    high = "darkred",
    geom = "circle")
Code Explanation
- nbreaks=6: break the legend with 6 ranks.
- low = “steelblue”: Use lighter colors for negative correlation
- mid = “white”: Use white colors for middle ranges correlation
- high = “darkred”: Use dark colors for positive correlation
- geom = “circle”: Use circle as the shape of the windows in the heat map. The size of the circle is proportional to the absolute value of the correlation.
Output:
Adding Label to the Heat Map
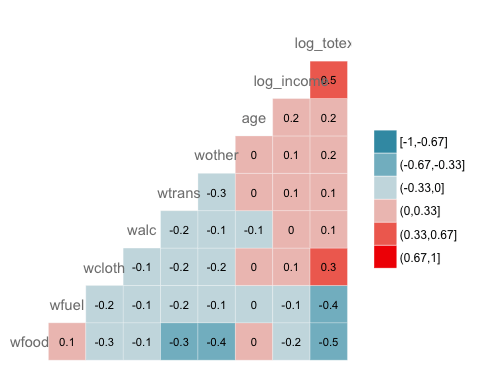
GGally allows us to add a label inside the windows:
ggcorr(data,
    nbreaks = 6,
    label = TRUE,
    label_size = 3,
    color = "grey50")
Code Explanation
- label = TRUE: Add the values of the coefficients of correlation inside the heat map.
- color = “grey50”: Choose the color, i.e. grey
- label_size = 3: Set the size of the label equals to 3
Output:
The ggpairs Function
The GGally library also provides ggpairs(), which returns a matrix of plots. For k selected variables the result is a k by k grid: the diagonal shows the distribution of each variable, while the panels above and below the diagonal can each carry a different computation. The syntax is:
ggpairs(df, columns = 1:ncol(df), title = NULL,
    upper = list(continuous = "cor"),
    lower = list(continuous = "smooth"),
    mapping = NULL)
Arguments:
- df: Dataset used
- columns: Select the columns to draw the plot
- title: Include a title
- upper: Control the boxes above the diagonal of the plot. Need to supply the type of computations or graph to return. If continuous = “cor”, we ask R to compute the correlation. Note that, the argument needs to be a list. Other arguments are available; see the GGally documentation for more information.
- lower: Control the boxes below the diagonal.
- mapping: Indicates the aesthetic of the graph. For instance, we can compute the graph for different groups.
Bivariate analysis with ggpair with grouping
The next graph plots three information:
- The correlation matrix between log_totexp, log_income, age and wtrans variable grouped by whether the household has a kid or not.
- Plot the distribution of each variable by group
- Display the scatter plot with the trend by group
library(ggplot2)
ggpairs(data, columns = c("log_totexp", "log_income", "age", "wtrans"), title = "Bivariate analysis of revenue expenditure by the British household", upper = list(continuous = wrap("cor",
        size = 3)),
    lower = list(continuous = wrap("smooth",
        alpha = 0.3,
        size = 0.1)),
    mapping = aes(color = children_fac))
Code Explanation
- columns = c(“log_totexp”, “log_income”, “age”, “wtrans”): Choose the variables to show in the graph
- title = “Bivariate analysis of revenue expenditure by the British household”: Add a title
- upper = list(): Control the upper part of the graph. I.e. Above the diagonal
- continuous = wrap(“cor”, size = 3)): Compute the coefficient of correlation. We wrap the argument continuous inside the wrap() function to control for the aesthetic of the graph ( i.e. size = 3) -lower = list(): Control the lower part of the graph. I.e. Below the diagonal.
- continuous = wrap(“smooth”,alpha = 0.3,size=0.1): Add a scatter plot with a linear trend. We wrap the argument continuous inside the wrap() function to control for the aesthetic of the graph ( i.e. size=0.1, alpha=0.3)
- mapping = aes(color = children_fac): Split every panel by children_fac, the ordered factor labelled “No” for households without children and “Yes” for households with children
Output:

Bivariate analysis with ggpair with partial grouping
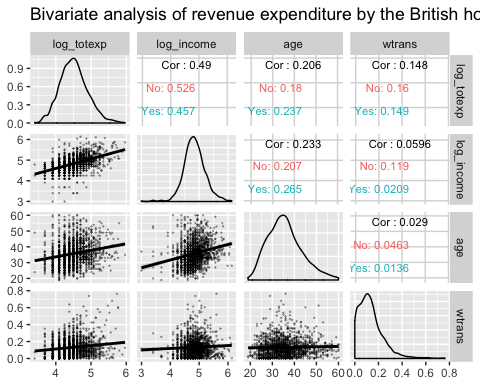
The graph below is a little bit different. We change the position of the mapping inside the upper argument.
ggpairs(data, columns = c("log_totexp", "log_income", "age", "wtrans"),
    title = "Bivariate analysis of revenue expenditure by the British household",
    upper = list(continuous = wrap("cor",
            size = 3),
        mapping = aes(color = children_fac)),
    lower = list(
        continuous = wrap("smooth",
            alpha = 0.3,
            size = 0.1))
)
Code Explanation
- Exact same code as previous example except for:
- mapping = aes(color = children_fac): Move the list in upper = list(). We only want the computation stacked by group in the upper part of the graph.
Output:
Correlation in R: Key Takeaways and Function Reference
- A Bivariate relationship describes a relationship -or correlation- between two variables in R.
- There are two primary methods to compute the correlation between two variables in R Programming: Pearson & Spearman.
- The Pearson correlation method is usually used as a primary check for the relationship between two variables.
- A rank correlation sorts the observations by rank and computes the level of similarity between the rank.
- Spearman’s rank correlation runs from -1 to 1, and values near either extreme indicate a strong monotonic relationship.
- A correlation matrix is a square table holding the pairwise correlation of every variable.
- A p-value tells you whether an observed correlation is statistically distinguishable from zero.
Every correlation function used in this tutorial is listed below:
| Library | Objective | Method | Code |
|---|---|---|---|
| Base | Bivariate correlation | Pearson |
cor(dfx2, method = "pearson") |
| Base | Bivariate correlation | Spearman |
cor(dfx2, method = "spearman") |
| Base | Multivariate correlation | Pearson |
cor(df, method = "pearson") |
| Base | Multivariate correlation | Spearman |
cor(df, method = "spearman") |
| Hmisc | P value | — |
rcorr(as.matrix(data[,1:9]))[["P"]] |
| GGally | Heat map | — |
ggcorr(df)
|
| GGally | Multivariate plot matrix | — |
ggpairs(df, columns = c("x1", "x2")) |
