
What is Monkey & Gorilla Testing? Examples, Difference
 Editorial Team
⚡ Smart Summary
Monkey testing feeds random, unplanned input into a running application and watches whether it survives, so crashes, freezes and unhandled states are exposed long before any predefined test case has been written.
What is Monkey Testing?
Monkey testing is a software testing technique in which the tester enters random inputs into an application without predefined test cases and checks how the application behaves, in particular whether it crashes. The purpose of monkey testing is to find bugs and errors through experimental, unscripted interaction.
The name comes from a simple picture, illustrated below.

- In monkey testing the tester (and sometimes the developer) is treated as the “monkey”.
- If a monkey used a computer, it would perform tasks at random, without understanding the system.
- In the same way, the tester applies random inputs to the system under test to find bugs without predefining any test case.
- In some cases monkey testing is aimed at unit testing or GUI testing.
What is Gorilla Testing?
Gorilla testing is a software testing technique in which one module of the program is tested repeatedly to confirm that it works correctly and contains no defects.
A single module may be exercised a hundred times or more in exactly the same manner, which is why gorilla testing is also known as “frustrating testing”. Monkey testing spreads randomly across the application; gorilla testing drills into one place until it breaks or proves solid.
Types of Monkey Testing
Monkey testing is divided into categories according to how much the tester knows about the system. The diagram below summarises the three types.
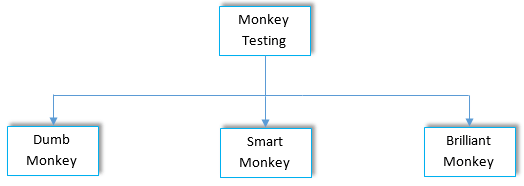
- Dumb monkey: the tester has no idea about the system or its functionality, and there is no assurance that any input is valid.
- Smart monkey: the tester has a precise idea of the system, its purpose and its functionality, navigates through it and supplies valid inputs.
- Brilliant monkey: the tester works from real user behaviour and can state where defects are likely to appear.
Monkey Testing vs Gorilla Testing vs Ad-hoc Testing
Monkey testing, gorilla testing and ad-hoc testing share an unscripted flavour, which is why they are often confused. The two tables below separate them.
Monkey Testing vs Gorilla Testing
| Monkey Testing | Gorilla Testing |
|---|---|
| Performed randomly, with no specifically predefined test cases. | Neither predefined nor random — the same checks are simply repeated. |
| Performed on the entire system and can involve many test cases. | Performed on a few selected modules with few test cases. |
| The objective is to check for a system crash. | The objective is to check whether the module works properly. |
Monkey Testing vs Ad-hoc Testing
| Monkey Testing | Ad-hoc Testing |
|---|---|
| Performed randomly, with no specifically predefined test cases. | Performed without planning or documentation, so no test cases or SRS are prepared. |
| Testers may not know what the system is or what it is for. | The tester must understand the system well before testing starts. |
| The objective is to check for a system crash. | The objective is to split the system into subparts at random and check their functionality. |
Advantages and Disadvantages of Monkey Testing
Because the technique trades planning for speed, its benefits and its weaknesses come from the same property.
Advantages of Monkey Testing
- New kinds of bug: the tester is free to work outside previously stated scenarios, which surfaces errors nobody thought to script.
- Easy to execute: arranging random actions against random data is a quick way to exercise the system.
- Less skilled people: monkey testing can often be performed without highly experienced testers.
- Less costly: it needs considerably less expenditure to set up and run than a scripted suite.
Disadvantages of Monkey Testing
- Bugs can be hard to reproduce: because inputs are random, recreating a failure may not be possible without a recorded seed.
- Less accuracy: the tester cannot define an exact scenario and cannot guarantee the accuracy of what was covered.
- Technical expertise still helps: to keep findings meaningful, testers need good knowledge of the domain.
- Slow relative to yield: runs can go on for a long time and still return few defects, leaving gaps in the system.
How to Perform Monkey Testing
Monkey testing becomes far more efficient when a tool drives it, and it can be run against Android builds as well as desktop and web applications. The general process is:
- Register the application under test with the tool or the dedicated server that will drive it.
- Prepare the references and configuration the tool needs to build a test suite.
- Run the built test suite.
- Let the tool write its log — the “monkey test” log file records every generated event and the results.
- Allow the run to continue until the system reaches a crash point, at which the offending action is captured in the log.
- Share the report with the responsible team and store the test data for future reference.
Keep every log. A random run is only useful later if the event sequence and the seed that produced it were saved, so defect management can tie the crash back to a reproducible input.
Monkey Testing Tools
Monkey testing is usually automated, because a machine can generate thousands of events in the time a person produces a few dozen. The commonly used options are:
- UI/Application Exerciser Monkey: a command-line tool built into Android that runs in the adb shell and sends pseudo-random streams of user events, such as taps, gestures and key presses, plus system-level events, to a device or emulator.
- MonkeyRunner: a separate Python API that drives devices and emulators from a workstation, sending specific commands and capturing screenshots. Despite the name, it is not the same tool as the exerciser monkey.
- UI Automator and Appium: general mobile testing frameworks that can be scripted to fire semi-random event sequences at a build.
- Fuzzing tools such as AFL: the same random-input idea applied to data rather than gestures, which is covered in fuzz testing.
Tool support for monkey testing is thinner than for scripted automation testing, so most teams combine a generic event generator with their existing framework rather than buying a dedicated product.
When to Use Monkey Testing
Monkey testing earns its place in specific situations rather than as a general replacement for planned testing.
Use it when:
- An early build needs a cheap stability check before formal test cases exist.
- The interface is highly interactive — games, drawing tools, media players — and real user behaviour is hard to predict.
- You want a soak or stress run that hunts for crashes, memory leaks and unhandled states over many hours.
- A release has passed scripted checks and you want an independent sweep for anything the script never touched.
Avoid it when:
- You need repeatable evidence that a requirement is met — that is the job of a written test case.
- The build is unstable enough that every run crashes immediately, which hides everything behind the first failure.
- Time is short, since a random run offers no guarantee of finding anything.
In practice the strongest results come from mixing approaches: scripted tests cover the known flows, exploratory testing investigates the unknown deliberately, and monkey testing attacks whatever both of them assumed would never happen.
