How to Remove Background from Image in Photoshop
⚡ Smart Summary
Removing the background from an image in Photoshop can be done with several quick, efficient extraction techniques. This resource demonstrates the Magic Wand with Refine Edge, luminosity-based selection through the Channels panel, and the Quick Selection tool for extracting fine detail such as hair.

Delete/Remove a Background in Photoshop Easily
As a designer, we should know some quick and efficient techniques to extract particular objects or design elements from an image. We will learn them in this tutorial.
How to Remove Background in Photoshop: First Example
Below is a step-by-step guide to remove a background from an image in Photoshop with an example:
Step 1) Select the Image whose background you want to remove
This is an image of a model with a clean white background, and we want to extract the model and delete the background in Photoshop.

We can extract this with the help of a Photoshop extraction tool like the “pen tool”, but it will be a very time-consuming technique. So we cannot use the pen to remove the background from the image.
Step 2) Choose the Magic Wand Tool and select the background
So now go and grab the “Magic Wand tool” and click on the white background to select it. To add to the selection area, hold the “Shift key” and click on the portion which you want to add to the selection to isolate an image in Photoshop.

Step 3) Apply Inverse
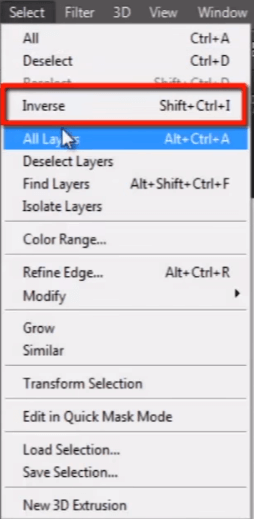
Now we want to extract the model, so we have to select her. Go to the Select menu and choose “Inverse”, so it will invert the selection.

Step 4) Refine Edges
Our selection is made, but still it is not perfectly selected, because it has very sharp edges selected around it, some pixels are not selected on the edges, and some unwanted pixels are selected. So to deal with this problem I will click on the “Refine Edges” button up here in the option bar.

This is the Refine Edge panel. I am changing the view mode from “Black & White” to “On Black”.

Because of the black background, we can see what the problem with the edges of the model is. Now start painting on the edges of the model and see how it is subtracting some unwanted white color pixels from the selection, as shown in the below Photoshop CC remove background example.

I have removed the rough edges and made them softer. Let me change the view mode to “Black & White”.
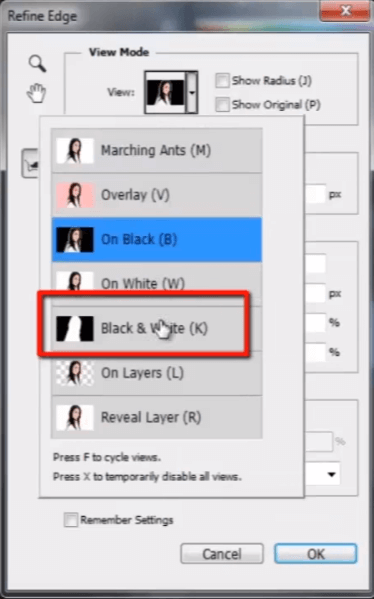
Keep in mind that black means “transparent” and white means “opaque”.
Step 5) Use the “Erase Refinements tool”
Here some part of the model has become transparent, so I need to remove it. For that, select the “Erase Refinements tool” and correct the selection.

But this is not a big issue, so we can deal with it later.
Step 6) New Layer
You can see here some transparent pixels around the edges of the model in some specific portions. So now change the setting of the “Output” option. Select “New Layer with Layer Mask” from the drop-down list.

Press OK. You can see here in the layer panel a new layer is created with a layer mask. Now see these transparent pixels here. To deal with it, duplicate the layer by pressing CTRL + J.

And you can see our problem is solved.
Step 7) Output
You can see, with the help of this cool trick, we have extracted the model very nicely.

Remove Background in Photoshop: Luminosity Based Extraction Technique
In this Photoshop CC remove background technique, we will talk about “luminosity based selection”. See, here is an image of smoke; in the smoke, some portion is fully opaque while some part is half transparent. So we want to extract the smoke with proper transparent pixels.

In the previous technique, we made our selection with the “Magic Wand tool”, but here it will not be the proper technique in the case of smoke. So here we will use the “Channels palette” to erase the background in Photoshop.

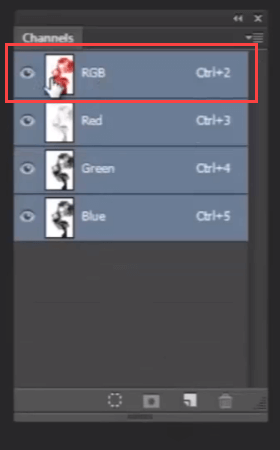
In the Channels panel, hold the CTRL key and click on the “RGB channel” at the top of the channels panel. It loads all the brightness values as the active selection. It has selected the entire white background.
Now go to the Select menu and choose Inverse.
Then press CTRL + J to create a new layer of the selected portion. You can see here a new layer is created of the selected area, but it looks very flat. So to maintain its density, select the layer and press CTRL + J around 4-5 times, and merge all duplicate layers.

Now you can see, with the help of this trick, how perfectly we have extracted the smoke. This is called the “luminosity based selection” technique to delete the background in Photoshop.
Photoshop Extracting Objects With Quick Selection Tool
Here is a model, and we want to extract her hair very quickly using the extract tool in Photoshop CC.

If we use the “pen tool” on this particular image, then it will be a time-consuming process. But if we do not want to waste more time on this, we can do it very nicely and quickly with the help of the “Refine Edge” option.

Grab the “Quick Selection tool” and select the model roughly. Click on the “Refine Edge” option.
Select the view mode “On Layer”.
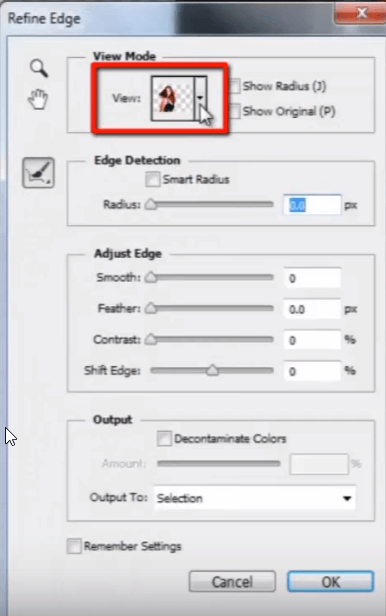
And start painting around the edges of the hair. You can see how it is refining the selection around the hair. Look, some unwanted pixels are also removed from the selection. I will take out this selection as a “New Layer with Layer Mask”.

Look, here a new layer is created with a layer mask and the model is extracted very nicely.

Take a duplicate of the layer, so that we can deal with some transparent pixels around the edges of the model.

So these are some cool and quick tricks for extraction in Photoshop CC.