How to use Brush Tool in PhotoShop?
⚡ Smart Summary
The Brush Tool in Photoshop paints color and effects with fully adjustable tips and behaviors. This resource explains the basic brush functions, such as presets, size, hardness, color, blend mode, opacity, and flow, then explores the Brush Options panel for shape dynamics, scattering, texture, and more.

What is the Brush Tool in Photoshop?
In this tutorial, we will learn about the basic functions of brushes for Photoshop CC. We will also talk about “brush options” to manage the behavior of the brush in different ways.
Basic functions of Brushes for Photoshop
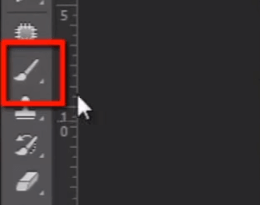
Now go and grab the “Brush tool” from the toolbar.
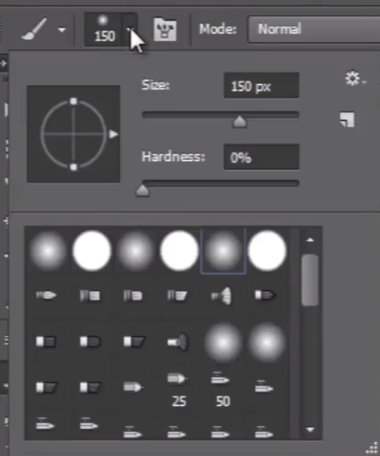
The first menu in the option bar is the “Brush preset picker”. Here we can change the brush tip; this menu shows different types of icons that are actually different types of brushes available.
Now click on this small wheel icon. You will get here a list of different groups of preset brushes. These brushes are inbuilt with Photoshop.
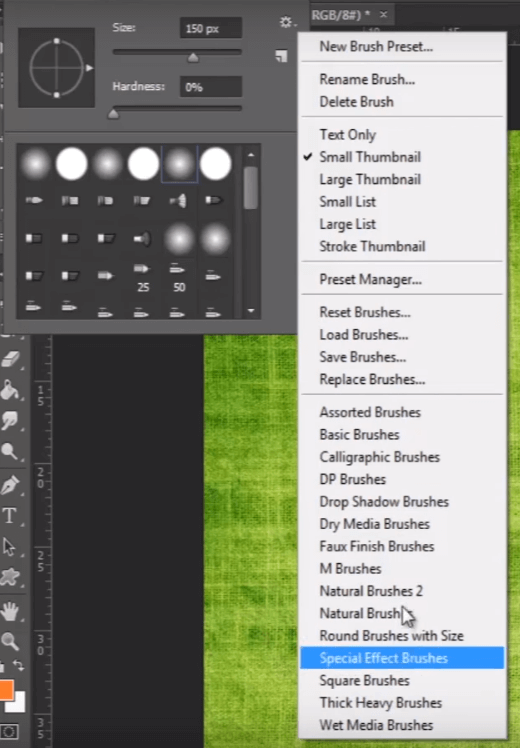
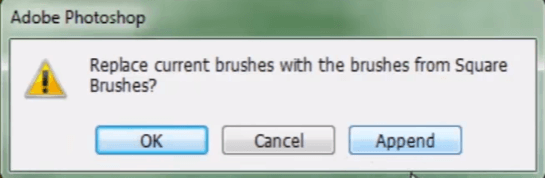
If you want to add any brush preset, then just click on it. I choose “Square Brush”. Then it will ask you to append the brushes or replace them. “Append” means it will add them to the existing list of brushes, and if you click “OK”, then it will replace all brushes together.
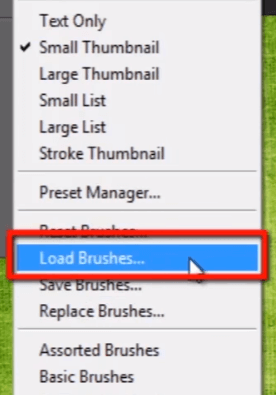
Now if you have a set of brushes downloaded from the internet by yourself, then to add those brushes you need to go and choose “Load Brushes”.
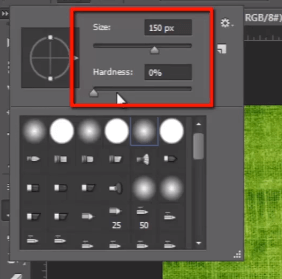
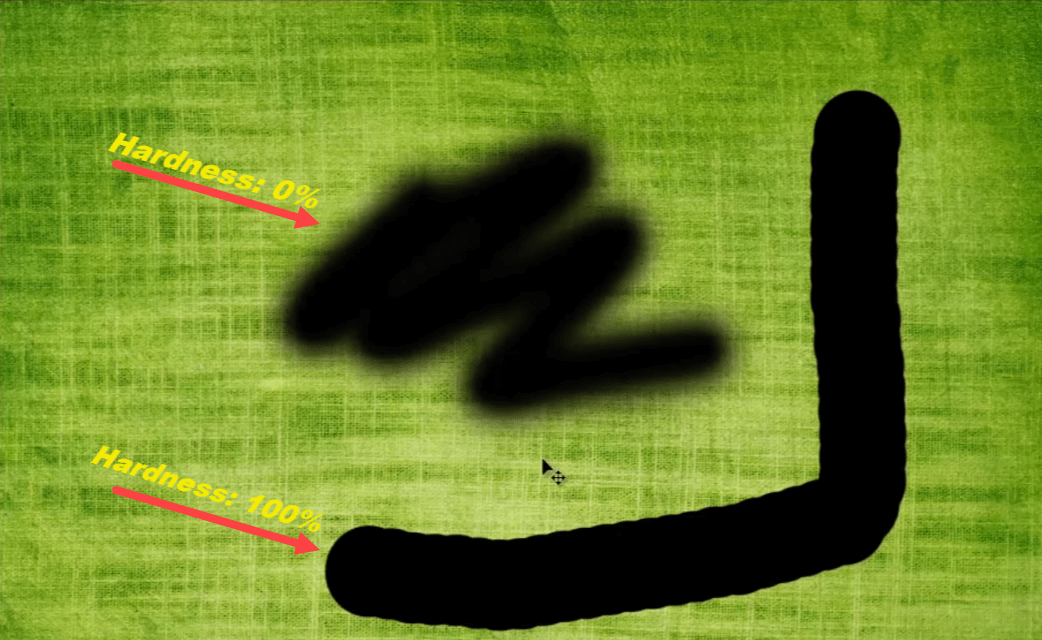
To talk about editing the brush, I am choosing a soft edge brush here, and you can see right above it “Size” and “Hardness”. You can set the size of your brush, and hardness determines the hardness and softness of your brush edge.
If I keep hardness to 0, then the brush will paint with very soft edges. And if I set hardness to 100, then it will paint very hard and sharp edges.
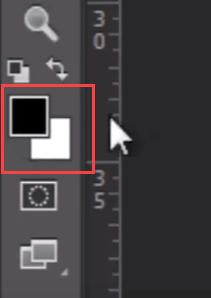
The brush is going to paint whatever color you have set in the foreground color. Right now it is black, but if I choose red color, then it will paint with red.
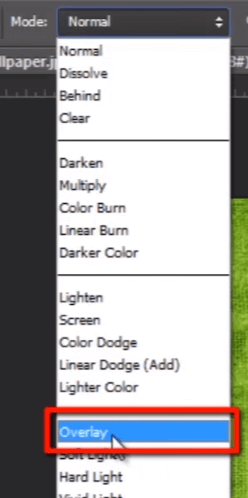
Now one more thing is that we can also apply blend modes to brushes. If I choose Overlay mode and paint with the same red color, then it will blend with the background image.
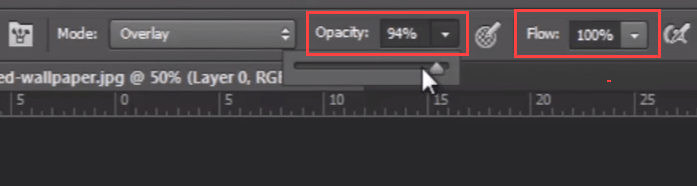
I can also play with its opacity. If I want to paint with the same color with some transparency, then I need to drag down the opacity. And the flow determines how much area the pixels flow into when clicking with the brush.
If I want to resize my brush, then this is the shortcut to do it. Just press “[” and “]” to size up and down. These are very basic features of the brush tool, but to become more creative we need to go ahead one more step into advanced options by adding behaviors to the brush.
Brush options to manage the Behavior of the Brush
For that, I need to go and click on this icon, up in the options menu next to the “Brush preset picker”.

It will open up the “Brush options” panel. We can also open it from the “Window” menu and select “Brush” to open the same panel.

In this panel, at the top of the list of options in “Brush Tip Shape”, we have the same options as we have seen before in the “Brush preset picker”, such as “Size”, “Angle”, “Roundness”, “Hardness”, and “Spacing”.

Check on these items below. If I want to change “Shape Dynamics”, then just click on that and you will get its options to modify brush behaviors.
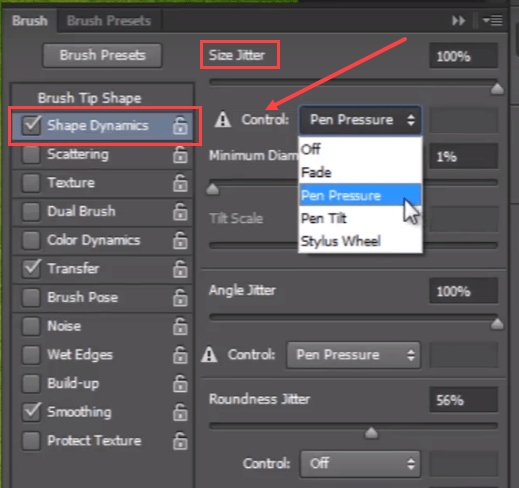
Such as “Size Jitter”. Just keep in mind that “Jitter” means it randomizes that feature as you paint. You can also choose different controls such as “Fade”, “Pen Pressure”, “Pen Tilt”, and “Stylus Wheel”.
Let me change my brush, so you can see the effect of every option when I change it. You can see this “preview panel” at the bottom of the “brush panel”, where we can see the changing behaviors of the brush as you change them. So you have “Size Jitter”, “Angle Jitter”, “Roundness Jitter”, and much more. The brush will paint as I set different values in this panel.
Next, I can scatter the brush. I can increase or decrease the count of brush strokes when we paint, and we can set “Count Jitter” too. You can see it looks very nice.
Next, I can give texture to the brush. For that, go to the pattern picker and choose any texture you like from the texture menu, and modify all other behaviors as per your requirement.
In “Dual Brush”, we can use two different brushes at the same time with the help of blending modes, and we can modify their size, spacing, scatter, and count.
I can add “Color Dynamics” to my brush; the color of the brush will be between the foreground and background color, and we need to set hue jitter, saturation jitter, brightness jitter, and purity to get proper output.
In this “Transfer” option, I can randomize the opacity and flow of the brush. You can see the changes in brush opacity in the preview panel.
“Brush Pose” is the new feature which is able to modify the “tilt” and “rotation” of any brush. You can use “Noise” to give a little bit of noise effect to your brush. “Wet Edges” will give a more natural look to your brush; it can give a wet watercolor look. “Build-up” allows you to build up on top of it in a natural way, as you create with real brushes and natural colors. “Smoothing” makes things smoother. And you can protect your texture on images by checking on the “Protect Texture” option.
So you have lots of options and behaviors of brushes, and you can make various types of brush designs every time and push up your creativity. Now in the next topic we will talk about how to work with “Text” in Photoshop.